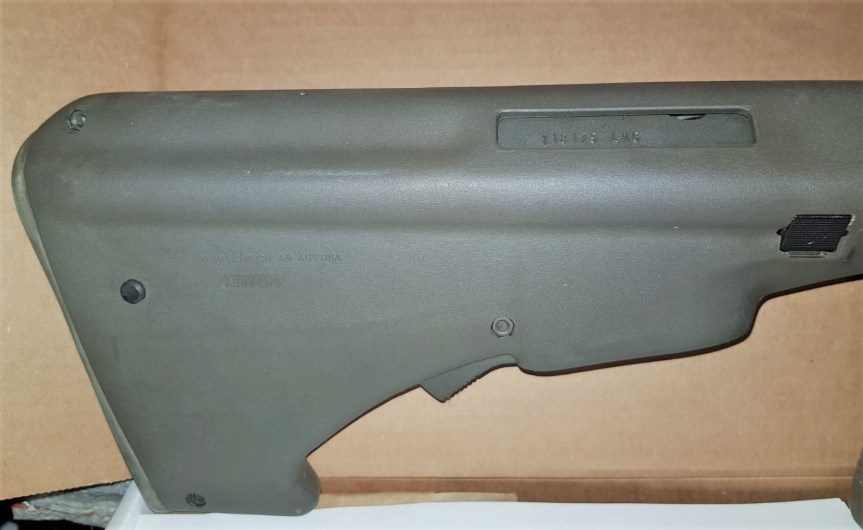
Sometimes all is not as it seems. That was the case when we examined this Steyr AUG. From the barrel and bipod it appeared to be an AUG in an HBAR or Heavy Barrel configuration but on closer inspection we found that it was in fact a rifle receiver, bolt and bolt assembly and chassis that had been paired with an HBAR barrel assembly.
Vic with the Steyr ‘HBAR’ (Vic Tuff)
Ordinarily, the HBAR could be modified to fire from an open, rather than closed, bolt. This example has the standard AUG progressive trigger for semi and full-auto. It does not have the modified bolt carrier, striker or trigger mechanism.
The HBAR has a 4x optic, rather than the rifle’s 1x, while the HBAR-T can be fitted with an optic like a Kahles ZF69 6×42.
A dedicated ‘LMG’ marked AUG stock and bolt carrier (Vic Tuff)
Adoption of the AUG HBAR does not appear to have been widespread and Steyr don’t currently list it as an option amongst their upgraded AUGs. For more Steyr we have previously examined a Steyr AUG SMG conversion and a Steyr MPi 81. We’ll take an in depth look at the AUG and AUG HBAR in the future.
Overall Length: 35.5in (90cm)
Barrel Length: 24.4in (62cm)
Weight: 8.6lb (3.9kg)
Action: Gas operated, rotating bolt – the HBAR typically fires from an open bolt, but this rifle-based example fires from a closed bolt.
Capacity: 30 or 42-round box magazines
Calibre: 5.56×45mm
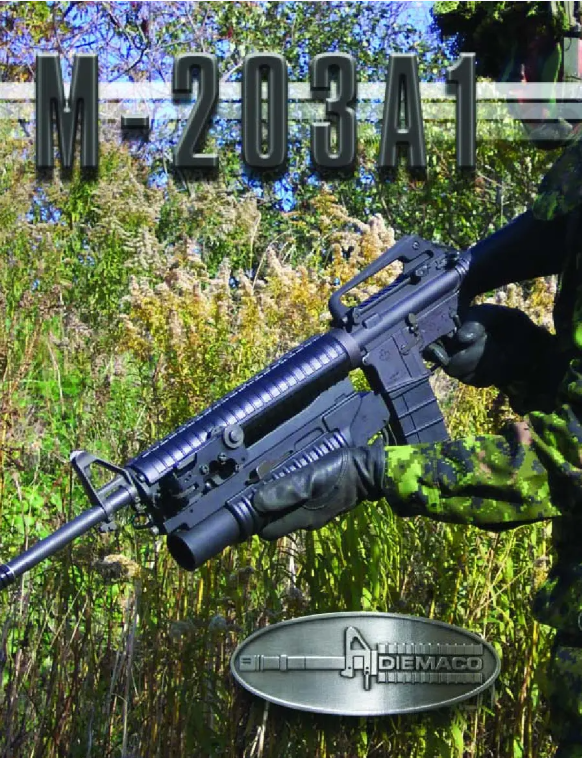
The Diemaco M203A1 is a development of the M203 40x46mm low velocity grenade launcher. The M203 was initially developed by AAI to replace the Colt XM148 which proved overly complex when tested in Vietnam.
The Diemaco M203A1 improves on the earlier launcher by incorporating its sight into the mount rather than being atached to the top of the barrel. The Diemaco M203A1 should not be confused with the Colt-manufactured M203A1 in US service. The Diemaco launcher is offered alongside the C7 and C8 rifles made by Diemaco (now Colt Canada).
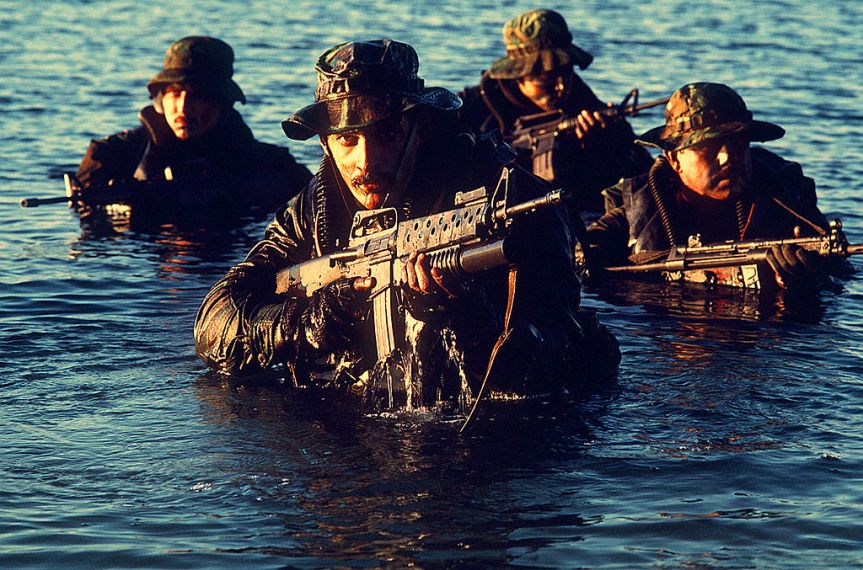
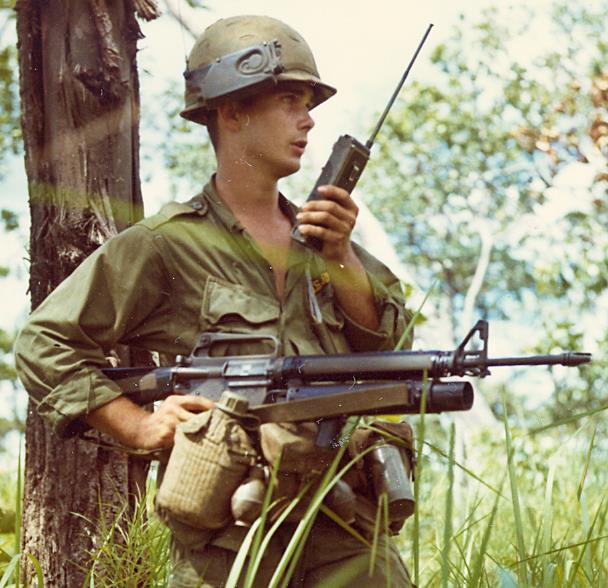
SEAL members emerge from the water during tactical warfare training c.1986. The SEAL member in the foreground is armed with an M-16A1 rifle equipped with an M203 grenade launcher (US National Archive)
Diemaco developed the M203A1 so it has a longer action, with the breech opening further to allow the firing of all 40×46 mm LV grenades including less than lethal baton rounds. It can also be mounted on all AR-patterned rifles as well as the Steyr AUG.
Like the original M203 the launcher can be operated by either a left or right handed users. The original model had an iron sight assembly has dual azimuth adjustment knobs and an elevation dial, this model, however, has a simplified tangent sight. Diemaco stated that the M203A1 has a maximum effective range of 400m (440 yd) with a muzzle velocity of 78 m/s (260 ft/s).
Diemaco brochure cover showing M203A1 on a C7 rifle (Colt Canada)
The M203A1 was tested by the UK’s special forces in the late 1990s, when they evaluated the Diemaco SFW carbine, which was subsequently adopted as the L119A1. The Heckler & Koch M320 GLM (HK AG36) has since been adopted by the British Army.
Calibre: 40 mm
Loaded Weight: 2.15 kg (4.74 lb)
Empty Weight: 1.85 kg (4.08 lb)
Overall Length: 318 mm (12.52 in.)
Barrel Length: 228.6 mm (9 in.)
Overall Height: 140 mm (5.51 in.)
Rifling: Right Hand Twist – 6 Lands
Rate of Twist: 1 turn in 48 in. (121.9 cm)
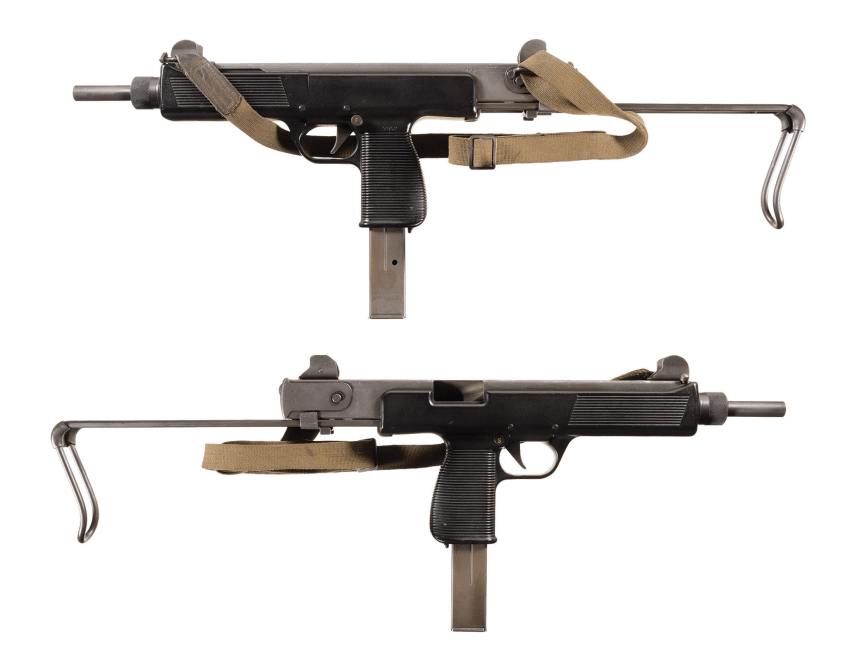
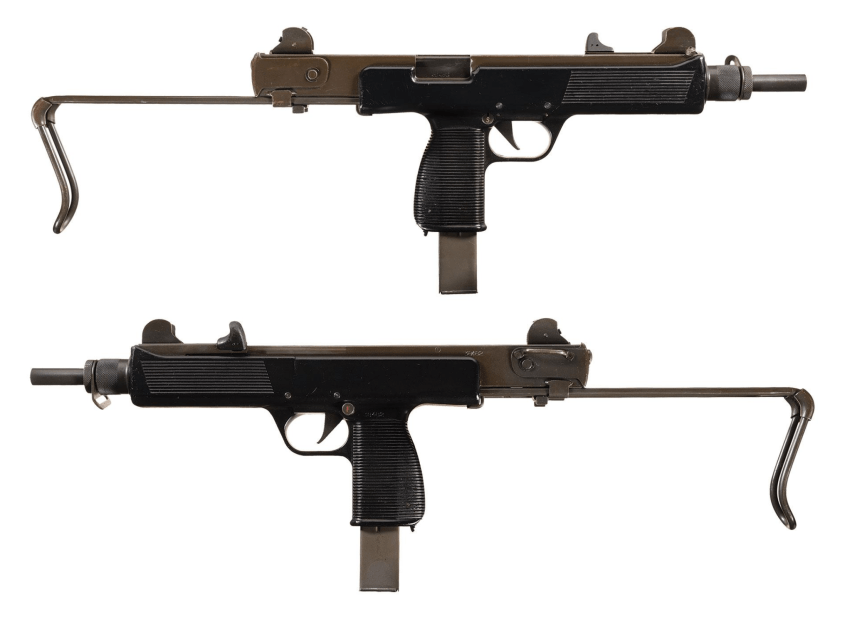
Developed in the late 1960s and introduced in 1969/70 the MPi 69 was Steyr’s entry into an already crowded European submachine gun market. Heavily influenced by the Israeli Uzi it had a bolt which telescoped over the barrel and fed from a box magazine that was inserted through a magazine well-come-pistol grip.
The MPi 69 weighed 6.5lbs (2.93kg) unloaded and had a polymer lower receiver into which a stamped metal upper inserted. Unlike the Uzi it had a collapsing, rather than folding stock, similar to the M3 submachine gun’s, and was cocked not by a handle but by pulling the sling (which was acted on the bolt) to the rear.
Steyr MPi 69 (Rock Island Auction Company)
The MPi 69 remained in production into the early 1980s when it was replaced by the improved MPi 81. Moving away from the slick-cocking ‘gimmick’ the MPi 81 had a conventional, non-reciprocating, charging handle on the left side of the receiver. The MPi’s polymer lower allows it to be a pound lighter despite being slightly longer as a result it also balances better than the standard Uzi carbine.
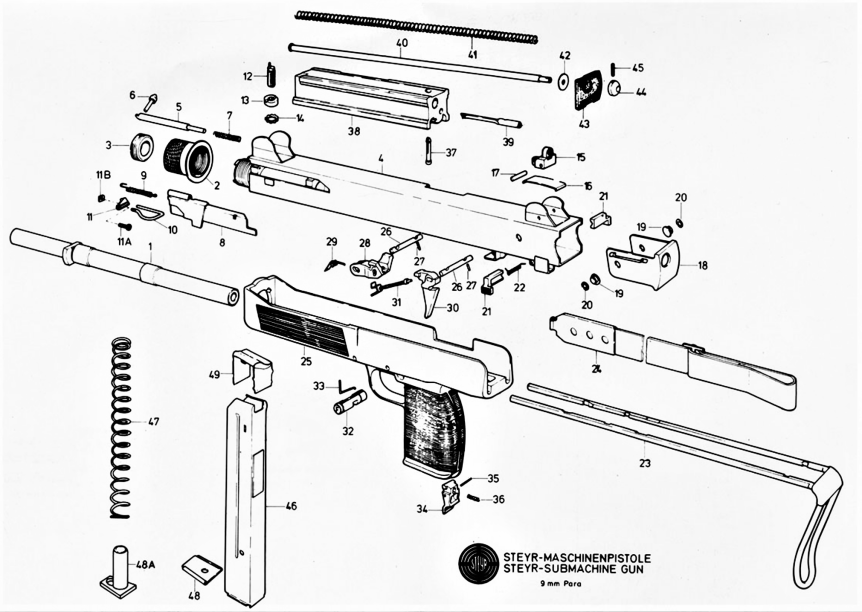
Steyr MPi 69 diagram (Steyr Manual)
The MPi submachine guns fed from 25 or 32 round box magazines and both guns had a heel-type magazine release paddle in the base of the pistol grip. They also shared their magazines with the AUG 9x19mm submachine gun conversion. Check out our earlier video on the Steyr AUG conversion here.
Steyr MPi 81 (Rock Island Auction Company)
The MPi submachine guns fire from an open bolt and had a 10in barrel and has a push through safety with settings for safe, semi and full auto and unlike the Uzi it does not have a grip safety – simplifying manufacture.
The MPi also has a progressive trigger which when set to full-auto will allow the user to fire semi when pulled to the first stage and full when pulled fully to the rear. While the MPi 69 had a cyclic rate of around 500 per minute, the MPi 81 increased this rate to ~750rpm.
Steyr MPi 69 disassembly diagram (Steyr Manual)
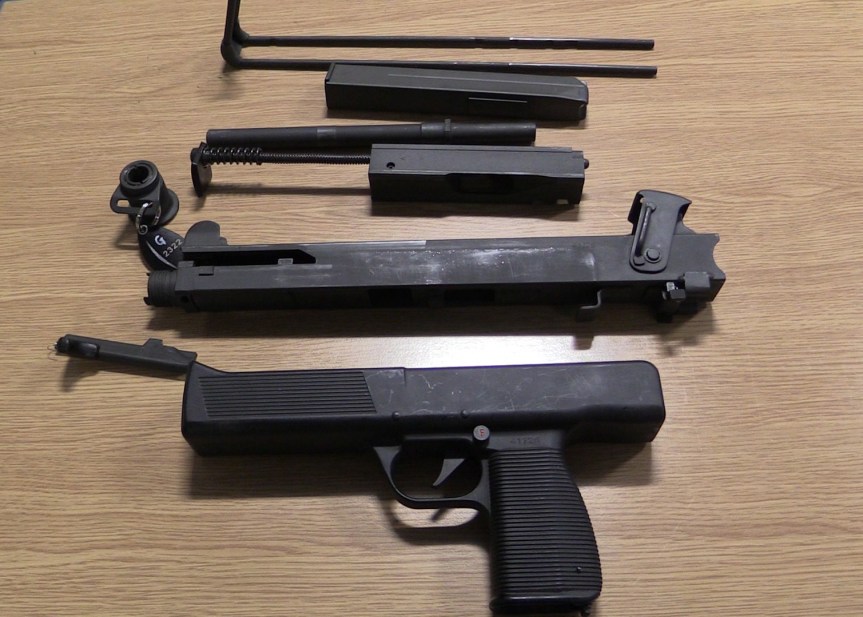
The MPi can be field stripped by simply rotating the receiver end cap up 90-degrees and pulling the bolt out the rear. The gun can be further stripped but the moulded polymer lower receiver can be difficult to remove from the upper. Like the Uzi the barrel nut is unscrewed to remove the barrel.
The MPi 81 fully disassembled (Vic Tuff)
It is unclear just how many MPi submachine guns were produced but they didn’t see any significant contracts beyond a few small sales to police forces and militaries.
The MPi 81 remained in production into the early 1990s when it was replaced by the smaller and more compact Steyr TMP in 1992. In turn the TMP design was sold to B&T a decade later.
Our thanks to the collection that let us take a look at this MPi 81 and to our friend Miles Vining for sharing some of his shooting footage of the MPi 81 with us, check out his video here and more of his work at www.silahreport.com.
In the second video Matt tackles the Heckler & Koch G11 and gives an update on the colouring book and the channel:
Thanks for watching chaps & thanks so much for your support in 2019, we greatly appreciate it. It’s been a busy year and we hope that you’ve all enjoyed our videos!
You can still pick up a copy of the ACR colouring book and the G11 sticker at www.armourersbench.com/shop. we’re very much looking forward to seeing your artistic sides when you send us some photos of your colouring to – contact@armourersbench.com.
Whilst looking through the piles of surplus ‘kit’ in my friends warehouse in Germany I came across an interesting find, an Explosive Ordnance Disposal (EOD) training kit that has several examples of WWII and after ordnance that might be found on training grounds and former battlefields throughout Europe.
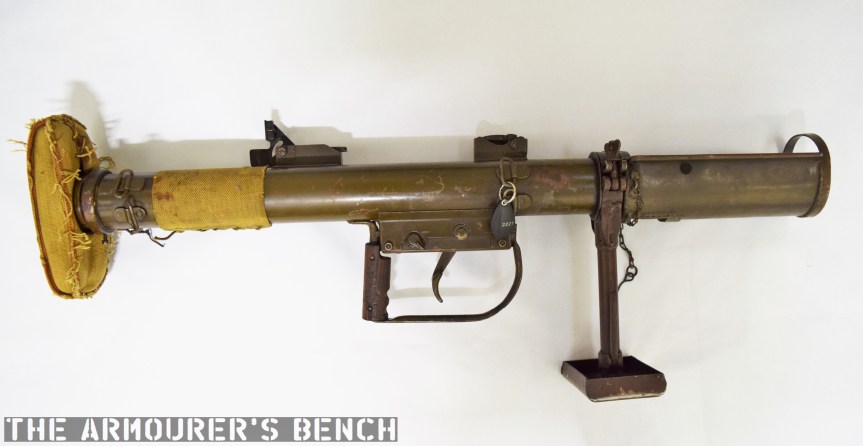
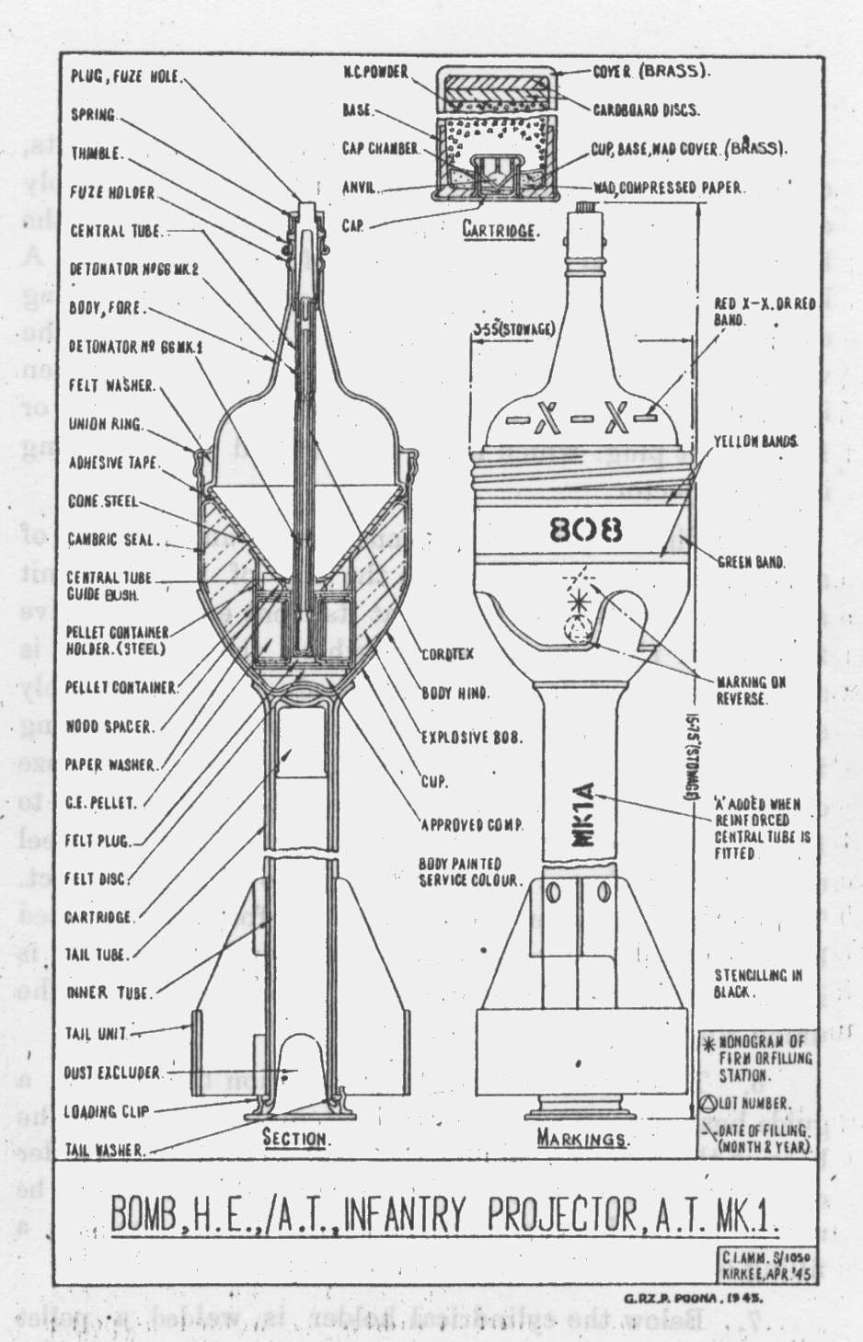
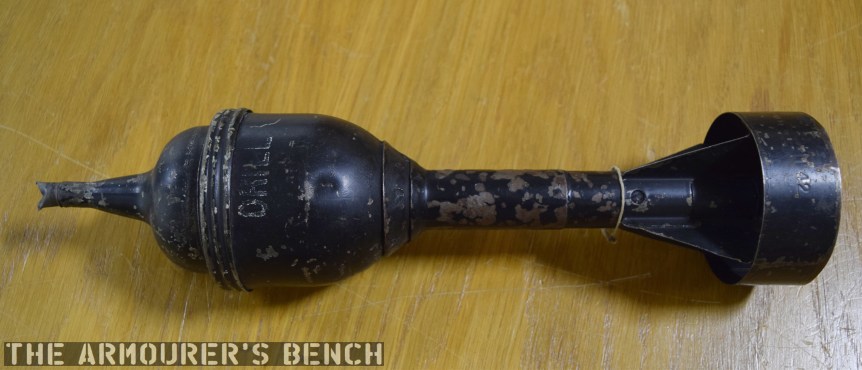
One of the elements from that training kit was a PIAT or Projector, Infantry, Anti-Tank, round. Many of these have been found across northwest Europe since the end of WWII and it was important for EOD teams to be able to identify them and understand how they work in order to safely dispose of them.
A British a PIAT or Projector, Infantry, Anti-Tank (Matthew Moss)
This example is likely an ‘instructional’ round that may have been produced from a previously live round and not subsequently marked as inert. In the video, which was filmed on location from memory, I mentioned that the charge was inside the front cone. Instead the charge was actually just behind the steel cone, which acted as a forcing cone, and has seen been replaced by some sawdust. We can see this in the diagram below, which shows an earlier Mk round but the configuration remains the same:
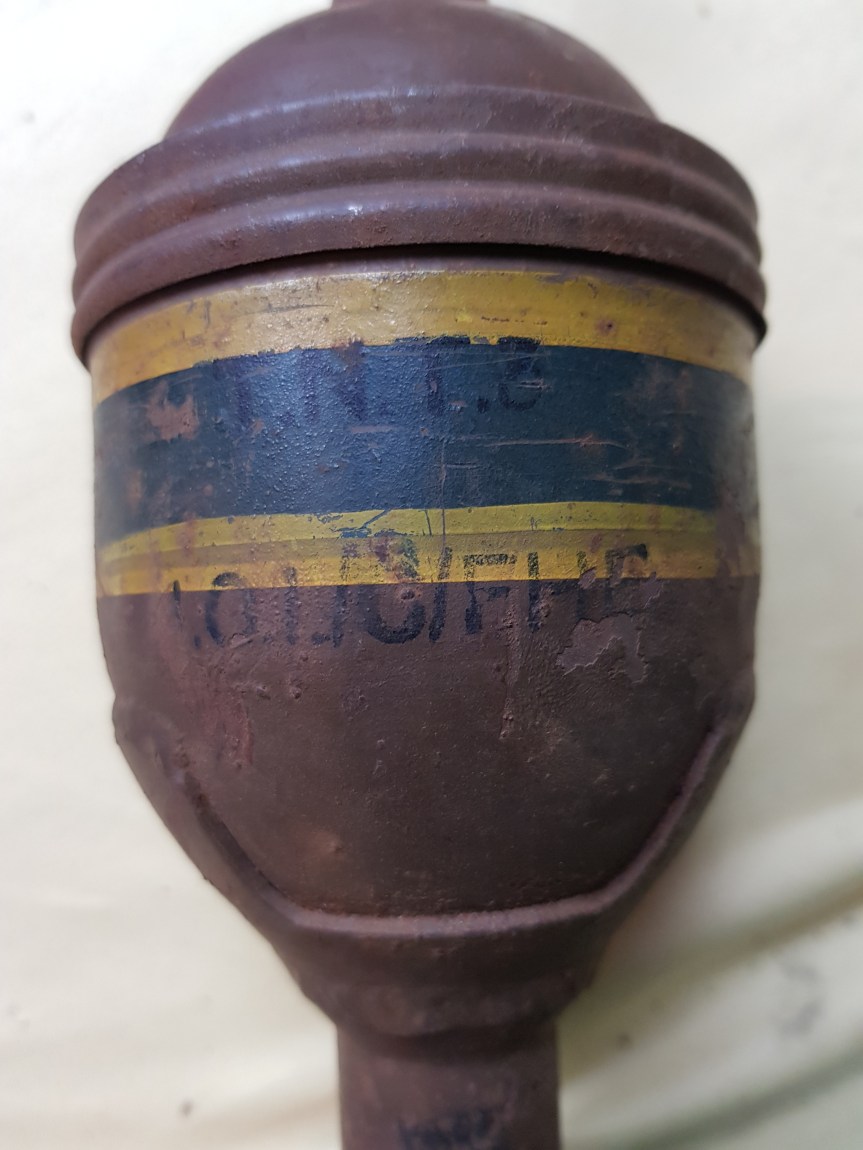
A close up of the bomb’s markings (Vic Tuff)
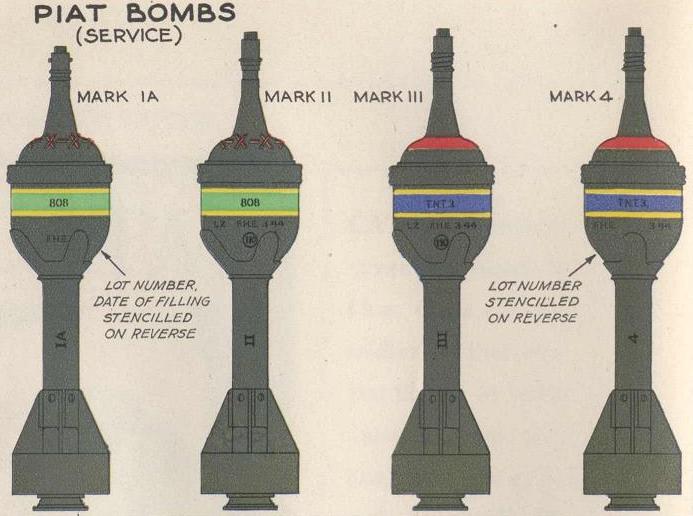
This time we examine an example of the Mk3 PIAT Bomb. When I filmed the video I wasn’t sure of the markings but this chart below more clearly explains them:
There were 7 marks of PIAT bomb:
MkI yellow/green/yellow band 808 stamped on green band, red x’s around nose cone
Mk2 as above
Mk3 yellow/blue/yellow band TNT stamped on blue band, red circle around nose cone
Mk4 as above
Inert bomb black with yellow band INERT in white
Drill bomb black with DRILL in white x 2
Practice bomb – to fit the practice insert tray, painted white and it looks nothing at all like a PIAT bomb!
The inert EOD ‘Mk3’ training round (Vic Tuff)
Our inert bomb isn’t painted black, instead it is painted up as a Mk3 to emulate what a live blind found in the field would look like.
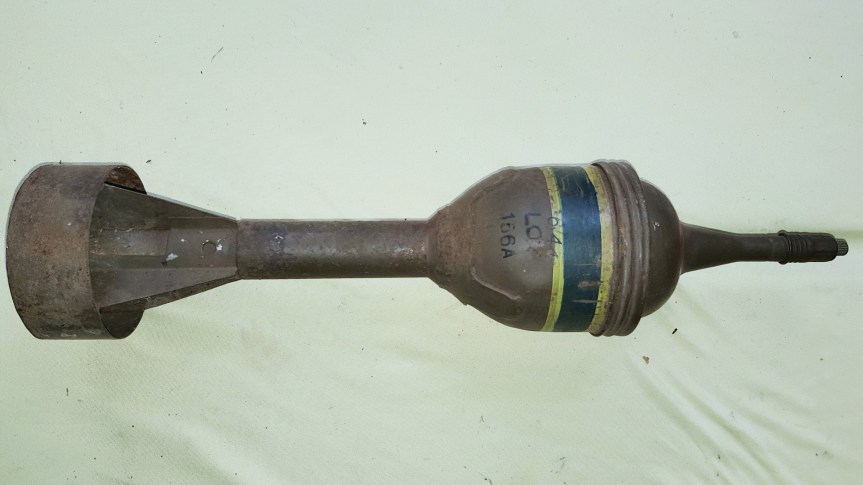
An inert ‘Drill’ round painted black (Matthew Moss)
Here’s an extract from the PIAT’s manual explaining how the fuze was fitted to a live round:
From the PIAT manual: The fuze. – Until required for use the fuze is kept in a container attached to the drum tail by a spring clip….
ii. To fuze. – Remove the fuze container from the drum tail and take out the fuze. Remove the thimble from the bomb nose by pressing it downwards and turning it clockwise. Remove the transit plug from the fuze chamber and insert the fuze flat end first. Replace the thimble. The transit plug should be placed in the fuze container and the latter put in the carrier, in case the bomb should later have to be unfuzed.
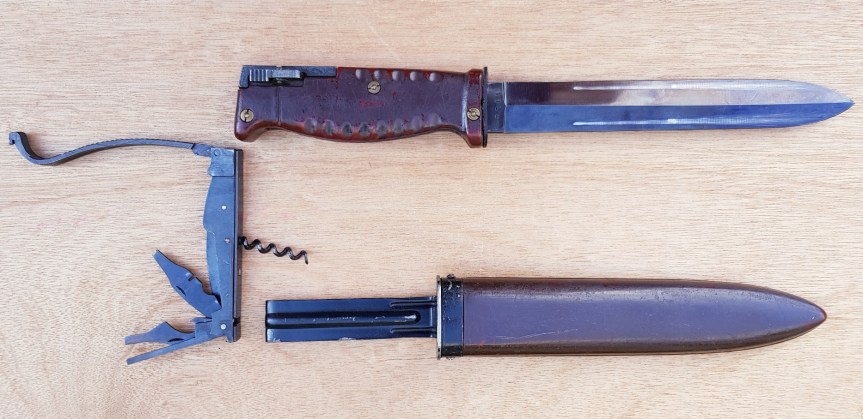
We’re proud to present our very first bayonet-centric episode. Vic takes a look at a bayonet for a Sudanese contract AR-10 as part of his ongoing Surplus Zone series. While a rather rare bayonet this example has some interesting features.
In 1958 the Sudanese Military contracted with Samuel Cummings company Interarmco, to supply 2,508 AR-10 Battle Rifles. 2,500 standard rifles and 8 adapted to mount optical sights as sniper rifles.
One of the requirements for the Sudanese rifles were that they were to be able to mount bayonets, something the AR-10 did not have a capability to do in its then current form. This inability to mount a bayonet was overcome by a rather simple and ingenious addition to the rifle. A cast and machined sleeve was fitted over the barrel between front sight base/gas block and the flash hider. This was pinned to the barrel just forward of the front sight base/gas block. It had machined into the underside of the bayonet adaptor a longitudinal rail to which the bayonet could be attached. This is the same interface as seen on WWII German issued Kar98K rifles, the significance of which will become clear!
It is uncertain why Interarmco chose the design of bayonet which they did. It would have been quite an expensive and complex one to manufacture but it is obvious that it is based upon the late WWII SG-42 bayonet come utility/fighting knife. The Sudanese contract AR-10 bayonet has a more symmetrical blade than that of the SG-42 and has no ‘blood groove’ (properly known as a fuller) which hints at the fact that it is seen more of a utility knife than as a ‘cut and thrust’ fighting knife/bayonet.
Sudanese contract AR-10 bayonet
It has been established that the SG-42 was manufactured by Waffenfabrik Carl Eickhorn in Solingen, Germany (determined by its cof marking / WaA19 inspection code), whereas the toolkit was made by Robert Klaas of Solingen (inspection code: ltk). Inside the bayonet’s grip are a number of tools which detach from the grip and can be used for rifle maintenance. The tools also include a bottle opener and a corkscrew. Inside the toolkit stored in the bayonet’s grip are a number of tools which detach from the grip and can be used for rifle maintenance. The tools also include a bottle opener and a corkscrew.
In regard to the AR-10 Sudanese bayonet, the Eickhorn company does not deny being the manufacturer of the Sudanese contract bayonet, they simply cannot confirm that they were the maker, since all relevant factory records have been lost!
In the Dutch AR-10 archives, Interarmco (i.e. Samuel Cummings) does not disclose the name of the manufacturer, but refers only (in the pertinent correspondence with A.I.) to “the Solingen manufacturer” of this knife-bayonet for the Sudanese contract.
Check out Vic’s earlier Surplus Zone videos hereand his special series on the AR-10 here.
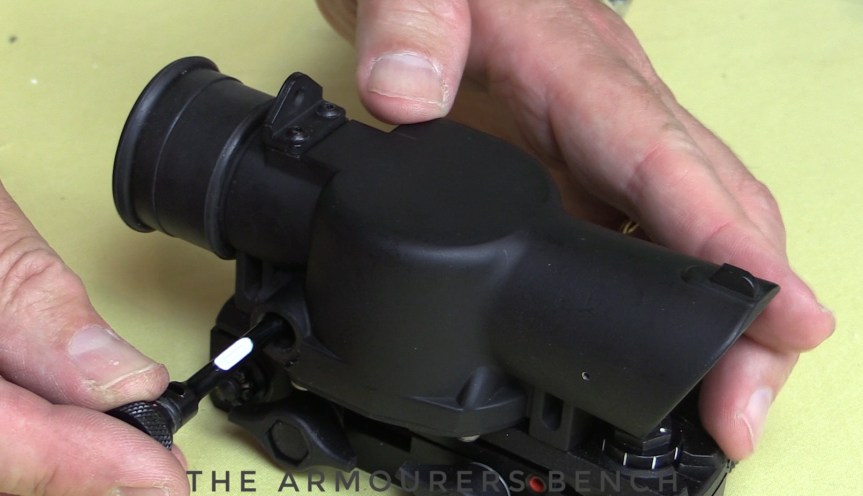
Vic continues his Surplus Zone series with a look at the British SUSAT sight, principle by Britain on the SA80 and by Spain with the CETME Model LV and AMELI. In this episode Vic shows us how to refit a SUSAT with new elements.
The Sight Unit Small Arms, Trilux was developed in the late 1970s by the Royal Armaments Research Development Establishment. It is a 4x optic which uses a radioactive tritium light source, for use in low light conditions, which due to radioactive decay has to be replaced every 8-10 years.
The Galil rifle adopted by the Israeli Defence Force in 1972 was designed by Yisrael Galili and Ephraim Yaari of IMI following the disappointing performance of the FAL in service with the IDF since the early 1950’s. These failings of the FAL in service were mainly due to the poor reliability of the FAL with some of the mainly conscript troops in the field mainly down to poor maintenance and cleaning by the users in the field. The Israeli military found that captured AK47 rifles functioned more reliably without the routine maintenance that the FAL required, this was down to the finer tolerances and mechanism that the FAL employed whereas the AK47 could function reliably without the same level of cleaning and maintenance.
Yisrael Galili, ever the showman, demonstrating the his rifle (Vic Tuff)
In the late 1960’s the IDF carried out a series of trials to select a replacement for the FAL. As part of those trials the following small arms were tested:
and a pre-production rifle from Beretta that ultimately led to the AR70 series rifle.
The result was that the AKM rifle came out as the winner of the trials but with some reservations. The Israelis didn’t like the stamped receiver of the AKM and as part of the trials they tested the Finnish M62 AKM variant rifle which had a machined receiver built from a steel billet which made it much more robust but heavy. This became the basis of what was to become the Galil.
Double page spread from a 1980s IMI Galil brochure (IMI)
A cold hammer forged barrel was selected together with a unitised front sight/gas block with a front sight base adjustable for elevation and drift adjustable for zeroing. The rear sight was positioned at the rear of the dust cover, which itself was strengthened to be more rigid than a standard AKM and allow the rear sight to maintain zero. The rear sight was an ‘L’ shaped flip type with positions for 300 & 500 meters. Flip up night sights were also fitted, they came with Tritium inserts. The folding stock was a virtual copy of the FN FAL Para type.
Galil Sporters
I won’t cover the Galil in any more detail as it has been covered by several others in great detail, what I will detail in future videos and articles is my own experiences of the semi-automatic ‘Sporter’ Galil rifles as well as the other IMI products that I have extensive knowledge of.
Yisrael Galili demonstrating the UZI (Vic Tuff)
Meeting Yisreal Galili
Back in the early 1980’s IMI had been courted by several US companies to develop semiautomatic ‘clones’ of their military small arms. Action Arms worked with IMI and the UZI Carbine was developed primarily for US civilian sales by them from 1980. Following on from the UZI Carbine, semiautomatic versions of the Mini UZI and then the UZI Pistol were developed and sold.
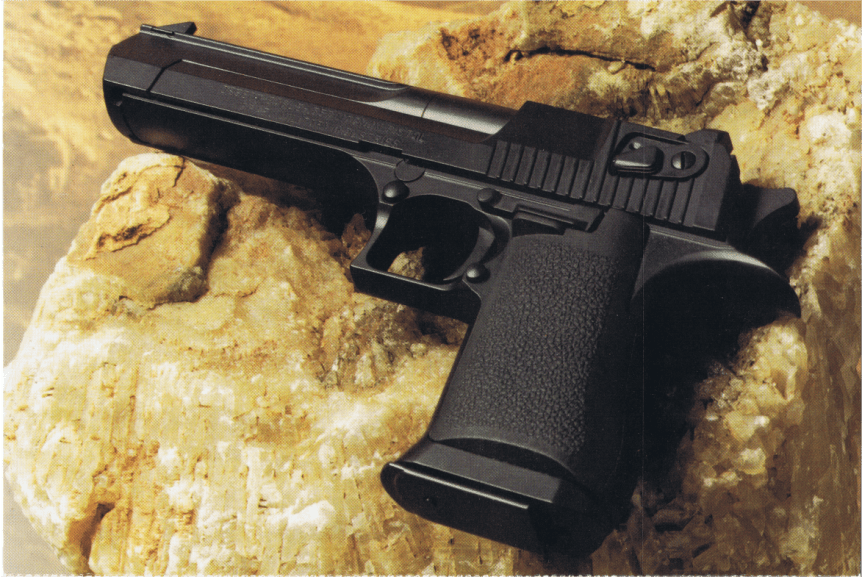
Magnum Research Inc. as part of their partnership with IMI in developing the Desert Eagle pistol also marketed the semiautomatic versions of the Galil rifle in the USA.
An IMI promo photo for the Desert Eagle (IMI/Magnum Research)
In the UK at that time I was working part time as the armourer and technical advisor for the UK & Commonwealth distributor of IMI products Pat Walker Guns. I had worked with Pat since 1980 refurbishing and converting select fire and fully automatic ‘surplus’ small arms to semi-automatic only ‘civilian’ legal configuration for sale on the UK & Commonwealth collector/shooter market. This was a wonderful job as I got to travel a lot to see caches of surplus small arms and work on them… halcyon days!
Ephraim Yaari & Yisrael Galil with UZIs (Vic Tuff)
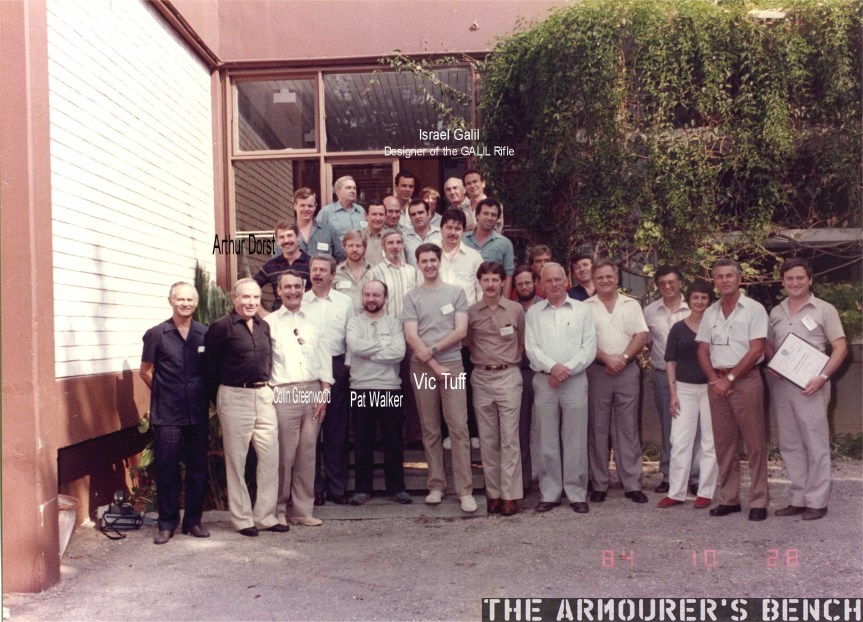
In or around 1983, Pat acquired the IMI agency for the UK, and as part of that agreement we had to be trained on IMI products so we could service and support them as the distributor. In October 1984, we flew to Tel Aviv in Israel to attend the first (and possibly only) armourers course on the entire family of IMI small arms! The UK team consisted of myself, as the technical part of the team, Pat Walker as the UK agent/distributor, and Colin Greenwood who was the editor of the very popular UK shooting magazine GUNS REVIEW who was attending the course so as to write an article for said magazine.
Once we arrived in Israel we were accommodated in the Plaza Hotel on the beachfront in Tel Aviv. That evening we were introduced to the other attendees on the course who came from the USA, Germany, Italy, the Netherlands, Switzerland, Finland, and a South American country… We were introduced to some of the IMI personnel, which included Yisrael Galili, and given a rundown of the schedule for the next week.
Promo image for the Galil Sniper, note the different position of the bipod (IMI)
During our time on the course we were given several ‘live fire’ demonstrations by none other than Yisrael Galili himself as well as Efrahiem Yaari (who would later go on to head up the special operations and weapons division of IMI as director in later years). We also got to handle and shoot all of the small arms IMI manufactured at that time including select fire versions and some prototype Desert Eagle pistols. In the evenings we were shown and also had to demonstrate how to strip, assemble, and troubleshoot all the IMI guns we had shot earlier that day… it became a source of entertainment that myself and the armourer of the Dutch distributor would see who could strip and reassemble each gun type the quickest… I won many a beer in those contests!
During one of the sessions where we were taught to strip the Galil, Yisrael Galili handed out some photocopies of a now infamous photo of the specially adapted Galil. He told us it was a special Galil for ‘mature’ IDF girls. Our friend Miles has a good article about the ‘Female Galil’ here.
The infamous ‘Female Galil’, with specially adapted ergonomics to suit female members of the IDF. Note the added front pistol grip, specially profiled barrel and the short magazine (Yisrael Galili)
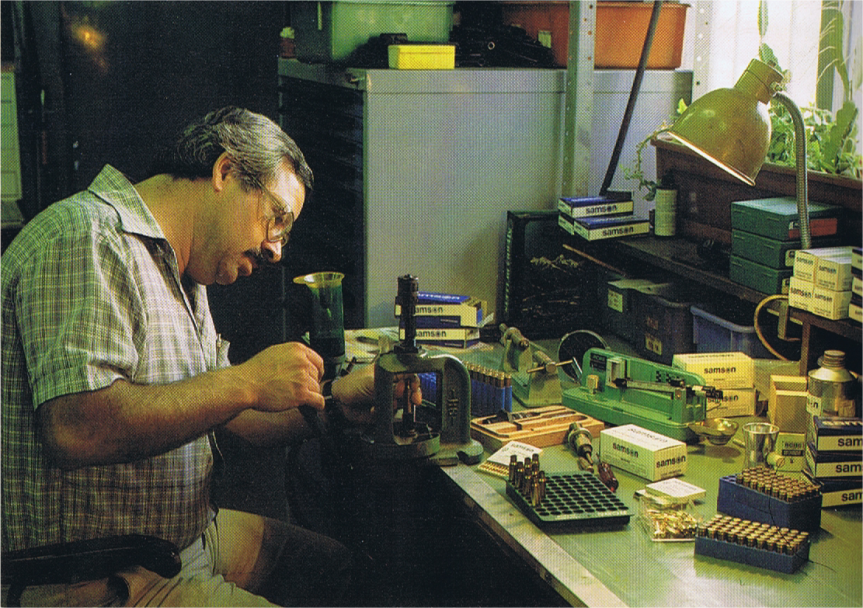
We were given guided tours of the IMI manufacturing facilities seeing how each model and each family of small arms were machined and assembled. We also got to visit the IMI ammunition plant and saw manufacture there as well as test firing the civilian brand of SAMSON ammunition they manufactured.
An 80s promo photo from the Samson factory (IMI)
It was with great pride that on the last evening we were in Israel we were each presented our armourers certificates and a commemorative book on the history of Israel by the Director of Sales Yehuda Amon at a presentation dinner in a restaurant in the ancient town of Caesarea. I also got to thank personally Mr Galili and Mr Yaarifor their excellent tuition and fantastic displays of weapons handling.
Myself, Pat Walker, Colin Greenwood Galili and the other participants and IMI staff from the 1984 IMI armourer’s course (Vic Tuff)
It was a fantastic opportunity for a then young man of 23 to get to work with such an influential smallarms company as IMI and get to meet such notable designers as Ysrael Galili and Ephraim Yaari. Sadly, the passage of time has robbed us of many of the people I shared that experience with Pat, Colin, and Mr Galili are sadly no longer with us. Luckily a few of those I met on the course are, and I still corresponded with them to this day.
Watch out for future articles and videos on my personal experiences with small arms.
Specifications for ARM (from 1983 factory brochure):
Here’s Vic’s video on the XM148, check out Matt’s article below:
There have been attempts to fire grenades from the infantryman’s weapon since the 17th century. Up until the 1960s these almost entirely involved muzzle attachments or grenades which could be fired off the end of a rifle’s barrel. In May 1963, the US military called for a new ‘underslung’ grenade launcher to complement the AR-15/M16, then in early testing. The grenade launcher program had its roots in the ultimately unsuccessful Special Purpose Individual Weapon (SPIW) program which had begun in 1952.
While a series of designs were developed by various manufacturers and designers, May 1964 saw Colt unveil the CGL-4. The Colt was tested against designs from Springfield Armory and Ford, a design from AAI was promising but it was not able to chamber the 40x46mm rounds used by the M79 and was rejected. The US military sought munitions commonality between the M79, already in service, and the new rifle-mounted grenade launcher.
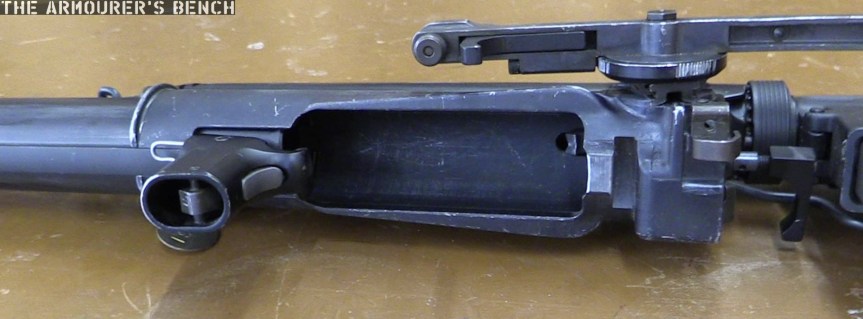
Left side view of the XM148’s bulky tangent sight (Vic Tuff)
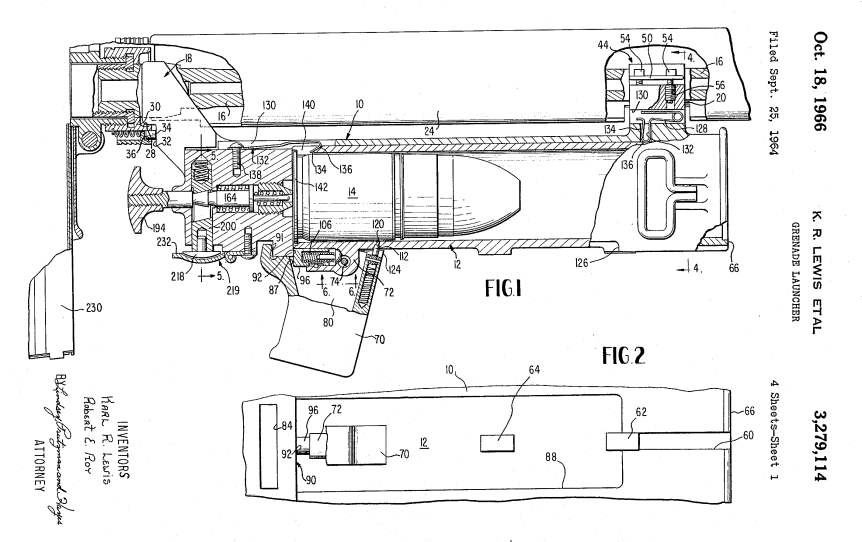
In March 1965, the CGL-4 was chosen for further testing and a contract for 30 launchers was signed. The CGL-4 was reportedly developed by Karl Lewis and Robert E. Roy in just 48 days. However, the design was complex. To load the barrel housing slid forward allowing a grenade to be placed in the breech, the weapon was then cocked and a long trigger, which projected back towards the rifle’s trigger guard, could be pulled to fire the weapon.
Karl Lewis & Robert E. Roy’s patent for the Colt CGL-4 (US Patent Office)
Despite some problems with barrel housings cracking an order for 10,500 of the new launchers, now designated the XM148, was placed in January 1966. Production capacity issues and problems with the launcher’s sight lead to production delays and it wasn’t until December 1966, that the first shipment of 1,764 launchers arrived in Vietnam for field testing.
Right side view of the XM148’s trigger, cocking mechanism and pistol grip (Vic Tuff)
Initial reports from the field were promising with troops praising the “tactical advantage of both the point fire and area fire system” concept. The XM148 was well received by the SEALs and the Australian SAS. The armourers of the Australian SAS, deployed to Vietnam with the 1st Australian Task Force, were also hard at work attaching XM148s to L1A1 rifles. Removing the L1A1′s handguard and attaching the XM148 to the rifle’s barrel.
Field testing was carried out by 12 units from six different divisions which were operating in various parts of Vietnam. This gave a wide variety of terrains and yielded some interesting results. In general it was found that the XM148 decreased rate and quantity of the grenadier’s fire, it slowed his reaction times when firing at a target, it hampered his movement in dense vegetation and also meant the grenadier had to spend longer caring for his weapon.
XM148 with breech open (Vic Tuff)
It was noted that the sight mount which was overly complex and prone to snagging on brush and kit, it was also felt that too much force was needed to cock the XM148 (around 30 lbs) and the trigger mechanism was felt to be overly complex and difficult to repair and disassemble. One safety concern was the XM148′s long trigger bar, which could snag and launch a round – not ideal for special forces patrols infiltrating through thick bush. Problems with the launcher’s quadrant sights also continued causing deflection errors out at longer ranges. The bulkiness of the sights exasperated these problems as when they were knocked the XM148′s zero could be effected. The XM148 also precluded the use of a bayonet as when fired it would blow the bayonet off the muzzle. Overall, troops felt the XM148 was too fragile and complex for use in the field.
SP4 Willey firing an M16A1 mounted with a Colt XM148 c. 1967 (US National Archives)
At least one unit found use for the launchers, the 1st Cavalry Division (Airmobile)’s Operational Report for Quarterly Period Ending 31 October 1967, noted that the XM148
“proved unsatisfactory in infantry units due to its lack of durability; consequently, USARV directed that they be turned in. However, 1/9 Cav has devised a method of mounting the launcher coaxially on the M60C machine gun used by scout observers on OH-13 scout helicopters. Durability in this environment is
not a problem since the weapon deos not receive the rough handling it did in the hands of ground troops. Firepower on scout helicopters is significantly increased. Fifty-two XM148s have been retained for use by 1/9 CAV.”
Finally, despite Colt’s efforts to rectify the growing list of problems the Army Concept Team In Vietnam deemed the XM148 unsatisfactory for deployment in Vietnam and recommended they be removed from service and a new improved launcher be developed. This was a massive blow to Colt who had already manufactured 27,400 XM148s. Many of these were already in Vietnam.
The US Army launched the Grenade Launcher Attachment Development (GLAD) program in the summer of 1967. A large number of manufacturers submitted designs including Colt, who offered the improved Henry Into-designed CGL-5. The Army turned down Colt’s offer of 20 free improved launchers and rejected the CGL-5 outright. The GLAD program saw the resurgence of the earlier AAI design, designated the XM203, this simple design, now chambering the 40x46mm shell, was eventually selected in August 1968. Ironically, as AAI was predominantly a research and development company and after an initial run of 10,000 made by AAI, Colt was subsequently awarded the contract to manufacture the M203 from 1971 onwards.
Harold Into’s patent for the product improved CGL-5 (US Patent Office)
While the XM148 proved to be a failure it played an important role in proving the operational viability of the rifle mounted grenade launcher system. The muzzle-launched rifle grenade is all but obsolete, superseded by the under-slung grenade launcher.
If you enjoyed the video and this article please consider supporting our work here.
Specifications:
Length: 16.5 inches
Weight: ~3lbs
Calibre: 40x46mm
Action: single shot, striker-fired single action
Capacity: 1
Rate of Fire: ~4 rpm


