This week we have a very special episode where we tap into a topic close to Matt’s heart, the PIAT. Matt wrote a book about the PIAT, or Projector, Infantry, Anti-Tank, in 2020 and continues to research its history. One of the most interesting aspects of the PIAT is its unique cultural history, having been portrayed in a plethora of films spanning over 70 years. Most famously it was heralded, literally, when Anthony Hopkins as Lt. Colonel Frost in A Bridge Too Far shouted ‘BRING UP THE PIAT!‘ A line which has become iconic. But there’s so much more to the PIAT’s onscreen career!
In this very special episode we are joined by Sebastian Abineri, Jack McKenzie and Timothy Morand who were part of what became known Attenborough’s Private Army or the APA while filming Richard Attenborough’s seminal war film ‘A Bridge Too Far‘. The APA were a large group of actors who played a variety of roles in the film. Join us as Seb, Jack and Tim regale us with their memories from filming and give us some insight into how the film was made!
Check out our earlier episode on ‘A Bridge Too Far‘ with special guest Al Murray here.
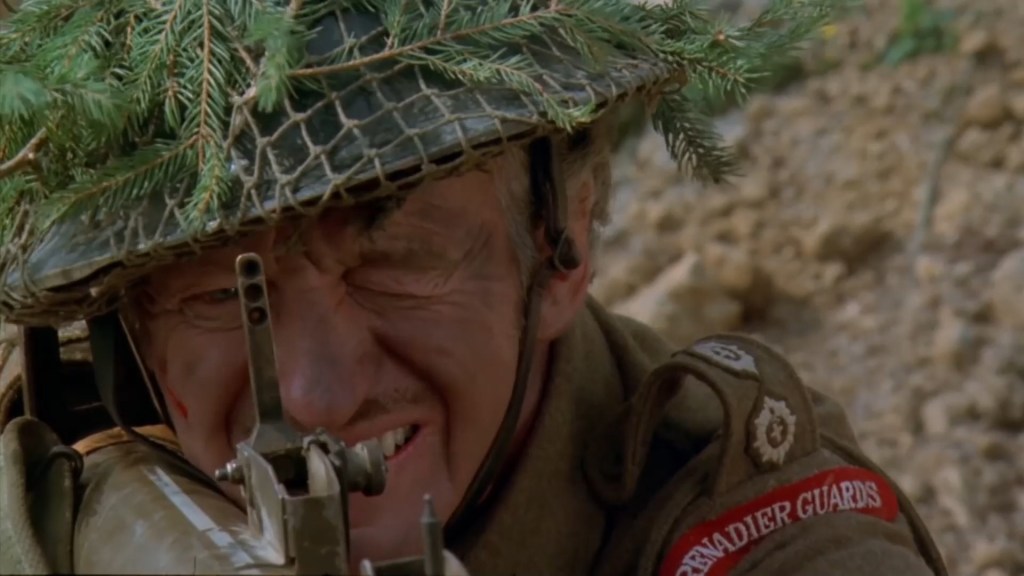
We return to the Projector, Infantry, Anti-Tank’s long and storied on-screen career. This time we are examining a scene from ‘Paper Tiger’ (1975). It’s an interesting film, and certainly not one you’d expect a PIAT to pop up in! David Niven plays Mr Bradbury, a tutor to a young Japanese boy. Bradbury is a Walter Mitty-like character that regales the child with made up tales of his wartime escapades.
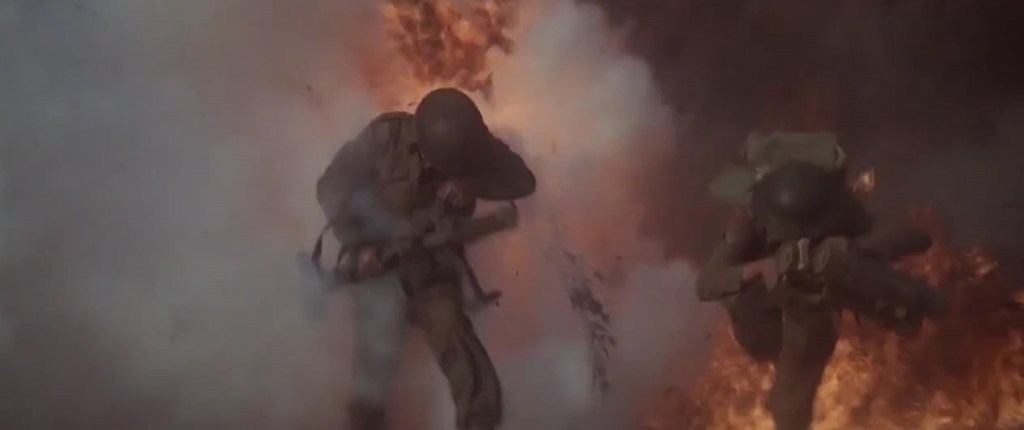
Early in the film Bradbury describes a battle in France in October 1944. Niven’s Character is shown to be a member of the Grenadier Guards and receivers orders to take an enemy pill box. Bradbury describes how he attacked the German position single handed. The sequence begins with what looks like a platoon making a frontal assault.
Niven receives a call from his commanding officer and then asks his Sgt to hand him ‘the bazooka’. But it’s not a Bazooka he’s handed but a PIAT! Now it’s quite the faux pa’s to call a PIAT a Bazooka but I imagine the script called for one and the film armourer brought along British weapons to fit the action involving the Grenadier Guards.
Niven’s character then charges across the ground in front of the pillbox. He takes cover in a shell crater and we can see that the bomb loaded into the tray is painted black with a yellow stripe – this denotes that its actually an inert drill round. – If we look closely inside the yellow stripe it also appears to have the words ‘drill use’ written on it. Note how far forward the bomb appears in the bomb support – this suggests that the weapon isn’t cocked and that the bomb has just been slid down onto the spigot to make it look loaded.
Before he can take on the pillbox a German armoured fighting vehicle (which is actually a disguised American M8 Greyhound) crests the ridge. Niven takes aim with the PIAT and knocks it out. As he aims, we can see the PIAT has the later pattern 3 aperture rear sight rather than the earlier 2 aperture. The apertures are for 50, 80 and 110 yards. The PIAT, however, is missing its webbing butt pad and gaiter cheek rest. But we can see the white indirect aiming line painted along the top of the PIAT for use in the light mortar role!
As the Greyhounds crew bails out Niven draws his revolver and shoots the crew with a style that pastiches many war films. Leaving his PIAT Niven runs forward and we see that the spigot is forward in the bomb tray – this means he would have had to manually re-cock the weapon before firing again! As he runs we can see he has another PIAT bomb handing from his belt. I’ve never seen any contemporary photos or documents referencing this method of carrying bombs – in reality they would have been carried in a 3-bomb bomb carrier.
He throws a No. 36 (Mills) grenade into the pillbox with perfect aim. Another funny nod to a common war movie trope! The bunker is knocked out and the enemy surrender en masse. It’s an interesting little scene, Niven as always is great and of course as a veteran of the war and an officer he would have been familiar with the PIAT.
Check out the rest of our videos looking at on screen PIAT portrayals here.
If you enjoyed this video and article please consider supporting our work here. We have some great perks available for Patreon Supporters. You can also support us via one-time donations here.Thank you for your support!
So you may have seen our earlier video looking at the portrayal of PIATs in the 1978 classic A Bridge Too Far! If not check it out.
When I think of Richard Attenborough’s all-star war epic telling the story of Operation Market Garden, I immediately think of the iconic ‘BRING UP THE PIAT’ scene where Anthony Hopkins playing Colonel John Frost commanding 2 PARA calls for the Projector, Infantry, Anti-Tank to take out a marauding ‘Panther’.
But this isn’t the only scene from the film depicting the PIAT! In this video we’ll look at a couple of the other scenes showing the PIAT in action.
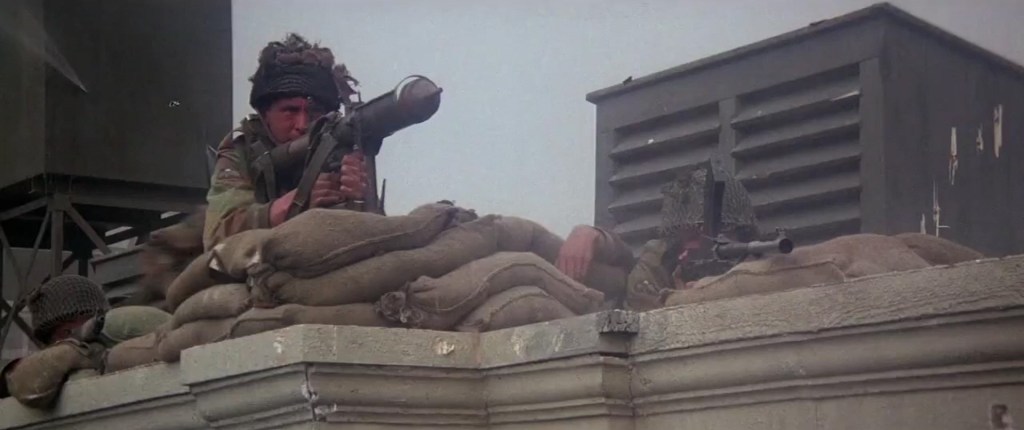
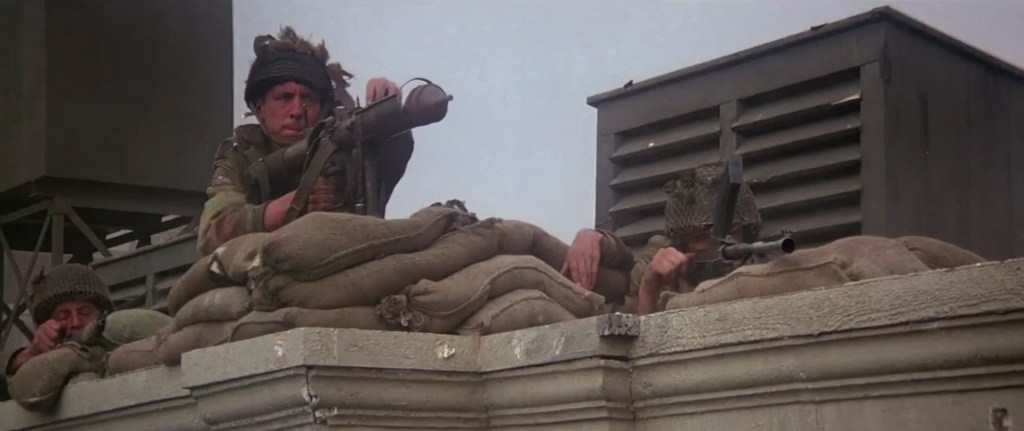
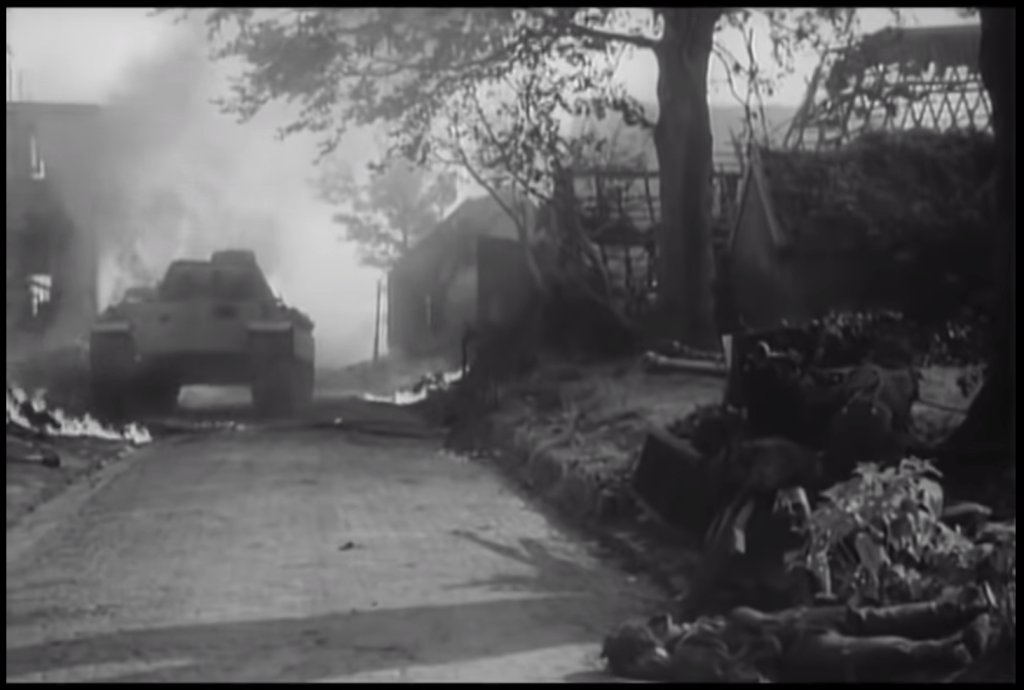
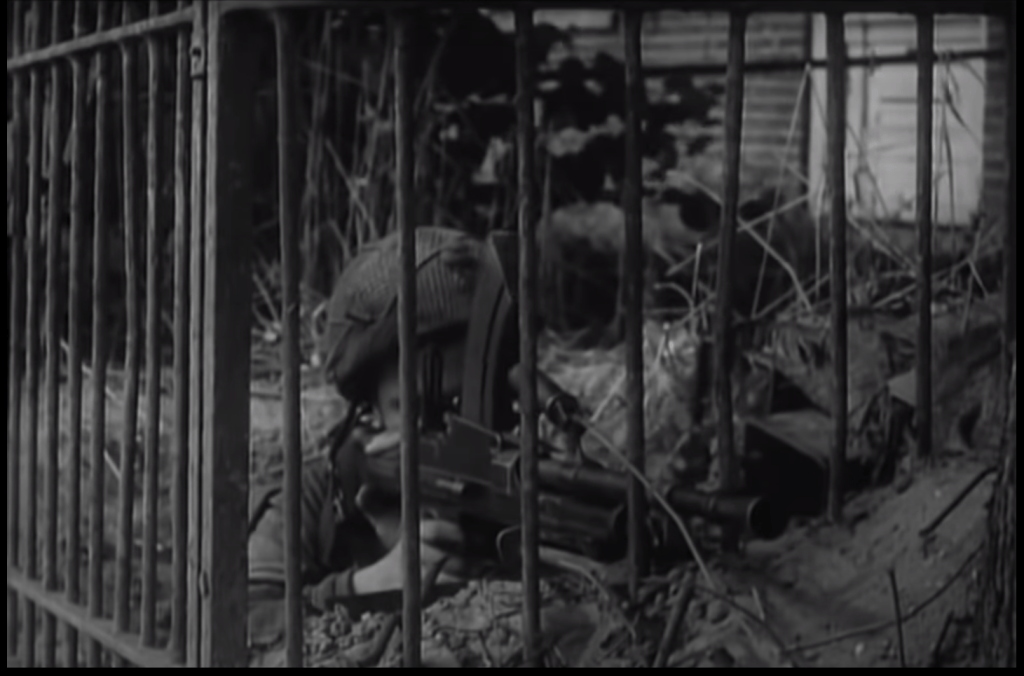
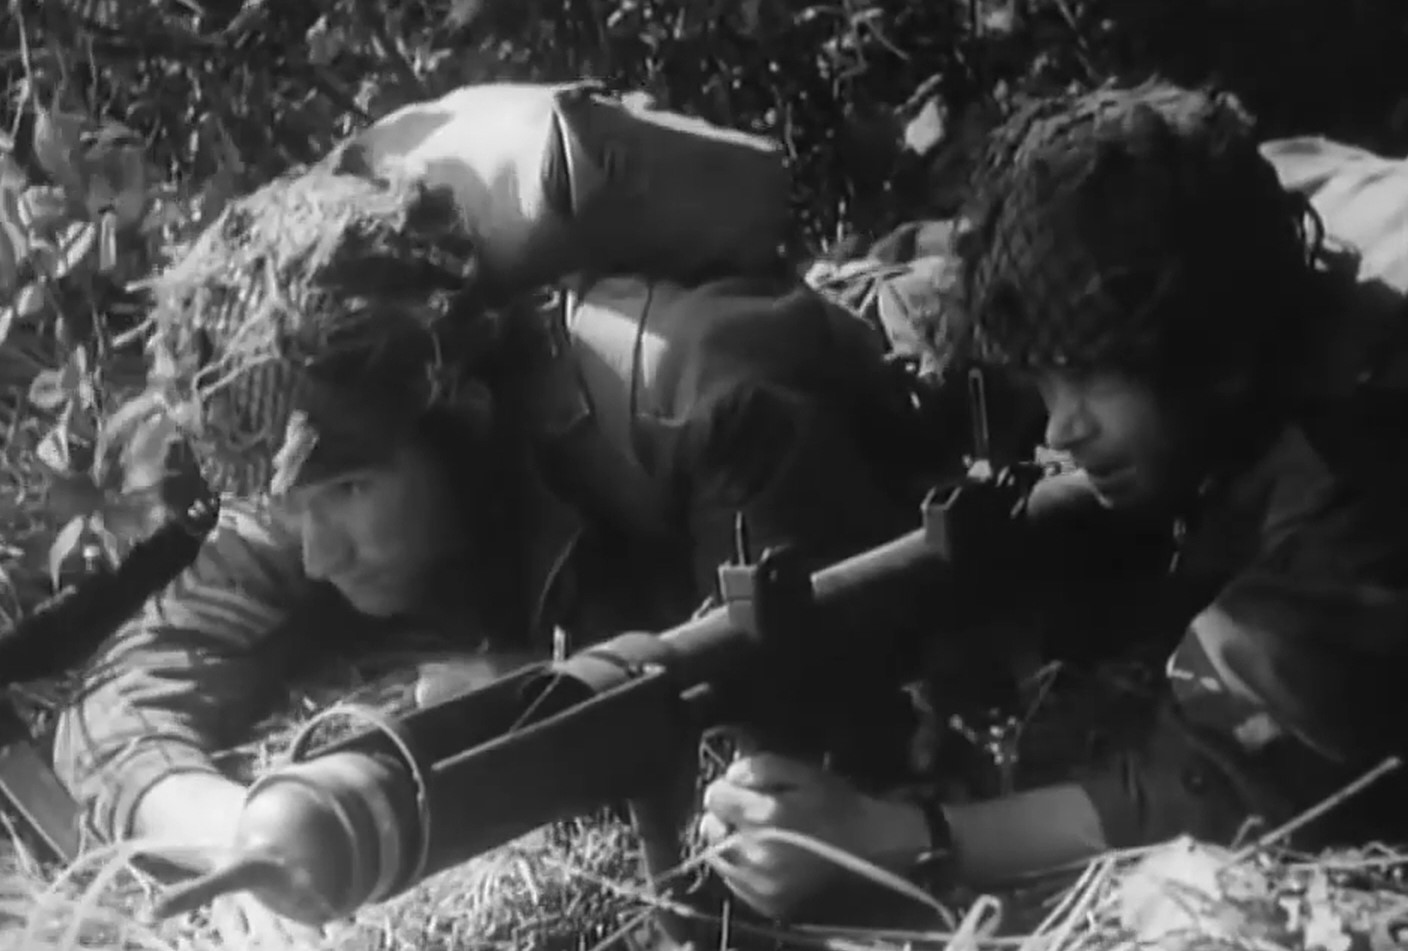
We first see the PIAT during the scene when the Guards Armoured Division’s spearhead meets heavy german resistance. Michael Caine’s Sherman’s get a pasting from some Pak 40s. The British infantry deploys and we see a cornucopia of kit ranging from Brens to Vickers to an M2 Browning. But blink and you’ll miss them a pair of PIAT teams also ‘bring up the PIAT’. A two man team can be seen moving forward, the No.1 carrying the PIAT and the No.2 carrying a 3 round bomb carrier, sadly killed by enemy fire.
The second scene in which we see the PIAT finally get to work on some German armoured fighting vehicles is during Gräbner’s attack over the bridge. As the PARAs at the Bridge prepare for the attack we see 2 or 3 PIAT positions get ready – loading bombs into their bomb support trays. One PIAT No.1 can be seen slotting the rear of a PIAT bomb into the projectile guide plates to hold the bomb in place – very authentic.
As the column crosses the Bridge Frost orders his men to open fire, Brens, Stens, Rifle No.4s and PIATs open up and the column is stopped in its tracks. During the scene we see a number of PIAT’s fire and knock out SS vehicles. One PIAT No.2 is hit by enemy fire. The first PIAT round fired hits a lead German vehicle causing it to halt, the second flips a Kubelwagen. We then see a No.2 two load a fresh bomb into the bomb support tray – with a tap to make sure its properly in place. We get a great show of the PIAT firing from the front. It’s worth noting that the PIAT doesn’t recock and the spigot is still seen in the bomb tray just before the camera cuts away. Meaning that that PIAT No.1 will have to recock his weapon before he can fire again!
It’s worth remembering without the ‘Bring Up The PIAT’ scene making a point of naming the weapon, most people would never have known what this unusual weapon that dealt so much damage in the earlier scene was! Of course the attack wasn’t stopped by PIATs alone, there were also airborne anti-tank guns, which the film doesn’t show.
Another little titbit of information I learnt since the first ‘Bring Up The PIAT’ video, thanks to my friend Robbie of RM Military History [check out his channel], is that the PIAT was fired in most of these scenes by one of the film’s armourer Bill Aylmore. The information comes from After the Battle – The Battle of Arnhem – War Film: A Bridge Too Far which describes him as formerly a sergeant with the 50th Regt. – which might be a reference to the Queen’s Own Royal West Kent Regiment. The book goes on to say that “Aylmore excelled himself during the filming of the battle on the bridge by being the ace shot with the PIAT. During all the various takes he was able to put the bomb exactly where the director wanted it and where it coincided with the special effects explosions.” – Good shooting indeed!
If you enjoyed these videos and this article please consider supporting our work here. We have some great perks available for Patreon Supporters. You can also support us via one-time donations here.Thank you for your support!
Following on from our earlier look at the PIAT scenes from A Bridge Too Far and Theirs Is The Glory in this video we’ll take a look at ‘The Unbroken Line’, a short British Army film, made in 1985. It tells the story of the British Army’s 300 year history with depictions of the battles of Blenheim, Waterloo and Operation Overlord – as well as a depiction of what fighting against a Soviet invasion in 1985 might have looked like.
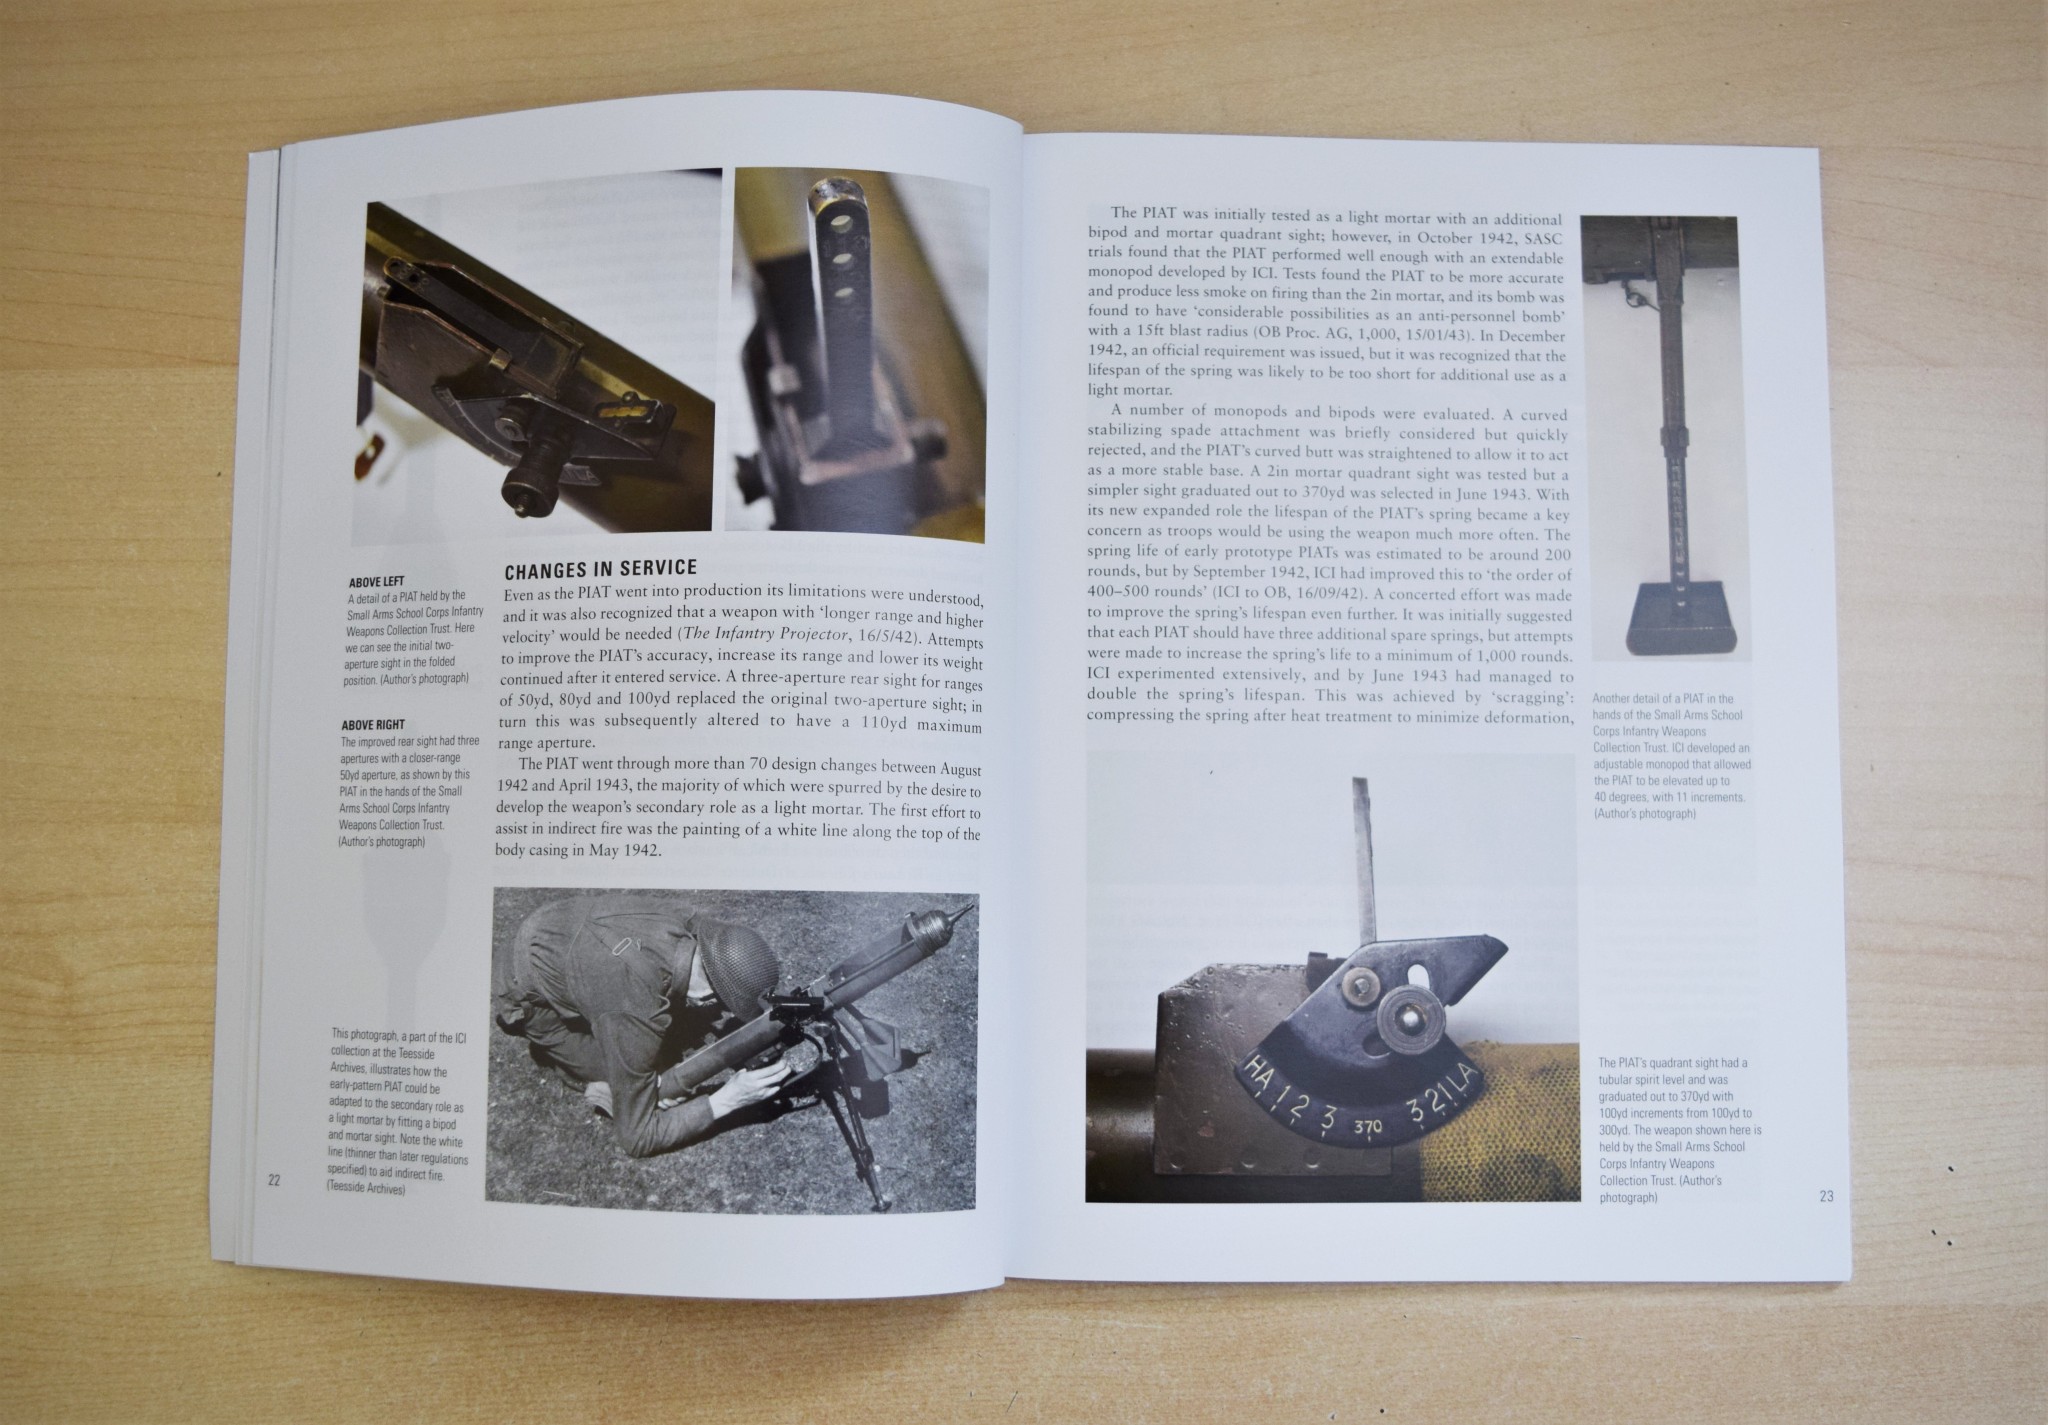
The PIAT No.1 takes aim (Still from The Unbroken Line)
In this short video we’ll look at one of the interesting scenes that features a PIAT in action! The PIAT goes up against a Jagdpanzer 38 tank destroyer. Set in Normandy after the D-Day Landings we see a section from the Dorset Regiment. When the German Jagdpanzer crashes through the wall the section commander shouts ‘PIAT’, calling on the PIAT team to move up and engage the tank destroyer. The PIAT No.1 take up position and manages to knock out the Jagdpanzer but sadly he’s then the victim of a German grenade. The Dorsets then storm the ruins and capture the defenders and the tank destroyer crew.
For more about ‘The Unbroken Line’ check out RM Military History’s special video where myself and Robbie chat with David Carson, the historical advisor on the film!
In late 1944, a platoon of Canadian sappers built an intriguing in-field adaptation to a Universal Carrier (sometimes known as Bren Gun Carrier) – they developed a PIAT Carrier.
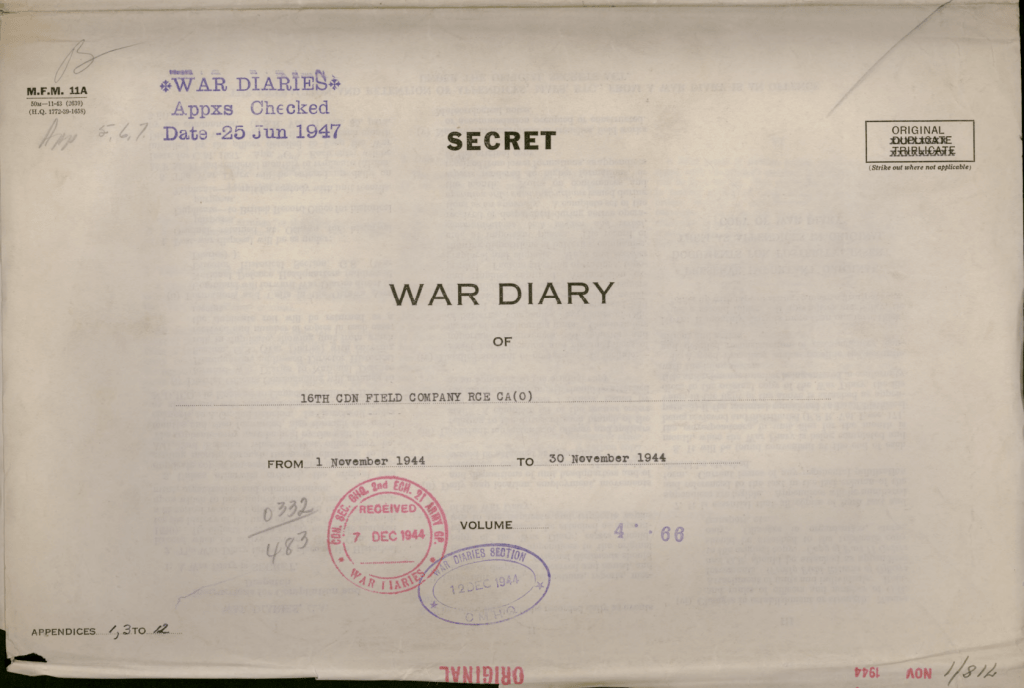
The 16th Field Company, Royal Canadian Engineers were attached to the 3rd Canadian Division during operations in northwest Europe. Each Canadian division had a Divisional Royal Canadian Engineers Group attached to it, made up of several field companies. In November 1944, the 16th Field Company, RCE was located near Nijmegen.
The ‘PIAT Carrier’ (Library and Archives Canada)
The experiments which led to the PIAT Carrier were embarked on after the division’s commander, Major General Daniel Spry, put out a directive for ‘harassing weapons’ to be developed. The interesting adaptation was somewhat reminiscent of a miniature Soviet Katyusha or Commonwealth Land Mattress. While similar in concept to these multiple rocket launchers, it is important to remember that the PIAT isn’t a rocket launcher – but a spigot mortar.
Loading a Land Mattress multiple rocket launching system (IWM)
The Canadian engineers mounted the PIATs in two rows at an obtuse angle at the rear of the Universal Carrier, presumably for use in a limited bombardment role. The idea behind the outfitting of the Carrier appears to have been to utilise the PIAT in its secondary, indirect role as a mortar, perhaps for fire against buildings or to harass enemy positions. From photographs taken in the field we can see that the engineers of 16th Field Company fixed the PIATs into a wooden frame at the rear of the Carrier, they appear to have had their monopods removed, but some still appear to have their slings fitted.
Developing the PIAT Carrier
From further research and some digging through the 16th Field Company’s War Diaries, I found reports on the adapted carrier and even some diagrams showing how the bombs landed. The diaries also reveal that the Universal Carrier was not the first vehicle the PIATs were mounted on – the first tests were carried out on a truck.
Front Cover – 16th FC, RCE, Nov. 1944 War Diary (Library & Archives Canada)
In the war diary we get the first mention of the PIAT battery in the entry for the 15th November 1944. It reads:
“The GOC directed that each arm of the service should be prepared to devise some means of harrassing the enemy during the holding role of the Div present area and to act as a counter-measure to the Moaning Minnies [Nebelwerfer] employed by the Germans. The ORE decided that the Sprs could make use of the 24 PIAT’s held by the C in Div Engre. The tentative Idea being that these be mounted on a veh, or two vehs, that they be fired mechanically and possibly simultaneously with a multiple mortar effect. Lieut. Cameron and No. 1 Plattoon [sic] were given the task, experiments to be carried out tomorrow for this purpose all PlATs and ammunition were called into this Company from Div Engrs.”
The next day on the 16th November the diary recorded:
“Lieut. Cameron made a number of tests with his PIAT platoon In conjunction with the N.S.R. and found that the maximum range that could be attained was 300 yds. Maj Main will discuss this matter with CRE tomorrow.”
Then several days later on the 19th November:
“Lieut. Cameron gave a demonstration of the capabilities of the PIATs used to fire with a mortar effect, 18 PIATs were mounted in racks on one vehicle at an angle of 45 degrees and fired simultaneously. There was no jar to the vehicle, Max range obtained was 300 yds against the wind and 400 Yds with the wind, detonation of salvo was all within one second of time and covered an area 25ft in length by 15ft width.”
This short report concluded by explaining why the PIAT Carrier may not be field practical, noting that “The plan is not practicable at present as areas of firing are not available that would permit the vehicle moving up to 300 yds from target before firing.”
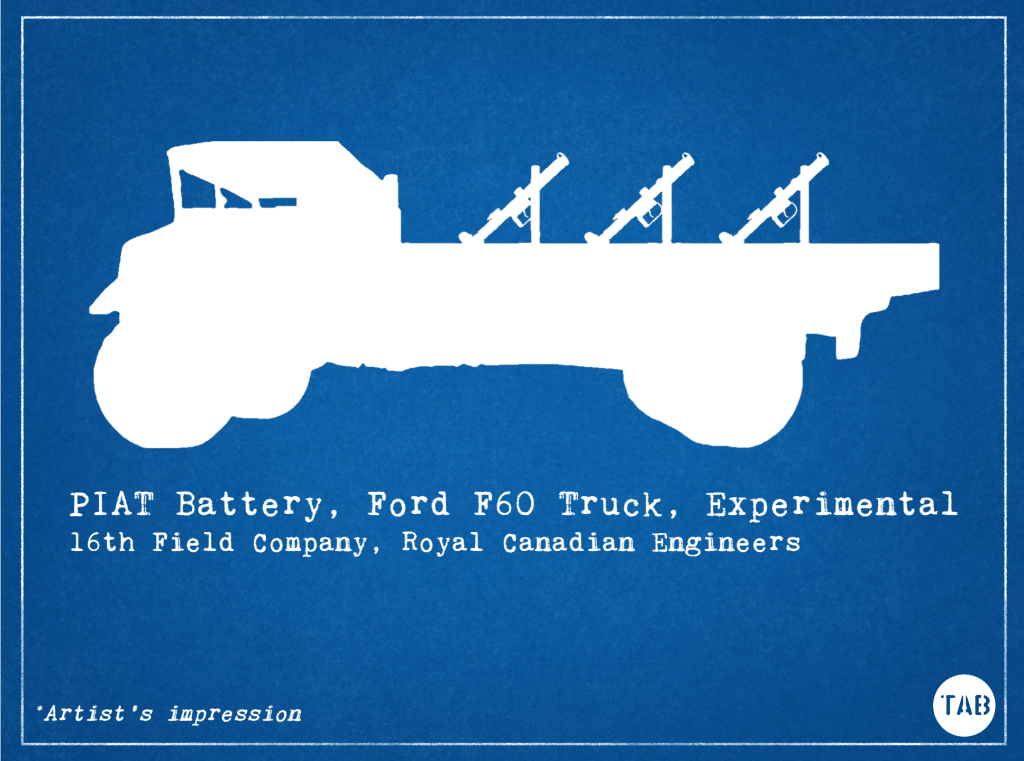
The first major test is described in a report dated 21st November. A total of 22 PIATs were available to Lieut. Cameron’s platoon. They mounted 18 PIATs in racks on the bed of a Ford Canada 60 cwt (60 hundredweight – 3 ton) truck, with the remaining 4 as spares.
The report explains that steel wasn’t available so wood was used for the racks. Which they also believed would have a “cushioning effect serving to shield the truck to some extent from the shock of recoil.”
The 18 PIATs were arranged in three rows of six PIATs with PIATs spaced 1 foot apart next to one another, with four feet between each row. The PIATs were angled at 45-degrees by a wooden plank attached to the side of the truck bed with the butt of the weapon bolted down under wooden struts.
With no photos of the ‘PIAT Truck’ here’s a quick fun artists impression (Matthew Moss)
To fire the weapons rods were run along the rows aligned with the weapons’ triggers with bars of 1/2in steel running back between each one and back towards the font of the truck where the operator was stationed. The report describes this set up as ‘satisfactory’.
In the first test all three rows of PIATs were fired at the same time. The report’s findings note that in the first test all but one of the weapons fired, the bombs were in the air for an estimated 4 to 5 seconds and the time between the first and last bombs striking the ground was approximately ½ to 1 second.
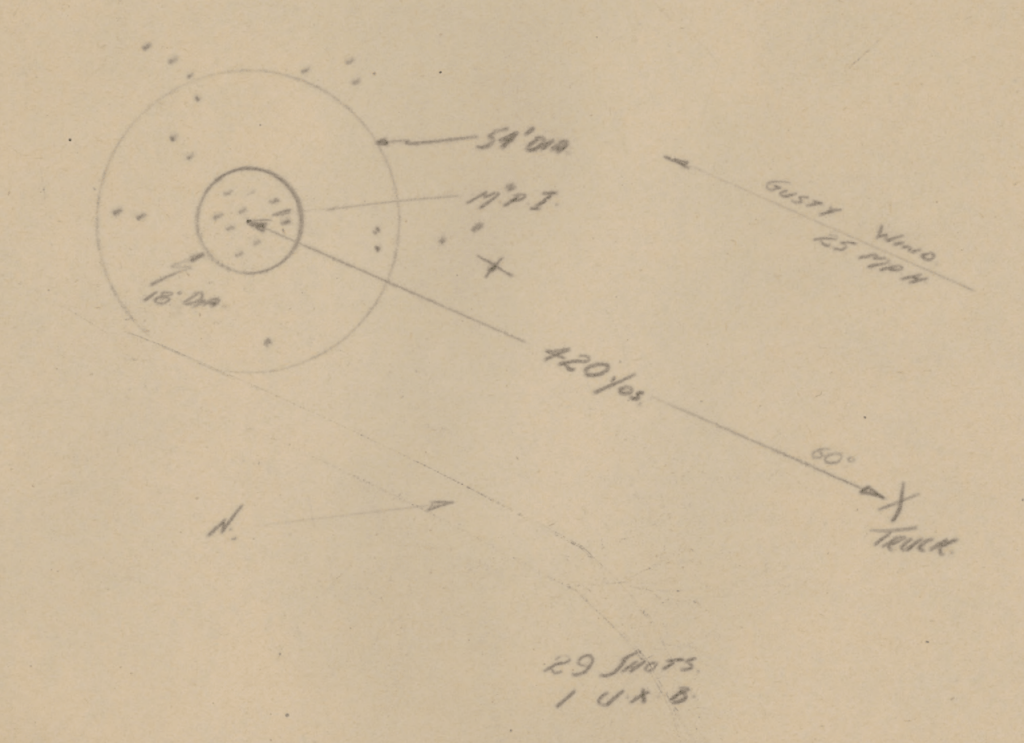
The blast radius of the individual bombs is noted as 5 feet with 6 to 9 inches of penetration through gorse and sandy loam soil. The range was found to be 310 yards against the win and 400 yards with it. The wind was noted to be travelling as 20-25mph. From the diagrams accompanying the report we can see that the beaten zone had a maximum diameter of approximately 54 to 60 feet. With a mean point of impact around 15 to 18 feet wide.
A fall-of-shot diagram from the November RCE report, 16th FC, RCE, Nov. 1944 War Diary (Library & Archives Canada)
The second test saw the sappers fire two full salvos to test how quickly the rig could be reloaded. The reload time between salvos was recorded as 1min 20seconds. The second salvo saw 6 of the PIATs fail to fire due to a mechanical failure when one of the trigger rods broke. The extreme range achieved during this second firing was 420 yards with the wind.
During this first field test of the truck mounted system, a total of 65 bombs were fired and only one failed to explode down range. The racks were strengthened and the trigger rod repaired, it was also concluded that the racks could be spaced closer together without “effecting the pattern of the beaten zone” down range.
There is no further mention of the testing in the war diary during November but progress definitely appears to have been made, an entry on the 16th December notes:
“The use of PIATs mounted on a vehicle has had further experimental trials, 15 PIATs have been mounted on a Bren Carrier by this unit and a trial shoot was held today, Against a slight wind a range of 310 yards was attained with the area of burst covering 25 ft deep and 50 ft wide, no recoil was felt in the carrier.”
The last mention of the PIAT Carrier comes on 30th December:
“The carrier mounted with 15 PIATs was on trial during the afternoon before an audience consisting of the GOC and Officers of the Div. All visitors were impressed by the display. A range of 350 yds was attained and the accuracy on target was good.”
There are no further mentions of the PIAT carrier in the diary. It seems that development of the idea didn’t progress into 1945, by early February, the 16th FC RCE were involved in Operation Veritable. It appears that the operational requirement no longer existed.
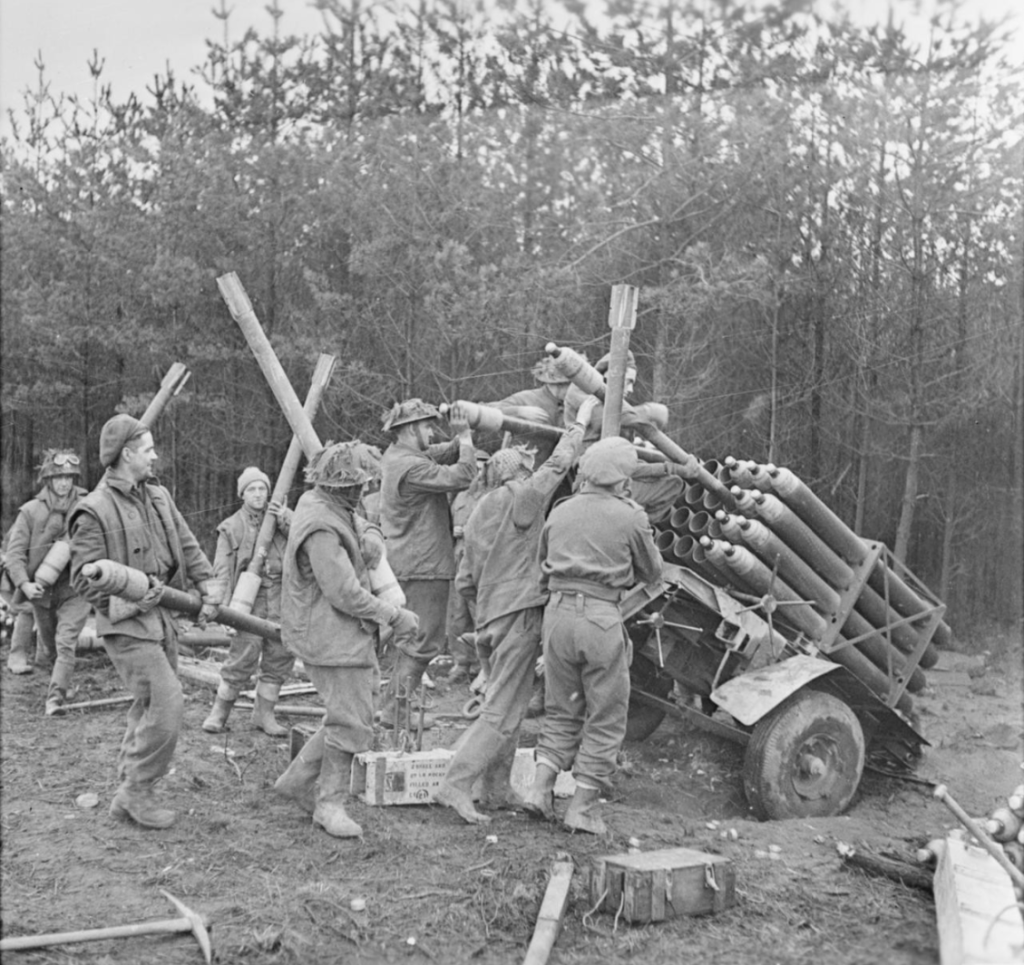
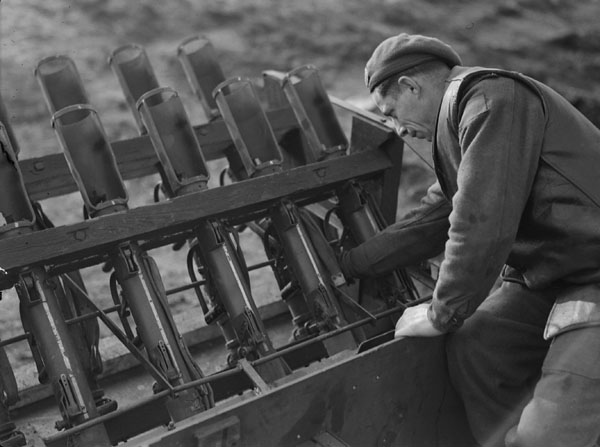
Lets take a closer look at how the adaptation was done. From the available photos, which were probably taken in mid-December 1944, we can see the trigger bar that was passed through the trigger guards of each of the PIATs, with the bar resting at the base of the trigger, it is unclear from the available photographs but this may have allowed the weapons to be fired either by row or all together.
Close up photograph of the racks holding the PIATs – note the trigger bars, wooden frames and the PIATs’ white in-direct fire aiming lines (Library and Archives Canada)
The sappers have built a wooden platform onto the back of the carrier with welded metal brackets holding the pieces together. The PIAT’s are held between two wooden cross pieces that have been bolted together. There’s a strip of metal running around the edged of the wooden frame that has been twisted 90-degrees and then welded to the carrier. It is also worth noting that all of the PIAT’s have had their butt pad covers removed and the feet of the PIATs’ rear end caps have been secured with a pair of brackets either side.
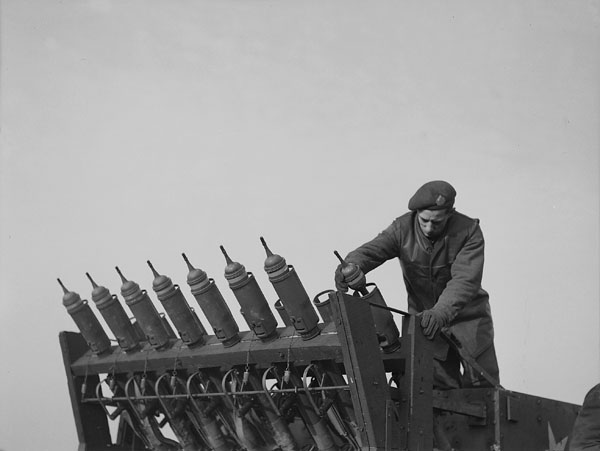
The PIATs in their racks (Library and Archives Canada)
In the photograph above we see all of the PIAT’s held in their racks with their sights folded down, slings still attached, and we get a good view of the white indirect fire aiming lines. At the bottom of the photo we can see a trigger bar which when pulled appears to pull the triggers of the whole row at once. As an aside, note that the carrier has a ‘crooked’ Commonwealth allied star – to differentiate it from the US allied stars which were aligned with their top point at 12 o’clock
It appears that the battery of PIATs was aimed by reversing the Carrier towards its target, that would certainly have been challenging and a fairly dangerous task given the relatively short range of the PIAT even when used as a light mortar.
From this photograph below, of a Canadian sapper loading the PIATs, we can see all of the spigot tube stoppers dangling on their chains. The sapper is loading the bomb from the front of the bomb support tray and has angled the tail up to slide the projectile loading clip into the projectile clip guides on the face of the PIAT.
Loading the PIATs (Library and Archives Canada)
It also appears that sandbags are being used as a counterweight at the front of the carrier. The combined weight of the PIATs and their bombs (about 555 lbs) as well as the weight of the frame would have been considerable.
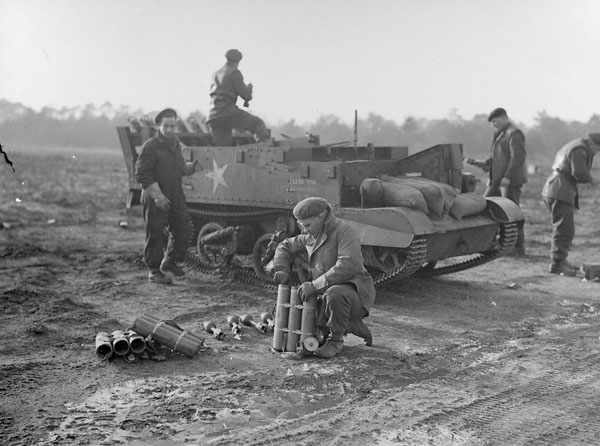
In the final photograph below we see the sappers preparing the battery to fire with a sapper in the foreground removing bombs from three bomb carriers. While in the background on the right we can see another sapper carrying bombs forward from another set of bomb carriers. I would guess that it was perhaps decided to mount 15, rather than an even number, PIATs as the bomb carriers held three round each – with 5 bomb carriers needed to reload the battery of PIATs.
Readying the PIAT Carrier for testing (Library and Archives Canada)
While sadly we don’t have any footage of the test we’re very lucky to have this selection of brilliant photographs courtesy of the Library and Archives Canada. It would seem that the limited range of the PIATs made the concept of a PIAT Carrier too impractical to field – but a maximum range of 400 yards may have offered some interesting tactical options for dealing with defended buildings or field works. Perhaps need for a response to the enemy Nebelwerfers was answered by the introduction of the longer ranged, harder hitting Land Mattress. Despite this the ‘PIAT Carrier’ is a fascinating piece of resourceful engineering – an innovative, field-expedient adaptation that brought together two classic bits of British and Commonwealth kit – the PIAT and the Universal Carrier.
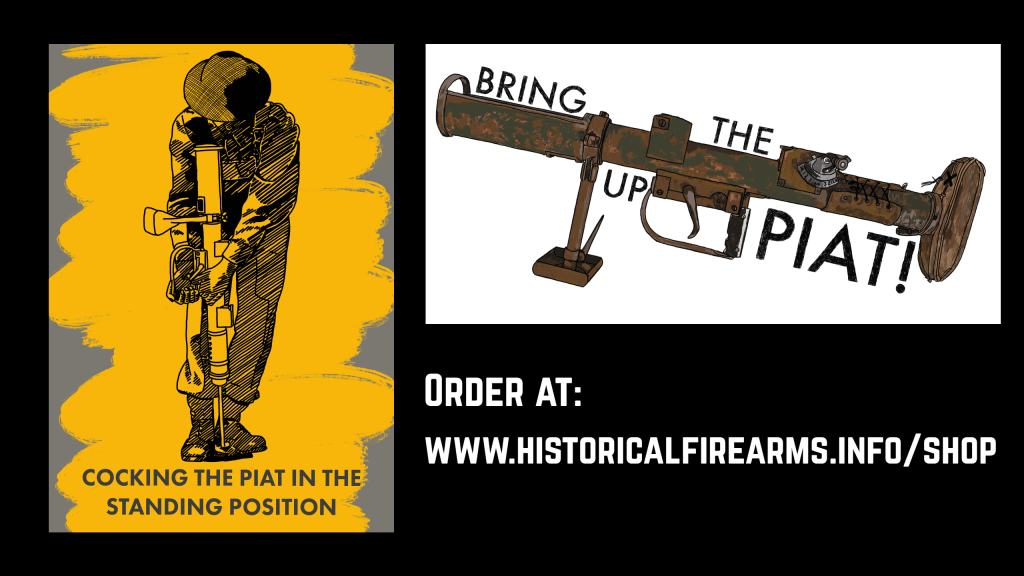
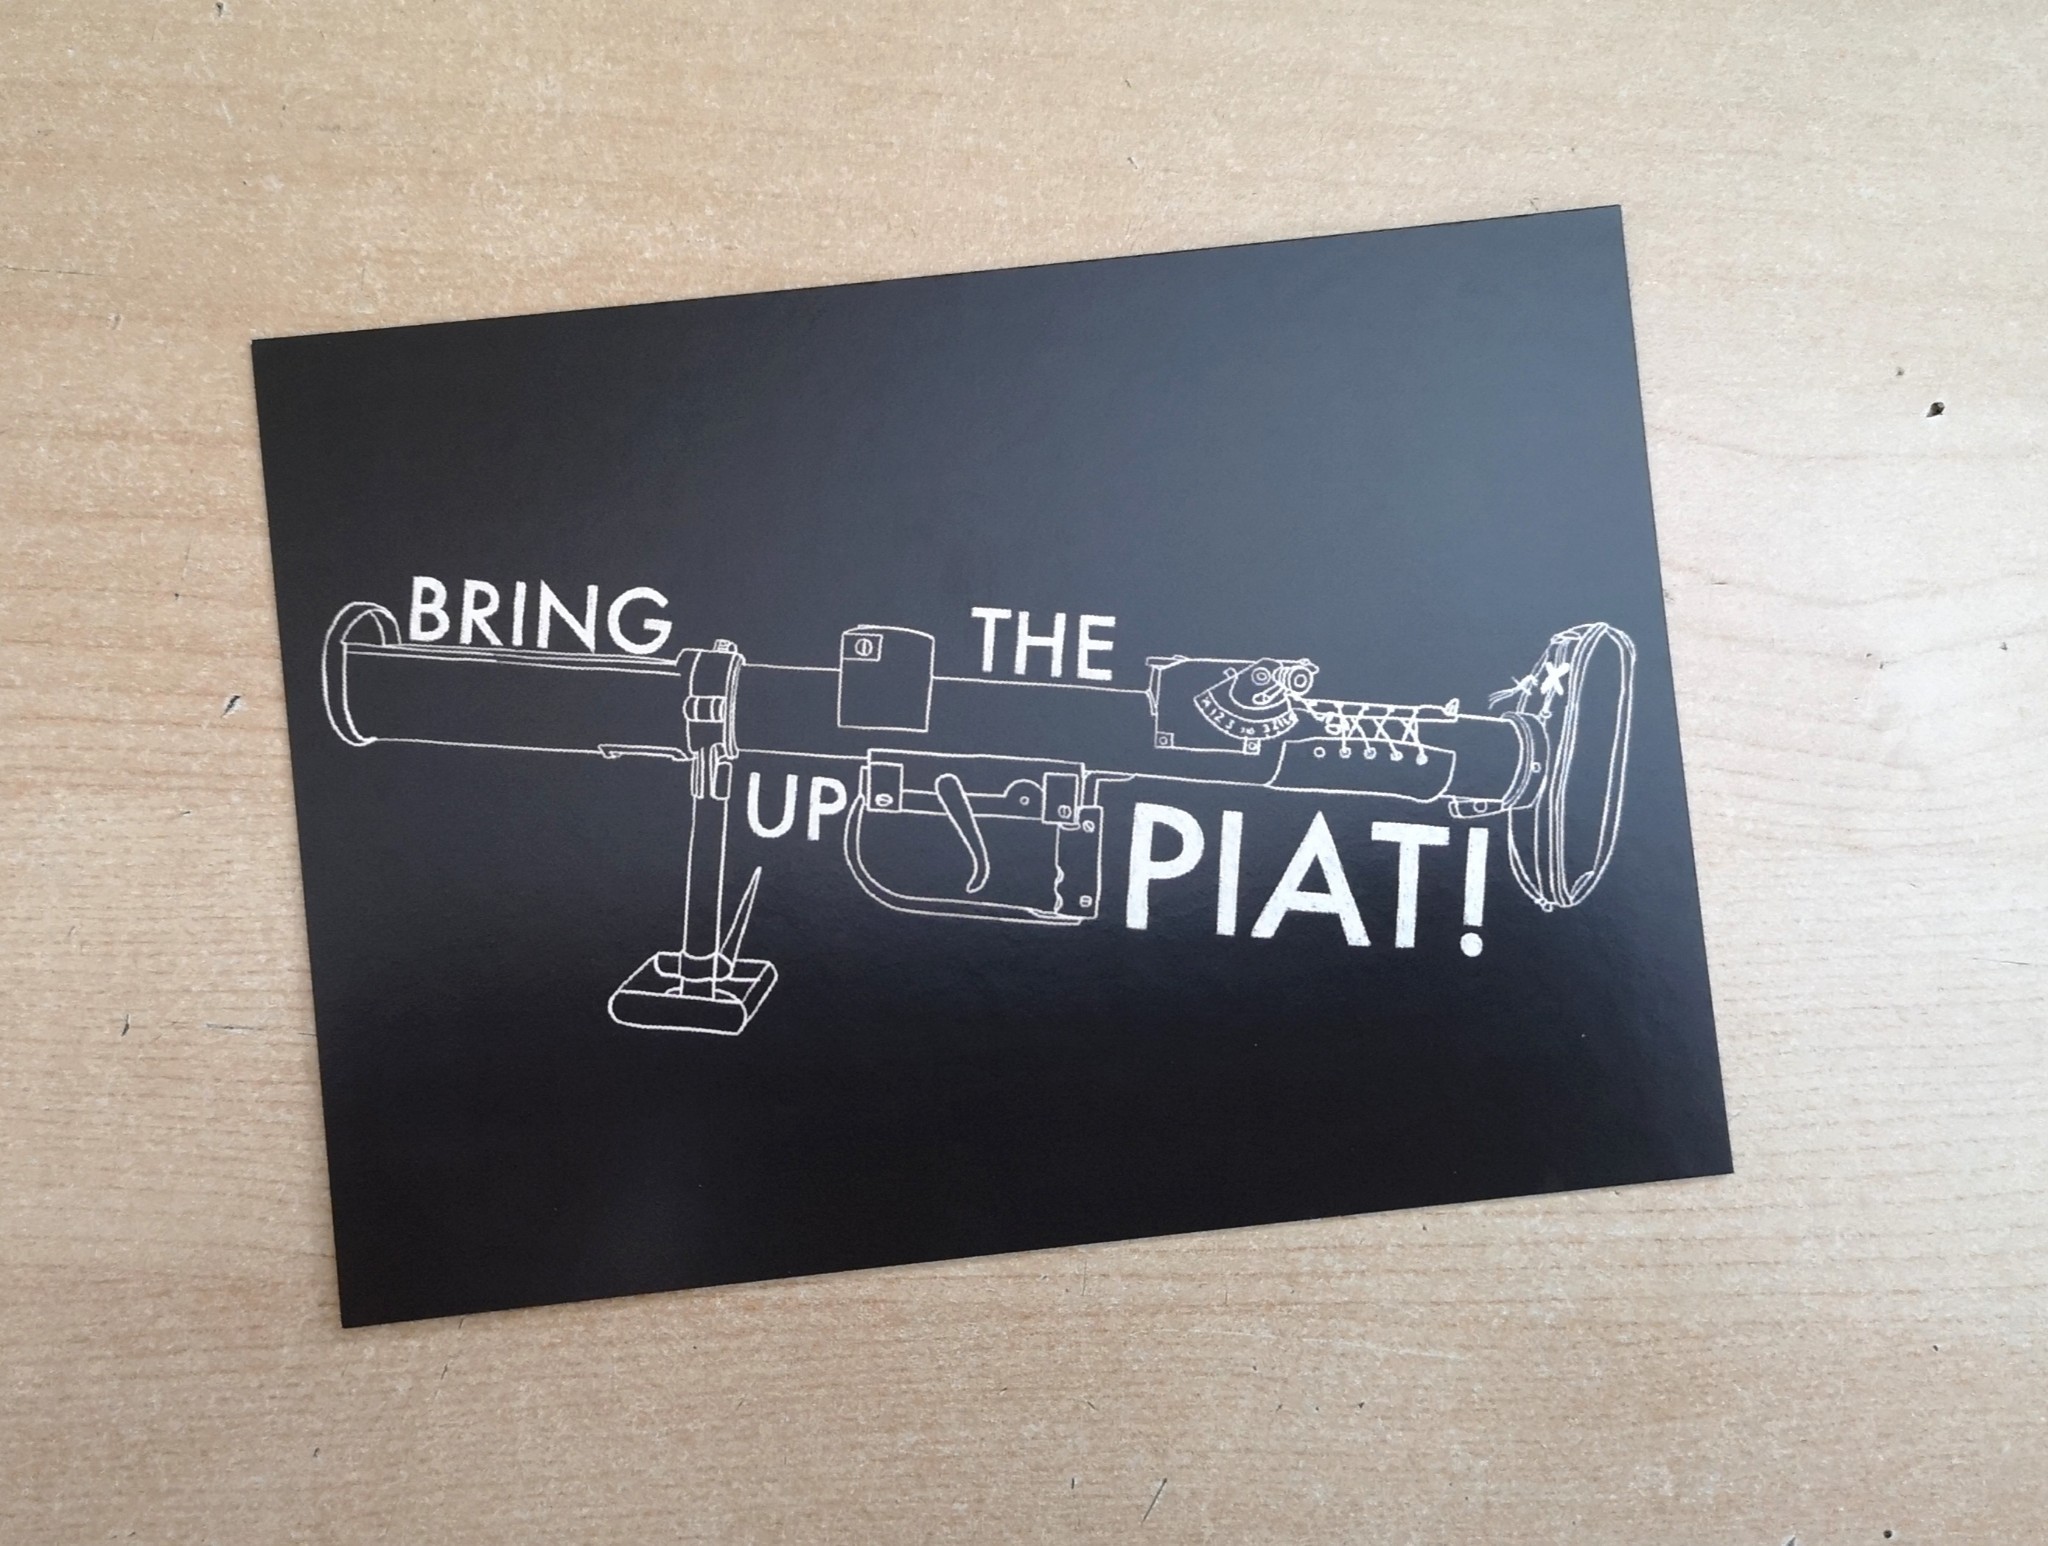
Our fantastic new PIAT posters were designed by the brilliant illustrator who put together our Advanced Combat Rifle colouring book last year! They feature a custom illustrations of the PIAT, the first has the immortal words “Bring up the PIAT” from the film A Bridge Too Far, while the second poster features a unique design featuring art influenced by the PIAT’s original manual – which has the caption – ‘Cocking the PIAT in the standing position’.
The posters are A3 art prints which are printed on 300gsm premium textured paper, which is great for framing. A3 dimensions are: 29.7cm x 42cm or 11.4in x 16.5in. Each poster will be numbered as these will be a pretty limited run! Both posters are available for £12 / $15.50 (plus shipping costs).
These are a great way to help support our work and I hope that you like the designs. Thanks guys!
Fighting On Film is a brand new podcast about classic and obscure war movies. Hosted by Matt and Robbie McGuire (of RM Military History). In this first episode we discus an absolutely fascinating war film – Theirs Is The Glory, a 1946 telling of the story of the Battle of ArnFighting On Film: Theirs Is The Glory (1946)hem. What makes the film unique is that it was filmed entirely on location and with a cast made up of soldiers who had fought at the battle!
Robbie and I discuss the unique production of the film, the weapons, kit and equipment seen on screen and some of our favourite scenes. We hope you enjoy our ramblings and we definitely encourage you to check Theirs Is The Gloryout.
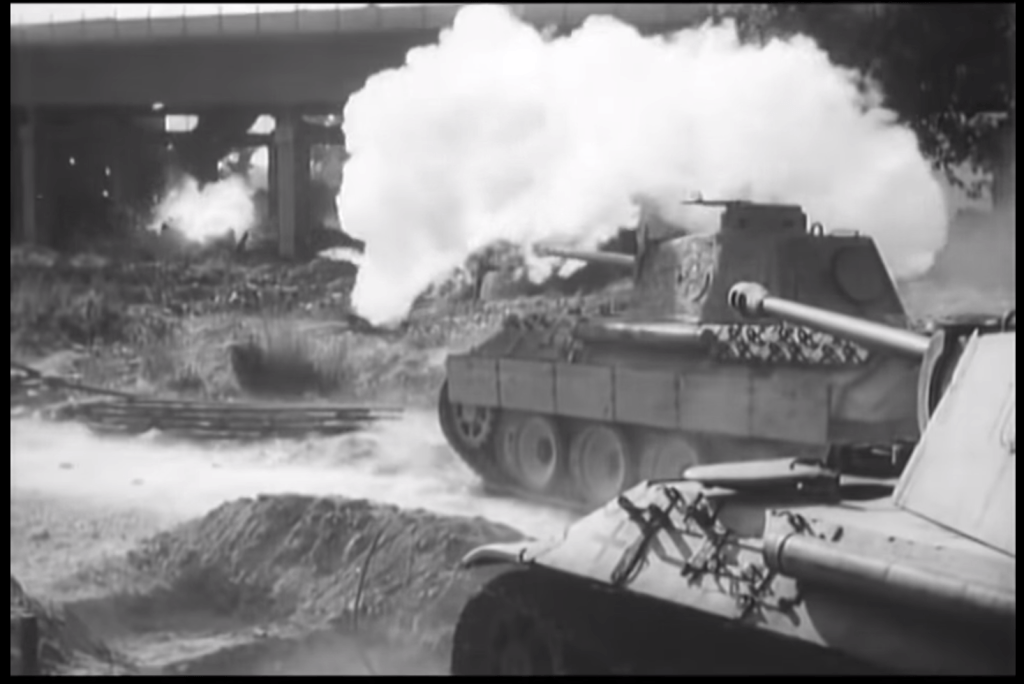
A Bridge Too Far (1977) is undoubtedly a classic of the war film genre, massively ambitious it attempts to tell the story of Operation Market Garden. One of the key stories told is that of 2 PARA besieged in Arnhem awaiting relief from XXX Corps.
A PIAT waits for the ‘Panther’)
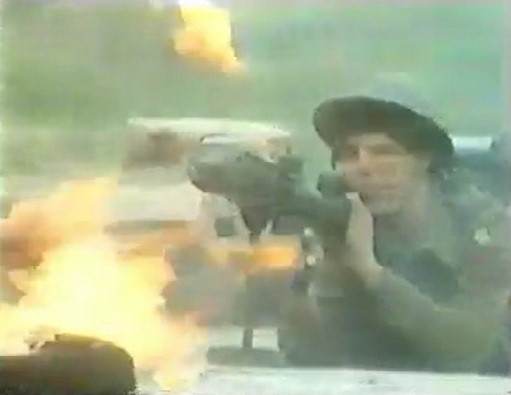
Perhaps one of the most enduring scenes sees Anthony Hopkins, portraying 2 PARA’s commanding officer Johnny Frost, spot an enemy tank approaching and bark the order: “Bring Up The PIAT!”
Set photo from A Bridge Too Far (Airborne Assault – PARA Museum)
The scene itself is actually quite authentic. The PIAT gunner misses, and that isn’t too surprising as despite being a platoon weapon not everyone had a lot of training on them. While the PIAT misses twice – this is because the gunner was firing from an elevated position. This makes judging the range and lead which should be given to an advancing tank all the more difficult. It is something we see in contemporary accounts, including in Arnhem Lift: Diary of a Glider Pilot, by Louis Hagen. Hagen describes firing a PIAT at a self-propelled gun (likely a StuG) from an attic during the fighting in Arnhem: “The direction was perfect, but it fell about twenty yards short.” Similarly, there are accounts from Home Army members fighting in Warsaw during the Uprising which describe exactly the same thing.
The second PIAT shot in A Bridge Too Far
While the flash we see in the scene might be excessive the recoil is quite authentic. While writing my book on the PIAT, I did a lot of research into the cultural impact of the PIAT and the numerous films it appeared in since World War Two. I recently wrote an article about the numerous films it has appeared in, you can read that here.
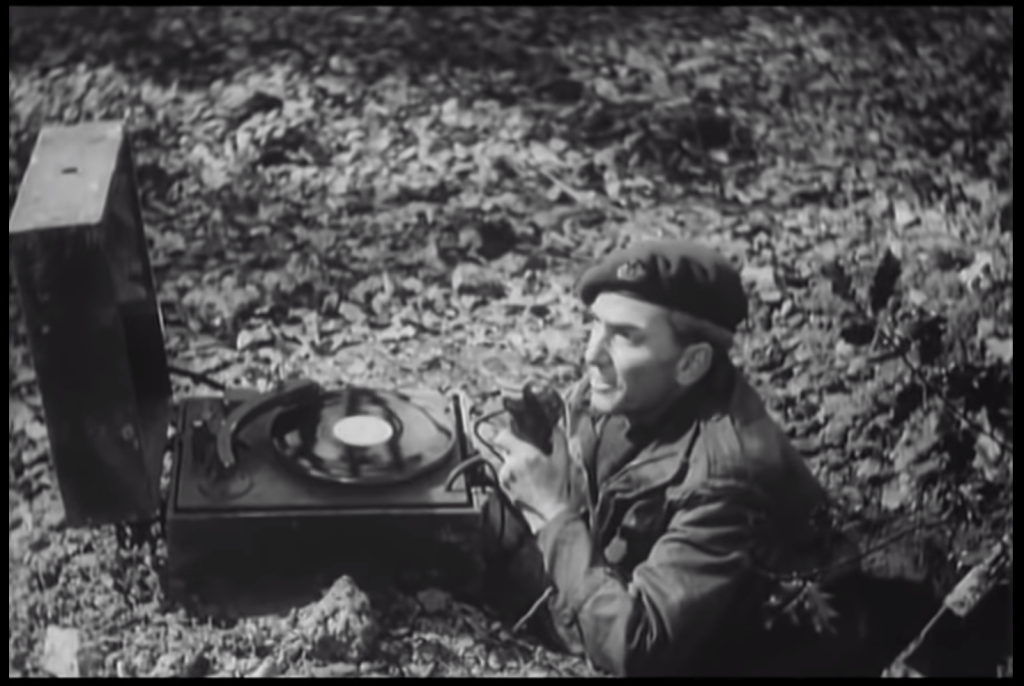
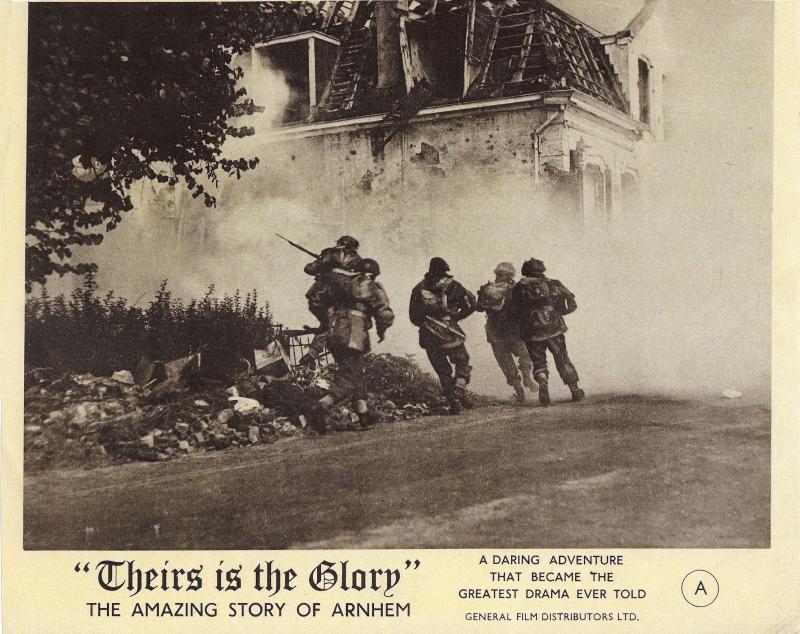
Perhaps the most important and realistic appearance was its first, in the fascinating 1946 film ‘Theirs Is The Glory‘. It’s a unique film that was filmed entirely on location with from veterans of the battle making up most of the cast and help from the British Army’s Army Film and Photographic Unit.
The PIAT appears twice in the film, scene some PARAs are trying to fight through to Arnhem but have been pinned down by what appears to be a French Char B. As a sidenote captured Char B1’s in German service were present in Arnhem).
‘Theirs Is The Glory’ Film Poster (Airborne Assault – PARA Museum)
The PIAT team are seen to move to the flank to get a good shot at Char B. The short scene gives a good indication of how the No.2 would load the PIAT as well as showing the rate of fire possible – a good team could get off five rounds a minute. Theirs Is the Glory also features another brilliant PIAT scene with Corporal Dixon seen knocking out a Panther
PIAT Team in action in ‘Theirs Is The Glory’
I would highly recommend both films as they are both interesting depictions of the battle and both good representations of the PIAT in action.
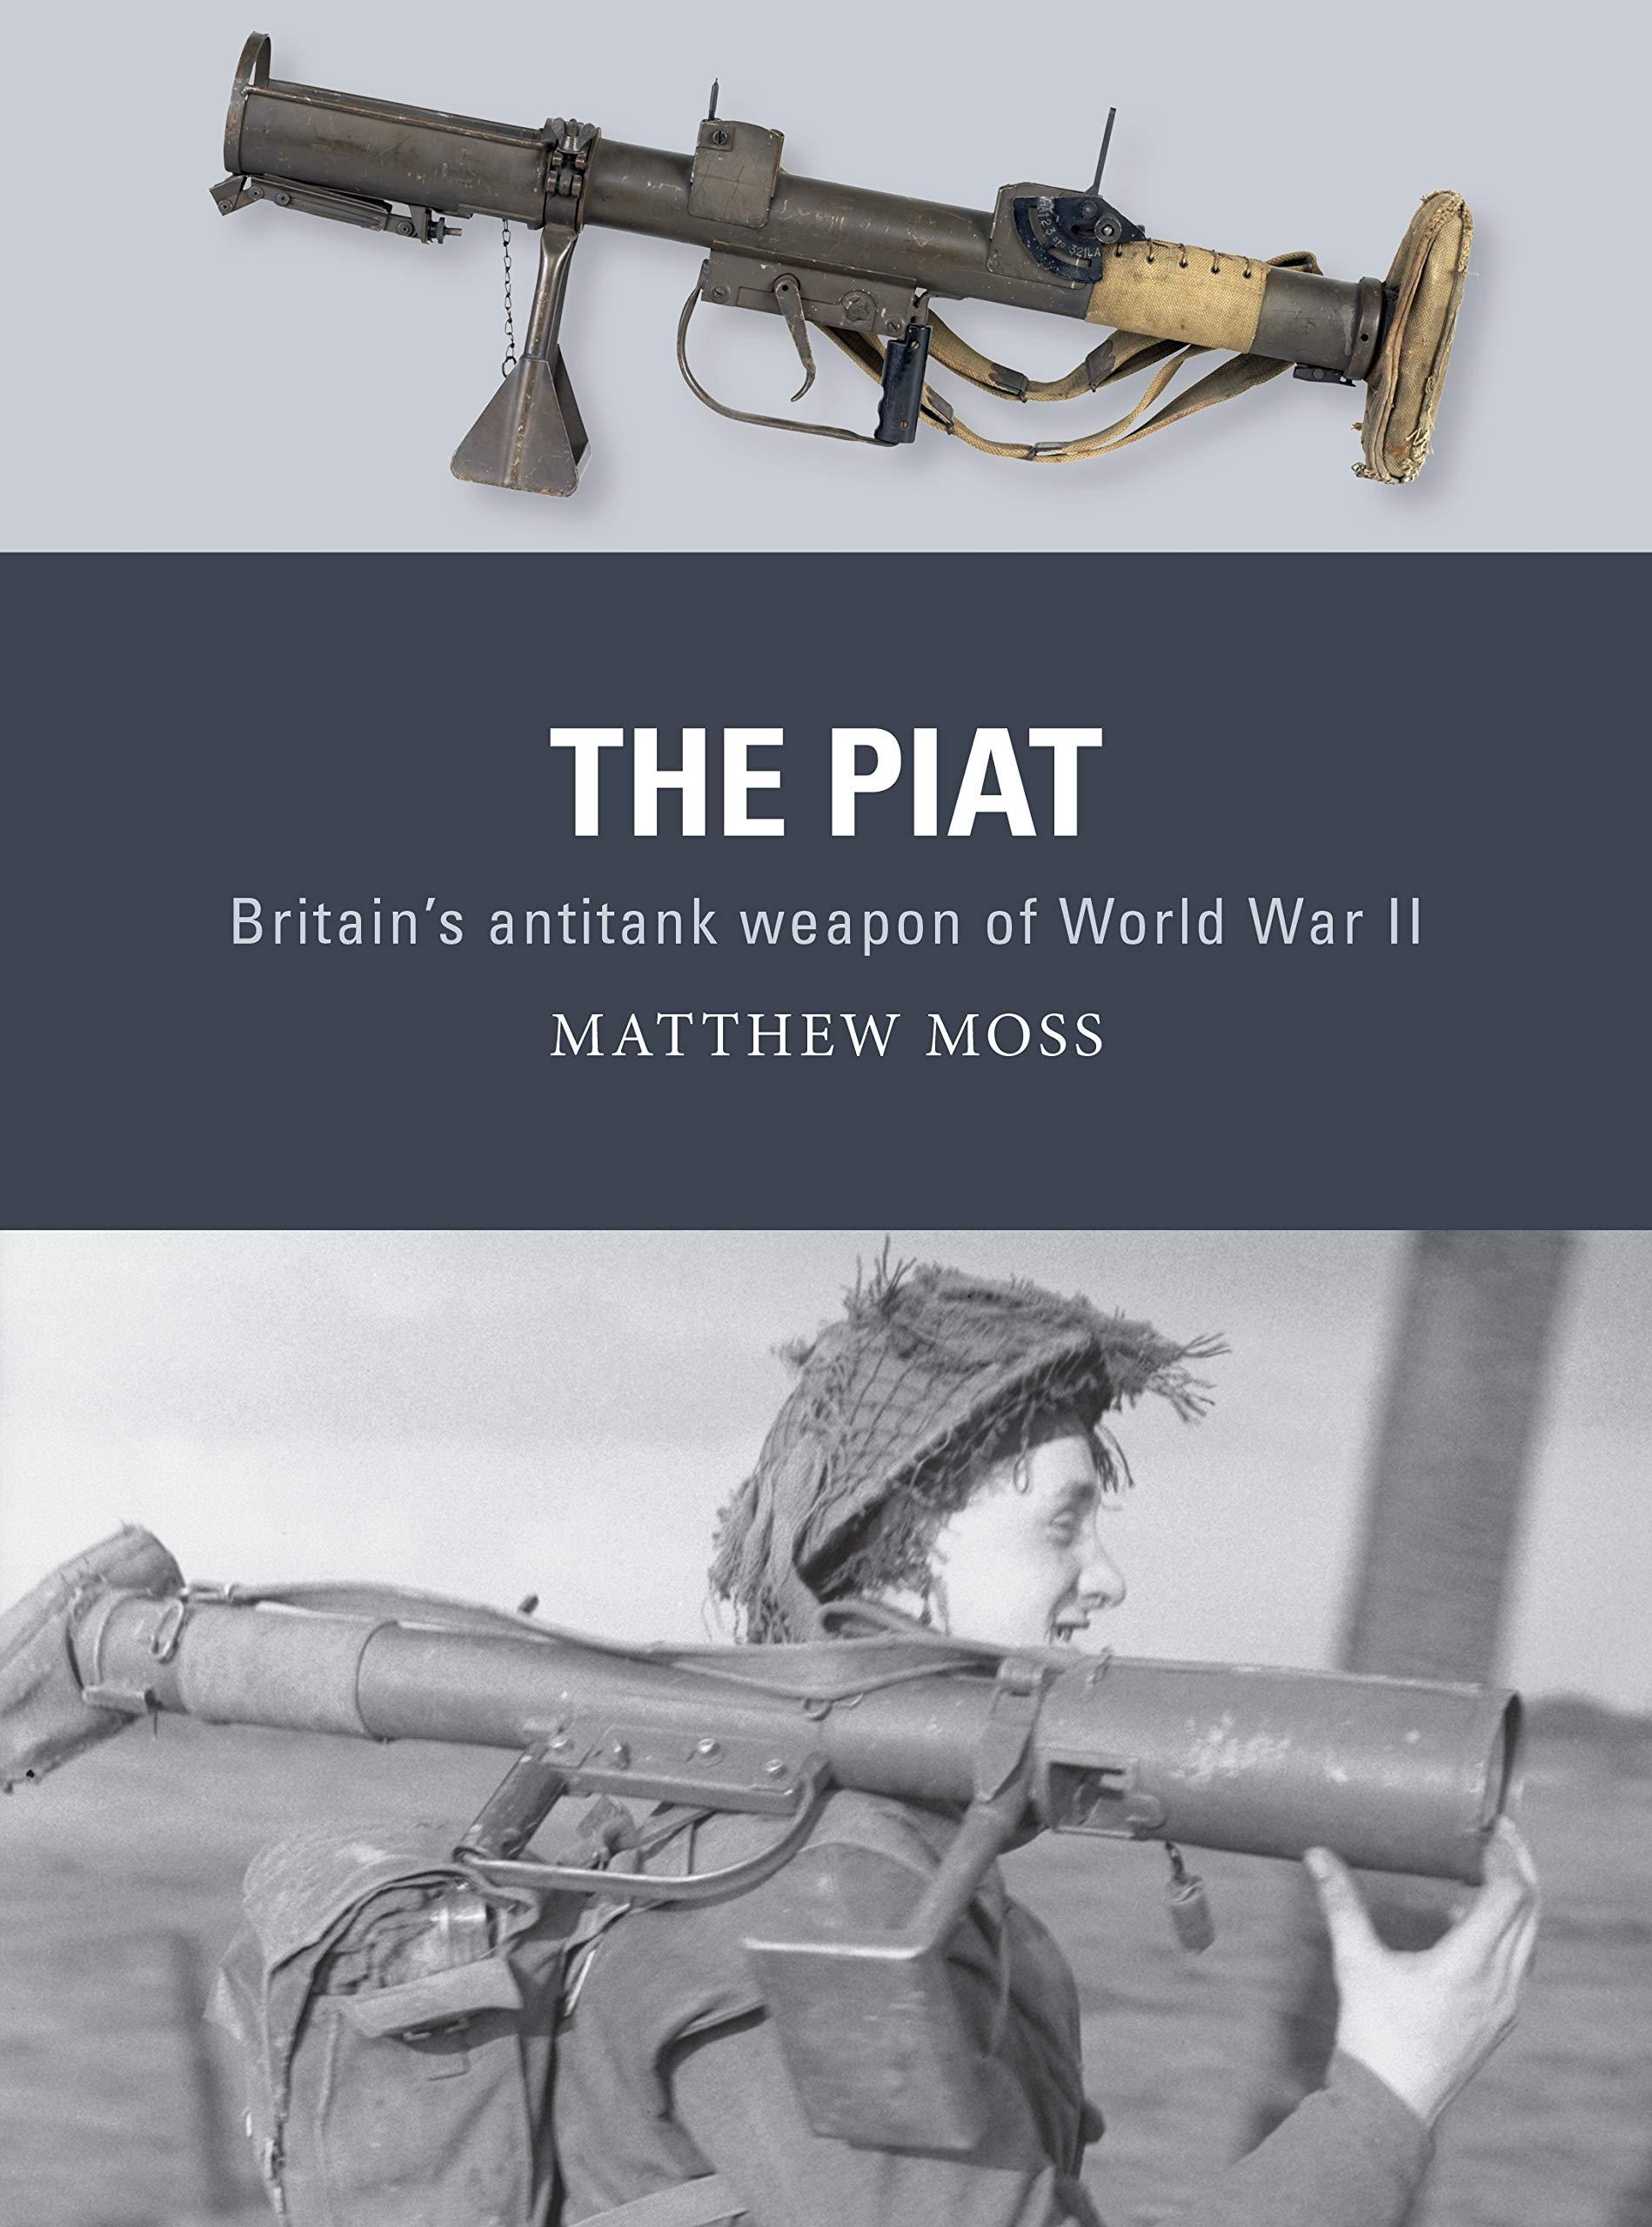
I’m very excited to say that my second book has been published! It looks at the much maligned and much misunderstood PIAT – Projector, Infantry, Anti-Tank.
The book is available from retailers from the 20th August in the UK/Europe and the 22nd September in the US – but you can order a copy from me now regardless of location. I filmed a short video to show you the book and talk a bit about the process of writing it, check that out above.
The PIAT was the British infantry’s primary anti-tank weapon of the second half of the Second World War. Unlike the better known US Bazooka the PIAT wasn’t a rocket launcher – it was a spigot mortar. Throwing a 2.5lb bomb, containing a shaped charge capable of penetrating up to 4 inches of armour. Thrown from the spigot by a propellant charge in the base of the bomb, it used a powerful spring to soak up the weapon’s heavy recoil and power its action.
With a limited range the PIAT’s users had to be incredibly brave. This becomes immediately obvious when we see just how many Victoria Crosses, Military Medals and Distinguished Conduct Medals were awarded to men who used the PIAT in action.
The book includes numerous accounts of how the PIAT was used and how explores just how effective it was. I have spent the past 18 months researching and writing the book and it is great to finally see a copy in person and know it’s now available.
The book includes brand new information dug up from in-depth archival research, never before seen photographs of the PIAT in development and in-service history and it also includes some gorgeous illustrations by Adam Hook and an informative cutaway graphic by Alan Gilliland.
If you order a book directly from me I’ll also include this custom illustrated postcard with a design featuring a PIAT and the famous line from A Bridge Too Far.
It’s immensely exciting to know the book is out in the world for all too enjoy. If you’d like a copy of my new book looking at the PIAT’s design, development and operational history you can order one directly from me here!
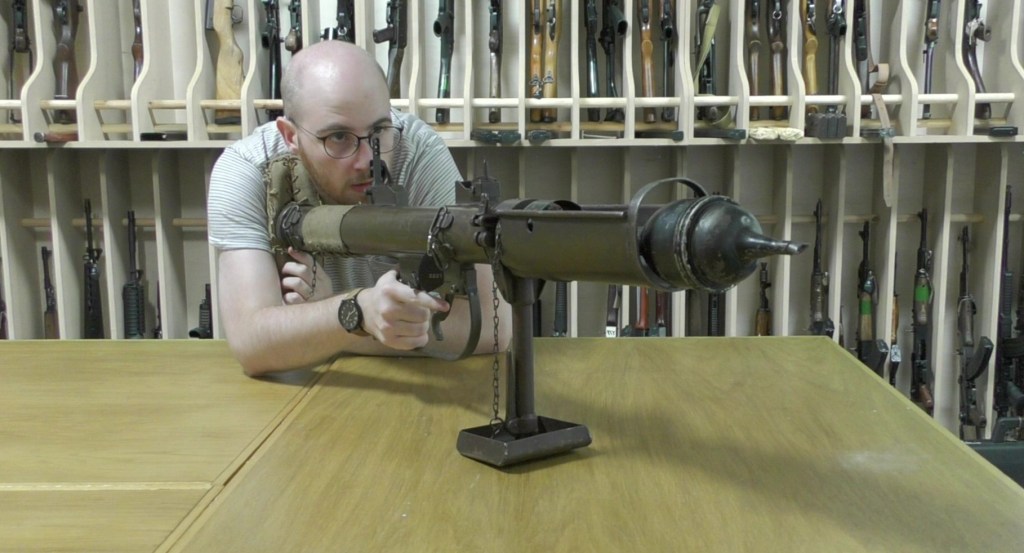
Me, bringing up the PIAT…
Thanks for your support and if you pick up a copy of the book I really hope you enjoy it!