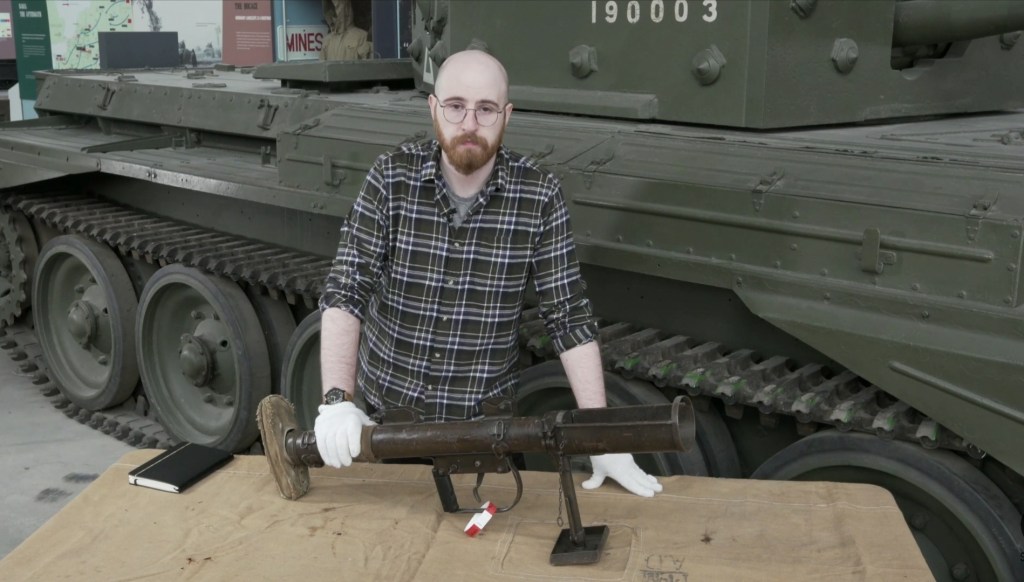
Earlier this year I had the pleasure of travelling to the Tank Museum to film some segments for the new documentary on the Rhineland Campaign – ‘Rhineland 45‘. We looked at various small arms used during the campaign ranging from Panzerfausts and Bazookas to MG-42s and M1A1 carbines.
Not all of the segments we filmed discussing the weapons could be included in the finished documentary, so I’m pleased to share a couple here. This one Brings Up The PIAT!
The Projector, Infantry, Anti-Tank was used extensively during Operations Veritable and Varsity in March 1945. British and Canadian troops put them to use against enemy armoured vehicles and defensive positions within the forests, towns and villages of the Rhineland.
If you’d like a copy of my book on the PIAT you can pick one up here.
Thanks again to Real Time History for inviting me to contribute, check out the documentary here.
If you enjoyed this video and article please consider supporting our work here. We have some great perks available for Patreon Supporters. Thank you for your support!
From the late 1960s into the 1990s, Northern Ireland suffered a long period of sectarian violence, commonly known as The Troubles. Without going into too much detail about the conflict, other sources do a much better job than I can today, the violence saw Irish Republican paramilitary groups, Ulster Loyalist paramilitary groups and British security forces involved in a protracted low-level conflict with a Republican insurgency fighting not just British forces but Loyalist paramilitaries like the Ulster Volunteer Force (UVF), the Ulster Protestant Volunteers (UPV) and the Ulster Defence Association (UDA). This article/video has no intention to comment on the conflict itself, merely examine a weapon produced during the period.
This copy or clone of a Sterling Mk4 / L2A3 submachine gun is believed to have been assembled by Loyalist paramilitaries although which group and its origins are unclear. Loyalist groups during the 60s and 70s tended to be less well armed and relied more heavily on improvised small arms and weapons stolen from military and police armouries and personnel than Republican groups. When tensions rose in the late 1960s, the Loyalists were largely equipped with obsolete and outdated weapons.
Right side view of the Sterling clone (Matthew Moss)
Sammy Duddy, a member of an early Loyalist group, the Westland Defence Association, and later a press officer for the Ulster Defence Association, recalled the dire state of their arsenal at that time:
“[…] we had no guns. The IRA had automatics [machine-guns], high-velocity sniper rifles, powerful pistols, the lot, but we had fuck all. There were virtually no guns on the Loyalist side. The only weapons we had were baseball bats and I just thought to myself, ‘what the fuck are we going to do when they [the IRA] come in with their machine-guns? Throw bats at them?’”
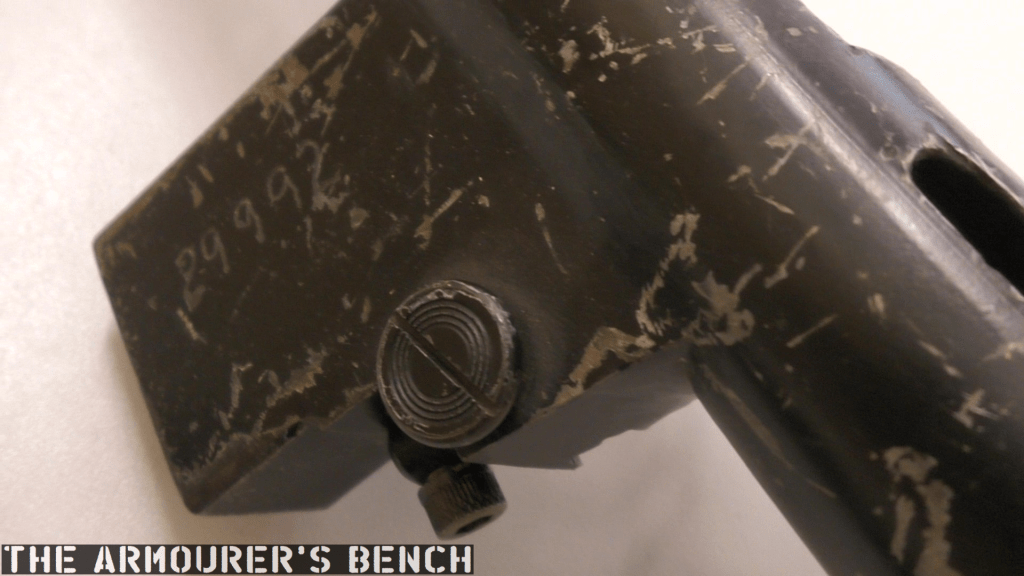
The Ulster Volunteer Force (or UVF) took to stealing what weapons and spare parts they could from the British military and Royal Ulster Constabulary. Weapons assembled from damaged captured Sterlings and Sterling spare parts kits became common. In this case, this weapon has a number of cannibalised original Sterling parts which have been paired with a craft-made receiver tube. From examination we can see that the weapon’s end cap has a Sterling part number stamp ‘CR110’ inside. Similarly the weapon has a factory-made plastic grip. Other factory made parts include the helically grooved bolt, the two recoil springs and the charging handle. There is also seemingly a factory-made trigger group and magazine release button. The magazine is well sized and utilises various parts from a Sterling’s magazine release including the button, an set screw and catch piece.
The weapon uses a Sterling’s factory-made pistol grip and trigger mechanism – a remarkably sophisticated craft-made weapon (Matthew Moss)
The trigger assembly housing is welded and ground smooth where it joins with the tube receiver. On factory-made guns there is a visible seam. The poorer quality tube steel of the receiver also appears to have drooped or bent a little around the middle of the weapon. The holes in the barrel shroud are of uniform size but they are roughly drilled and not equally spaced. At the front of the receiver we can see they have retained the barrel with a pair of large bolts, suggesting that the barrel may have been factory made too. There is now end cap catch at the rear nor provision for a folding stock either. While whoever made the receiver tube went to the trouble of added hand stops found on the actual Sterling they are clearly only lightly welded on.
Close up of the weapon’s magazine housing, with salvaged Sterling magazine release button (Matthew Moss)
Another difference is the absence of a bayonet lug on the left side of the barrel shroud, and a much cruder fixed sight sat within a U-shaped piece of metal welded to the tube receiver – to act as a front sight protector. The factory-made Sterling’s front sight is adjustable and the sight protectors are folded forward and aligned across the tube receiver. The rear sight and its protectors appears to have sheared off at some point. The only marking on the weapon, ‘29992’, is crudely electro pencilled on the top of the magazine housing, where you’d normally see markings saying ‘Sterling Mk4’ or ‘L2A3’. When that crude serial number was added is unclear. The black paint on the receiver is wearing thin and we can clearly see some file marks in places.
Hundreds of craft-made submachine guns were built to feed from Sterling and Sten magazines and there are numerous surviving examples of guns made from box tubing – often parts were clandestinely made in Northern Ireland’s factories and at shipyards like Harland & Wolf in Belfast – giving rise to the name ‘shipyard special’. Other nicknames included ‘rattlers’ and table leg guns.
Left side view of the Sterling clone (Matthew Moss)
The origins and story behind this particular weapon remain unknown, it is today part of a UK Ministry of Defence collection and said to have been found in Northern Ireland during the Troubles. Regardless it’s a very interesting piece of clandestine engineering which shows considerable skill in its assembly. Which is unsurprising as there are numerous accounts of skilled machinists working on illegal firearms parts during the period.
If you enjoyed this video and article please consider supporting our work here. We have some great perks available for Patreon Supporters. You can also support us via one-time donations here.Thank you for your support!
Bibliography:
The Northern Irish troubles | This Week | 1972, Thames TV, (source)
Terminal Effects: The Guns of the Loyalist Paramilitaries, Balaclava Street, (source)
Improvised Weapons of the Irish Underground (Ulster), D. Shea, Small Arms Review, (source)
Beyond State Control: Improvised and Craft-produced Small Arms and Light Weapons, G. Hays and N.R. Jenzen-Jones, Small Arms Survey, (source)
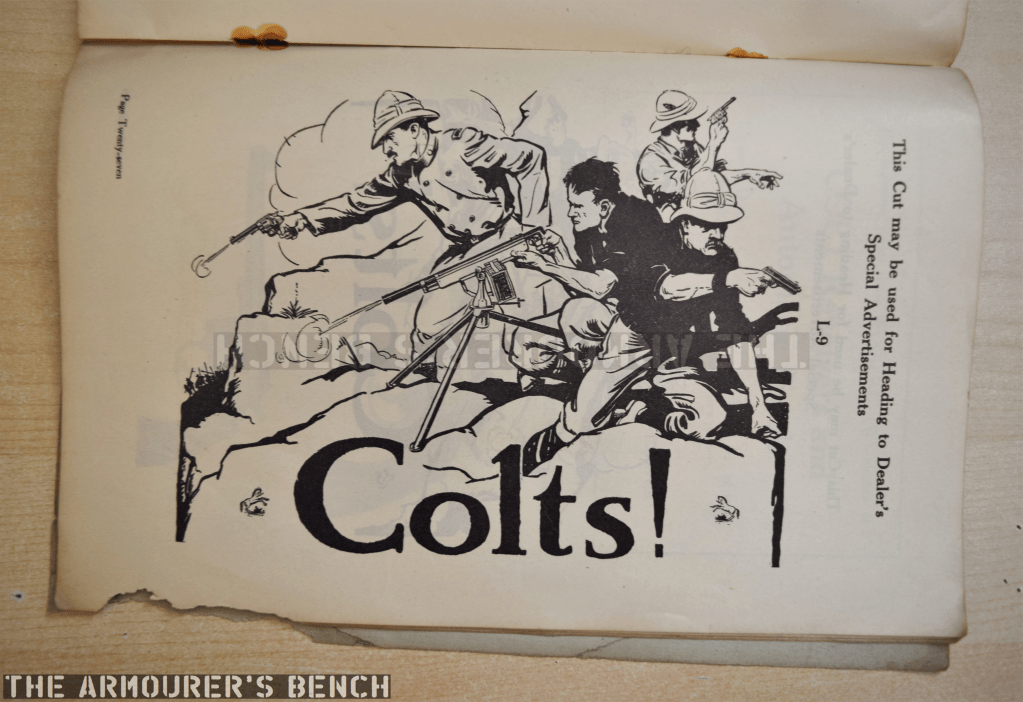
In this video we’re taking a look at something very rare, a pre-1911 catalogue produced by Colt. But it isn’t a catalogue to order guns from. Instead, it’s a catalogue to order gun advertisements from! Old firearms ad from this period are fascinating and give us an insight into who markets company’s were aiming their products at.
The catalogue includes illustrations of pistols and entire print ads which could be printed locally. It covers most of the commercial Colt line ranging from Colt Model 1908 Vest Pocket pistols, to Colt Police Positive revolvers and Colt’s military automatic pistols.
New fangled Colt automatics (Matthew Moss)
The catalogue’s introduction explains Colt’s advertising strategy, saying:
“we advertise in the big national mediums to CREATE A DEMAND ON YOU for our arms; these advertisements are read by thousands of perspective customers IN YOUR LOCALITY, therefore YOU can obtain the benefit of SALE by local advertising.” It’s a sound enough strategy.
Only one ad includes a Colt product that isn’t a pistol. The ad above features an illustration which includes John Browning’s first machine gun, the Colt-produced Model 1895. It’s an evocative advert including revolvers, a semi-automatic pistol and the 1895.
Colt Model 1907 Military pistols, the predecessor of the 1911 (Matthew Moss)
One of my favourite parts of the catalogue covers Colt’s burgeoning automatic pistol line. This section actually helps us date the catalogue as there are no 1911s. It includes the Colt 1907 Military, the Colt 1902 Military, the Colt 1903 Pocket Hammer and the Colt 1903/1908 Pocket Hammerless automatic pistols.
Some of the illustrations of Colt’s revolvers available for printing (Matthew Moss)
The catalogue includes printable illustrations of the Colt ‘New Service’, the Colt ‘Army Special’, the Officers Model Target, the Police Positive Special, Police Positive and Police Positive Target. As well as some classics, with a full page of Colt Single Action Army revolvers.
Some cutaway diagrams of the Colt Pocket Hammerless (Matthew Moss)
The Colt advertisement catalogue is now part of our reference collection and we were able to bring this video/article thanks to the support of our Patrons. We have many more videos on important and interesting primary source materials in the works. If you enjoy our work please consider supporting us via Patreon for just a $1. Find out more here.
Check out videos on items from our reference collection here.
In this video/article we will examine some rare footage of the Covenanter Bridgelayer in action. The footage is available to watch on the BFIs website and originally comes from the Wessex Film and Sound Archive. The 16mm film was filmed at some time in August 1942 but little else is said about locations in the BFI archive entry for the footage.
The Covenanter Bridgelayer being demonstrated (IWM MH 3674)
The tank’s hull number is visible as T.18434 which I think would make it one of the earliest English Electric-built Covenanters. The covenanter was developed in the late 30s as a cheaper cruiser tank. It entered service in 1940, but saw limited active service – instead being largely used in training roles. The bridge element of the vehicle was a Scissors Bridge 30ft, No. 1. – it was deployed and recovered by a clutch and 2 to 1 reduction gear, it was powered directly from the tank’s engine.
Cruiser Mk V Covenanter III (A13 Mk III) (IWM KID 778)
A US report on the Covenanter Bridgelayer explains how it worked:
“The opening of the bridge begins after the launching mechanism has begun to pivot on the rollers of the launching frame. Since the cables are of fixed length, they act to open the bridge as it is pivoted about the rollers. Having been laid across the obstacle, the bridge is disengaged from the prime-mover [the tank itself]. The bridge is then ready for the passage of other vehicles. To retrieve the bridge, the prime-mover crosses the bridge to the far side of the obstacle, hooks up to the bridge, pulls it back to the traveling position, and is then ready to proceed to the next obstacle.”
Illustrations of the Covenanter Bridgelayer from a US Military Intelligence Service Tactical and Technical Trends report, 1942
The bridge had a span of 34 feet and vehicles up to 30 tons could cross it. It could be deployed in under 3 minutes and in total the bridge and the system which launched it was 3.5 tons. The vehicle had a two man crew, with a driver and a commander.
Above is a British Pathe newsreel that gives us a closer look at some of the Bridgelayer’s mechanism at work.
The US report also noted that “In one case 1,200 successful launchings and recoveries were made by one vehicle without undue maintenance.” The system was only mounted on a small number of Covenanters. One source suggests 20 Covenanter I and 60 Covenanter IV tanks were converted into Bridgelayers. Far more Valentines were equipped with them and subsequently the Churchill AVRE became the British Army’s primary bridging tank.
A later Valentine Bridgelayer in action in Burma, 1945 (IWM)
No location is given for the footage but the presence of a number of barrage balloons to the rear is intriguing! It may have been filmed at the Royal Engineers Establishment at Christchurch or at another demonstration elsewhere. Scissor Bridges, with similar basic designs remain in service with numerous militaries around the world today.
If you enjoyed this video and article please consider supporting our work here. We have some great perks available for Patreon Supporters. You can also support us via one-time donations here.Thank you for your support!
Bibliography:
‘Covenanter: Reservist Tank’, Tank Archives, (source)
‘A Home Guard parade and an inspection by the Duke of Kent’, BFI, (source)
Tactical and Technical Trends, No.15, Dec. 1942, Military Intelligence Service, War Department, (source)
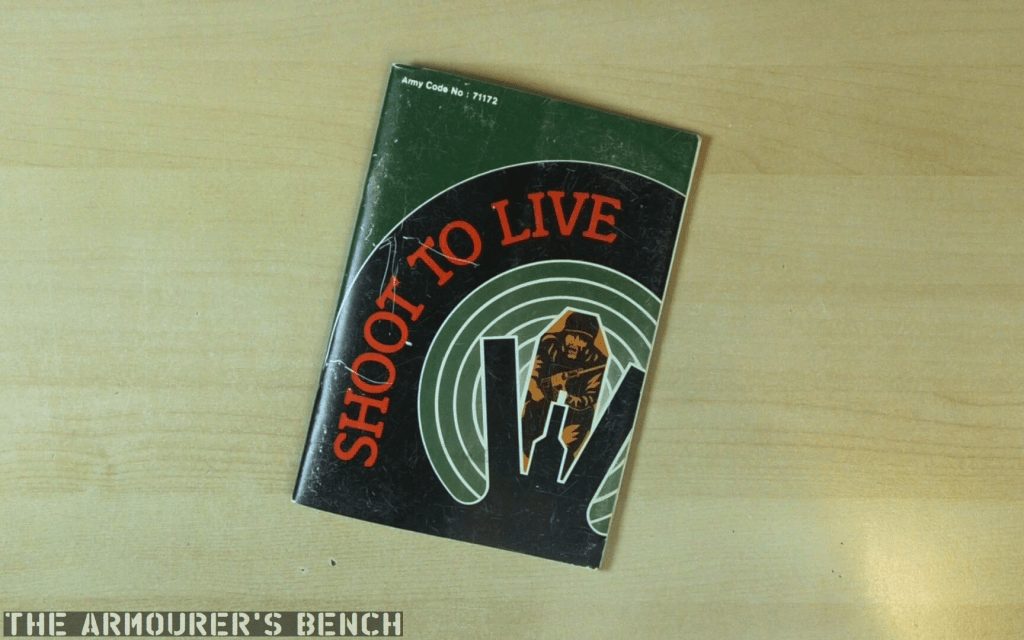
‘Shoot to Live’ is a British Army marksmanship training pamphlet published in the late 1970s and early 1980s
Shoot To Live cover (Matthew Moss)
‘Shoot to kill’ had long been a British Army slogan, appearing in numerous training films and pamphlets. One training film from the 1970s, which features in our video, can be watched here.
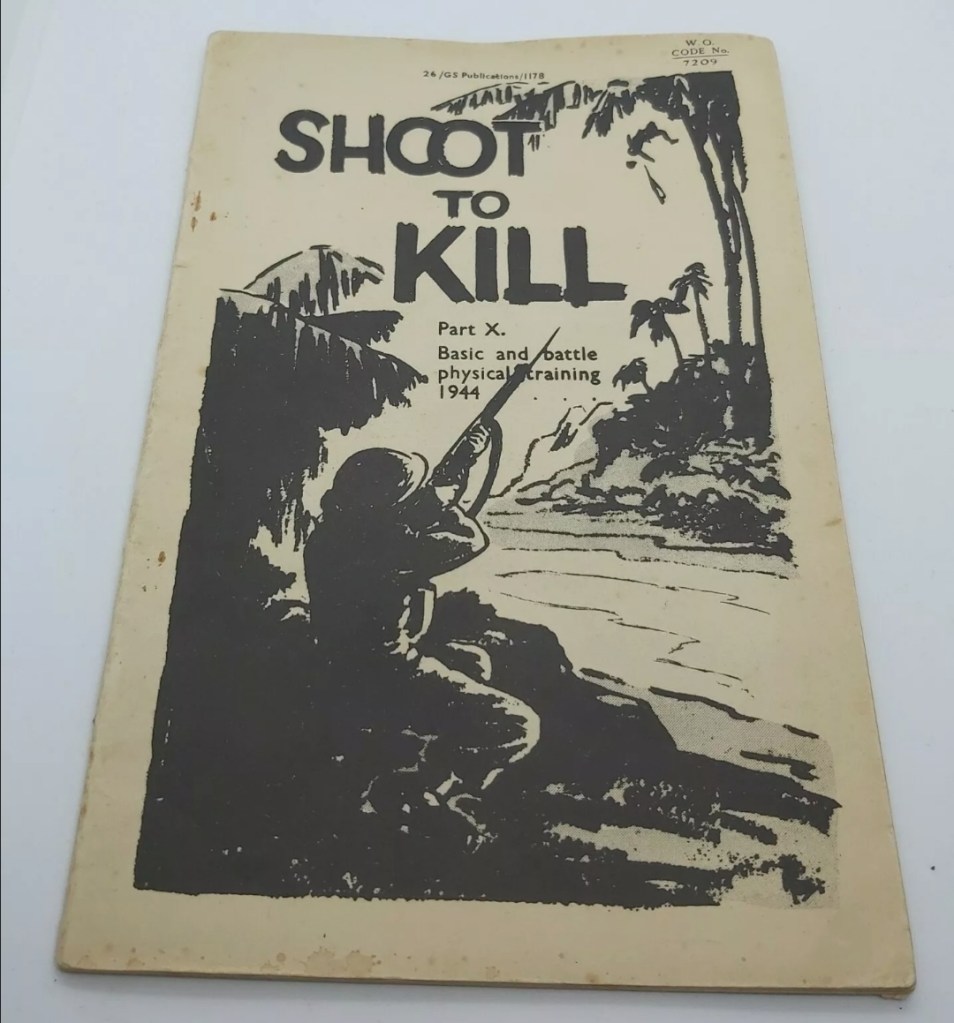
A 1944 British Army manual – ‘Shoot to Kill’ (source)
But in the late 70s and early 80s a new introductory pamphlet on marksmanship filed the old slogan on its head. In the video above we take a look inside an original copy of ‘Shoot To Live’.
Below are some pages from the booklet:
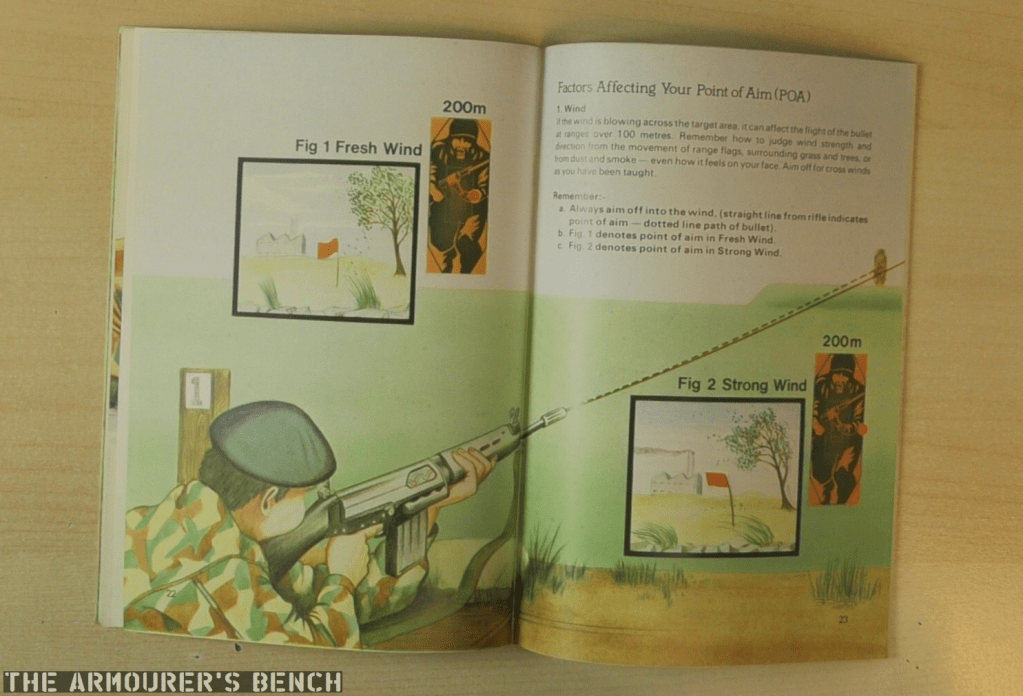
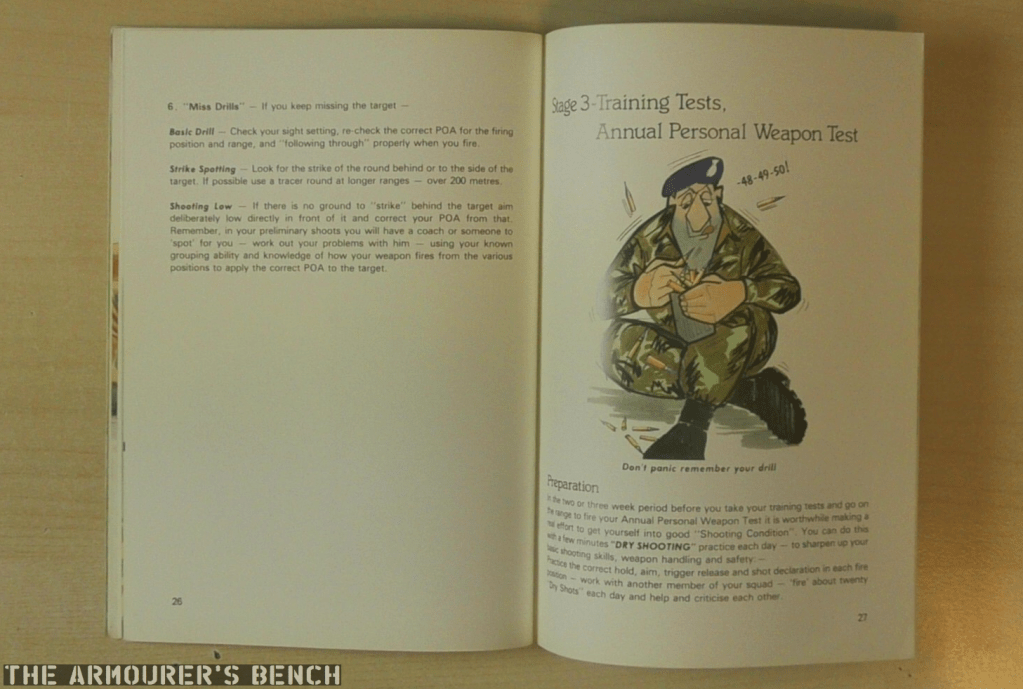
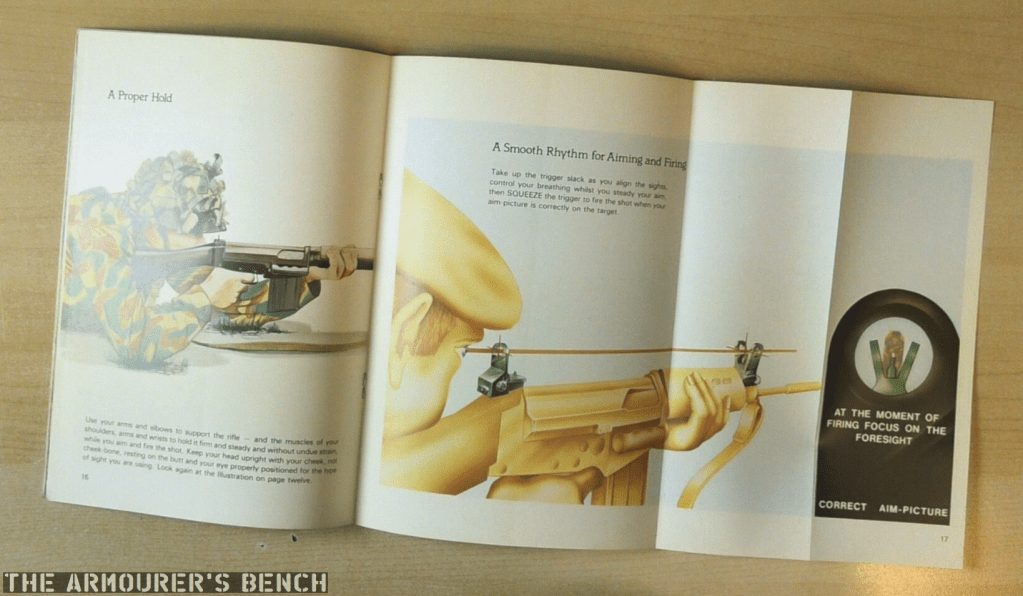
Shoot To Live section on compensating for wind (Matthew Moss)One of the more humorous illustrations from Shoot To Live, showing the loading of a magazine (Matthew Moss)Shoot To Live’s section on proper sight alignment (Matthew Moss)
The ‘Shoot To Live’ manual is now part of our reference collection and we were able to bring this video/article thanks to the support of our Patrons. We have many more videos on important and interesting primary source materials in the works. If you enjoy our work please consider supporting us via Patreon for just a $1. Find out more here.
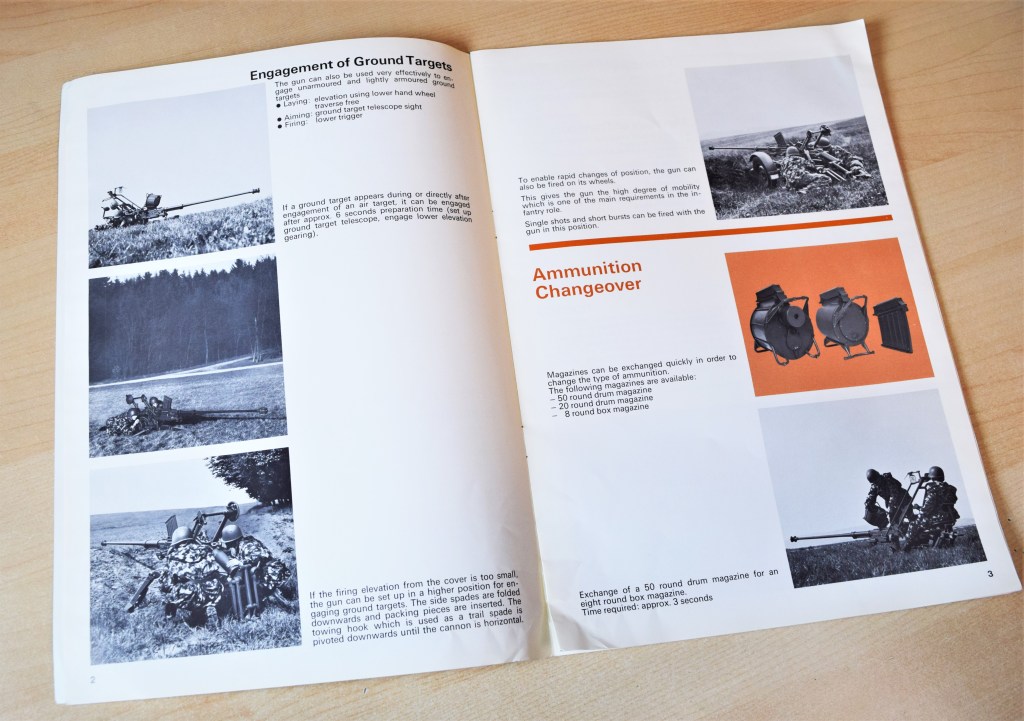
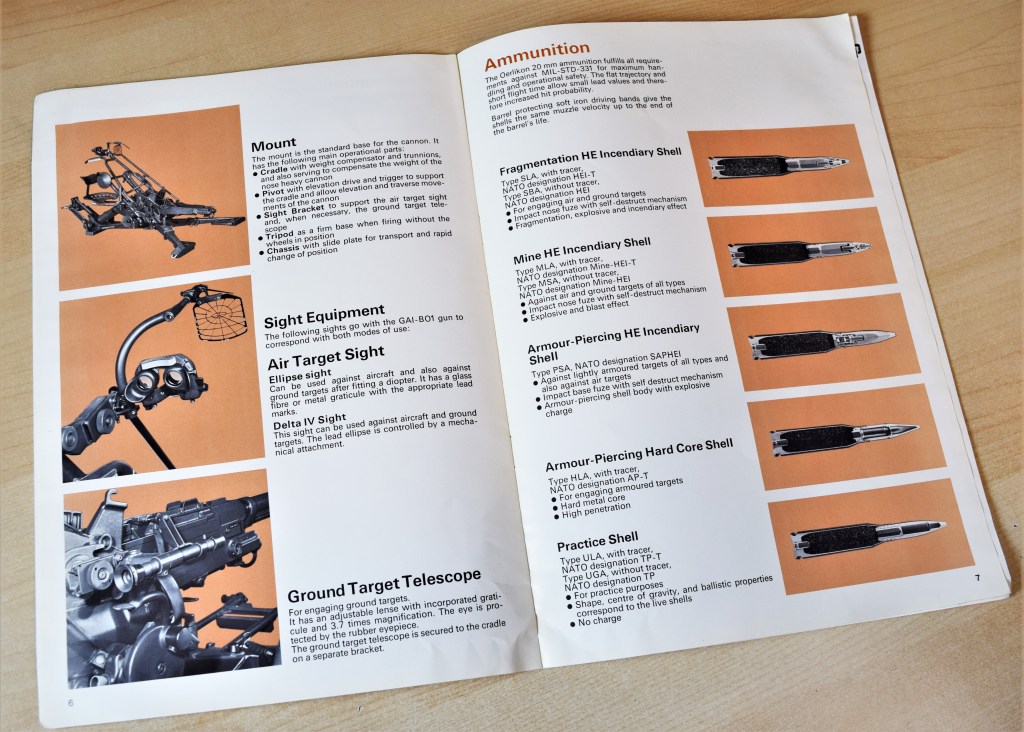
In this video we take a look at an original 1970s brochure for an Oerlikon 20mm Cannon. The booklet, printed in 1974, covers the Type GAI-BO1 – which had previously been designated the 10ILa/5TG. The Swiss Oerlikon had been introduced in the mid-1930s and seen widespread on both sides use during the Second World War.
Engagement of Ground Targets (Matthew Moss)
The brochure covers the anti-aircraft and ground roles the cannon was capable of fulfilling as well as explaining the major assemblies of the weapon and some of the accessories like sights and magazines. The brochure also lays out some of the ammunition available for the Oerlikon, ranging from practice shells to fragmentation HE incendiary and armour-piercing hard core shells. The Oerlikon cannon remains in production and in service with dozens of countries around the world.
Sights, mounts and ammunition (Matthew Moss)
The brochure is now part of our reference collection and we were able to bring this video to you due to the support of our Patrons. We have many more videos on important and interesting primary source material like this brochure in the works. If you enjoy our work please consider supporting us via Patreon. Find out more here.
A couple of weeks ago we looked at some photographs showing an interesting modification seen on a STEN MkII held by Deputy Prime Minister Clement Attlee. The STEN Attlee posed with had a front grip added, something the MkII didn’t typically come with.
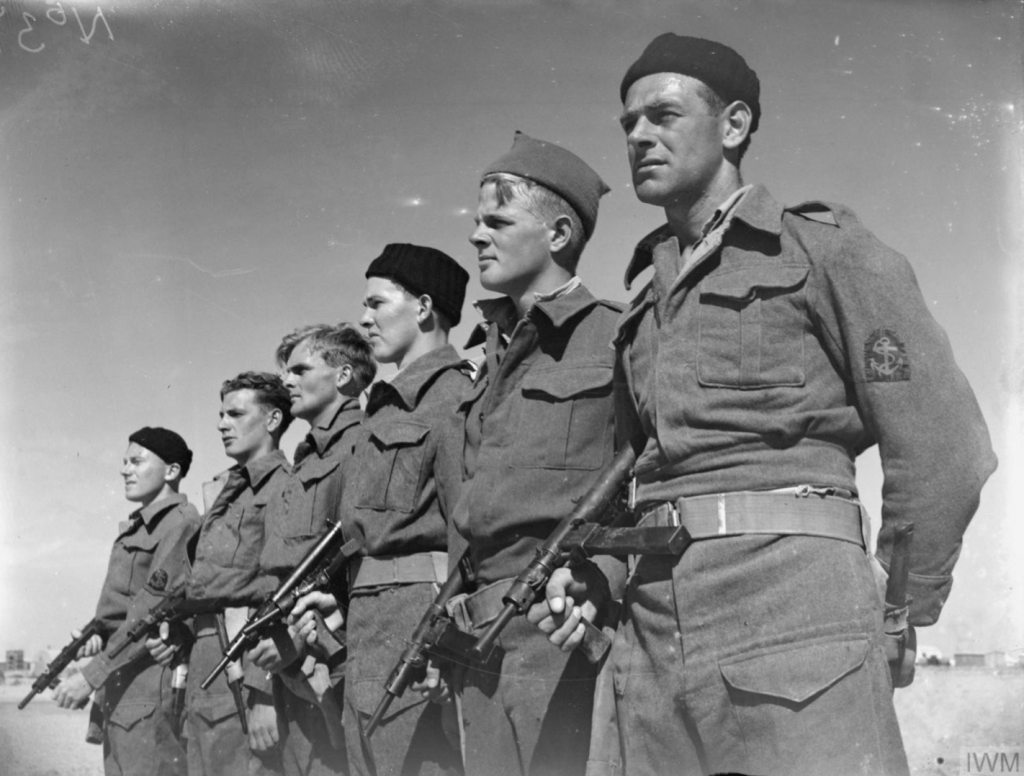
A few people very kindly sent me some other contemporary photos showing other ad hoc STEN front grips so I thought a follow up video was needed. I also found a group of photographs taken in June 1943 at the Combined Training Centre at Kabrit, in Egypt. The photos show groups of Commandos and the Royal Navy’s Naval Beach Parties armed with Stens with a pretty standardised style of front grip.
Commandos on parade with STEN MkIIs equipped with ad-hoc front grip, at Kabrit in June 1943 (IWM A17755)
In these photos we can see the men training with the STENs and the front grips are quite clear. It’s especially interesting in that it isn’t just the Commandos who have the front grips but also men of the Naval Shore Parties. It’s also relatively rare to see STENs in North Africa. You might have seen some of these photos, taken by Royal Navy photographer Lieutenant L.C. Priest, in our video looking at the unusual fighting knives the Commandos are equipped with.
The plethora of photos from Kabrit show a fairly standardised design for the grip. A metal ring, seemingly tightened by a wingnut on the left side and a generous wooden grip that was long enough to fit all four fingers on. The grip appears to have some finger grooves and a fairly standard shape. A photo (see above) of Naval Commandos on parade shows the men with the STENs tucked under their arms, holding the front grips. This is identical to how the STEN MkI with its front grip was paraded with. The photo also gives us a good look at the uniformity of the grips.
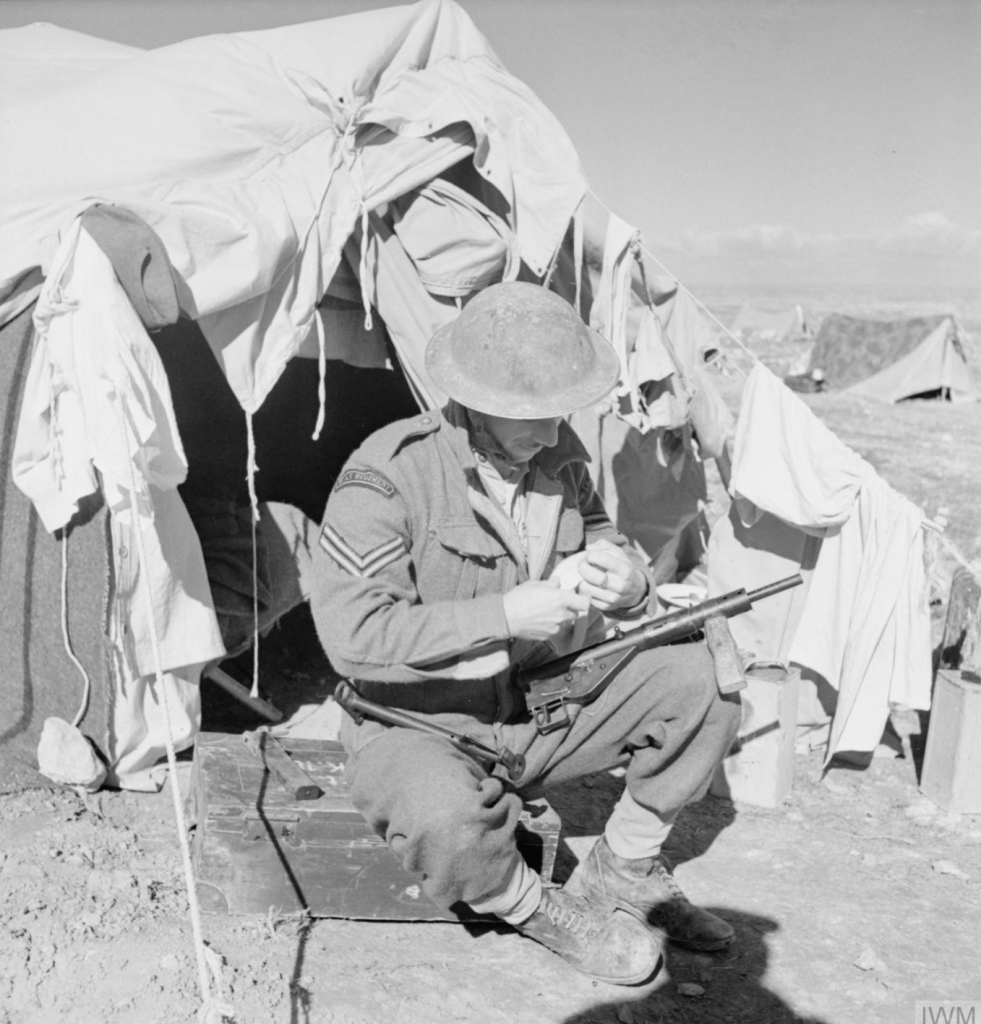
RAF Regiment Corporal cleans his STEN MkII, equipped with a makeshift front grip (IWM CM4296)
While the photos from the Combined Training Centre at Kabrit represent the largest number STEN front grips seen in one place and several units there are a few other photos which are really interesting. First up is this photograph of a Corporal from the RAF Regiment taken in Libya sometime in 1943. The Regiment had been formed just a year earlier. The corporal is sat cleaning his STEN MkII with the butt removed but the bolt still in the weapon. On the barrel nut of his weapon he has a wooden front grip. Again seemingly attached to a metal band around the barrel nut. The wooden grip appears to have some rudimentary finger grooves. Sadly, I couldn’t find any other photos of this Corporal and his STEN. But the design of his front grip is very similar to those seen in the Kabrit training photos and could well be of the same origin.
Finally, we have a photograph from a completely different theatre – Burma. The caption for this photograph reads: “Men of the 2nd York and Lancaster Regiment searching the ruins of a railway station for Japanese snipers, during the advance of 14th Army to Rangoon along the railway corridor, 13 April 1945.” This soldier’s STEN MkII has a grip just in front of the trigger mechanism cover and behind the magazine housing and ejection port. It’s actually in a position close to that of the original STEN MkI’s integral folding pistol grip.
Soldier of the 2nd York and Lancaster Regiment with a STEN MkII outfitted with a homemade front grip, Burma 1945 (IWM SE3804)
At the end of the day the adaptation is a good idea, a front grip provides a means of pulling the weapon into the shoulder and a more natural place to grasp other than the barrel nut, the trigger mechanism housing or the magazine – which was discouraged. It is interesting to note that I’ve yet to see any examples of a MkIII being fitted with a front grip like these.
This is certainly something I’m going to do more research into to see if there’s any documentary reference to the use of front grips like these. With the introduction of the MkV, with its front grip, it seems that the idea was sound enough. If you know of any other examples let me know in the comments!
If you enjoyed this video and article please consider supporting our work here. We have some great perks available for Patreon Supporters. You can also support us via one-time donations here.Thank you for your support!
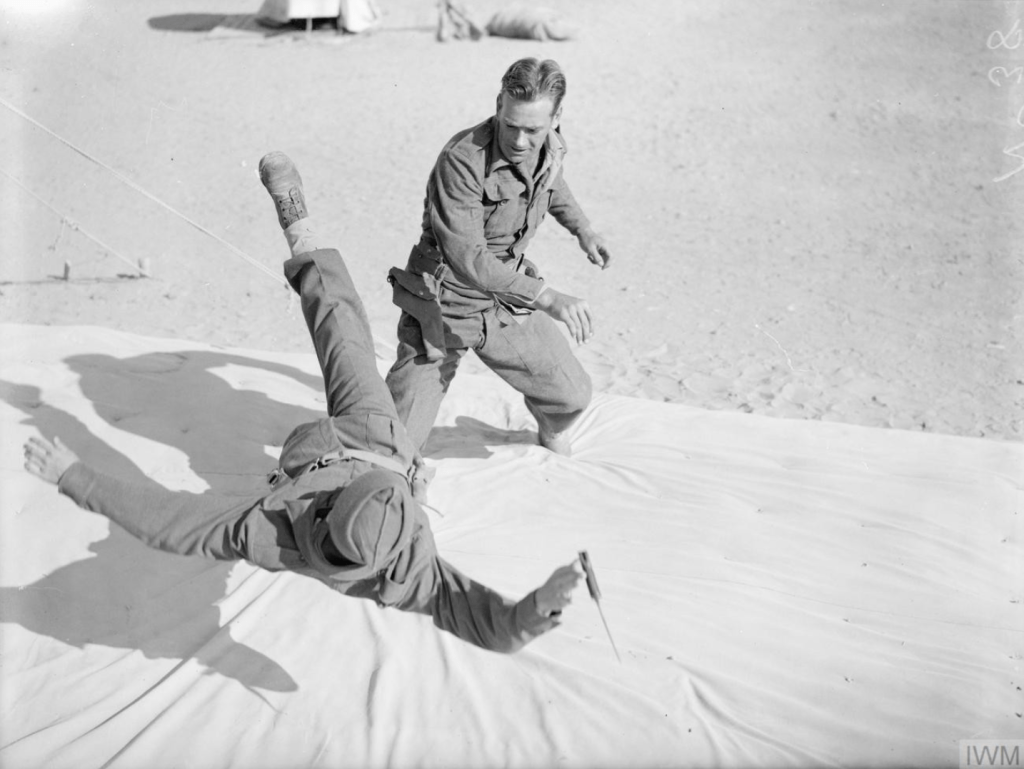
While doing some research for a couple of upcoming videos I came across some photographs of Commandos training, at the Combined Training Centre at Kabrit in Egypt, which showed men equipped with some interesting fighting knives.
Typically when we think of Commandos and fighting knives we think of the Fairbairn-Sykes fighting knife with its stiletto point and cast grip. So much so that it became the iconic symbol of the Commandos.
Well these Royal Navy Commandos appear to be armed with fighting knives crafted from earlier standard issue bayonets. The knives have the standard stiletto blade but quite clearly do not have the Fairbairn-Sykes’ instantly recognisable cast ringed grip.
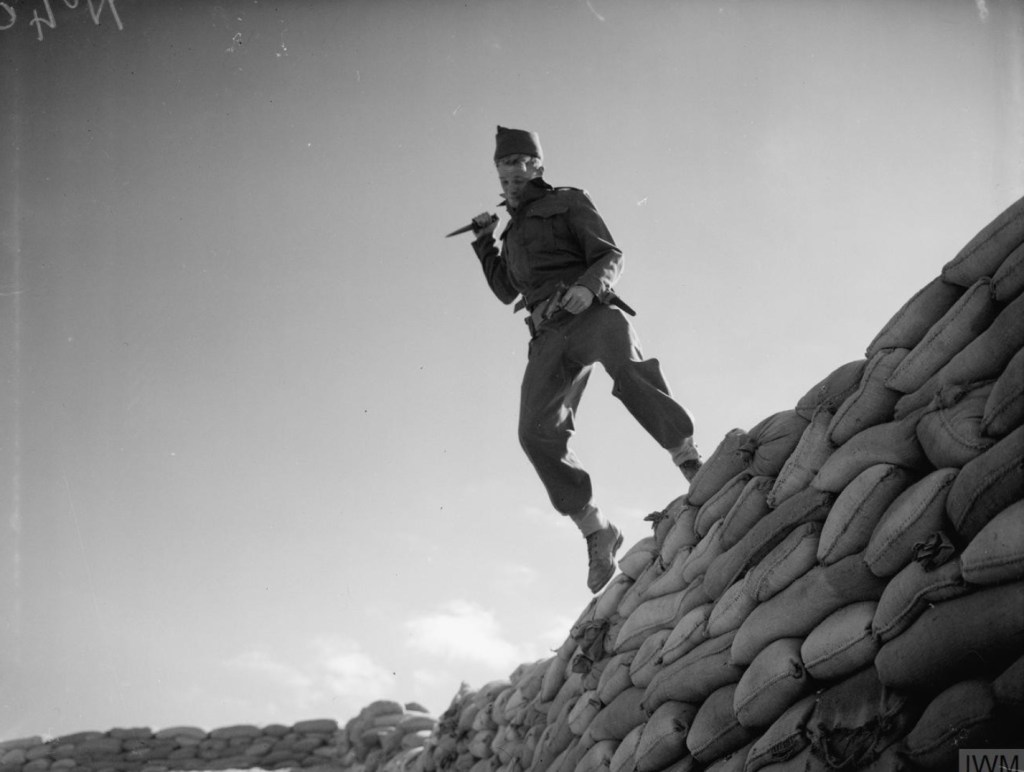
Commandos training in hand to hand combat at Kabrit in June 1943 (IWM)
In the series of photos taken during training at Kabrit, we can see numerous Commandos equipped with them and featuring in some quite dramatic photos from June 1943 – seemingly taken during training for Operation Husky. At first I thought the knives might have been made from the still-in-service 1907 Pattern sword bayonet used by the SMLE No.1 Mk.3. In some of the photos the scabbards appear to look like shortened 1907 bayonet scabbards with the same brass fittings and the knives appear to be retained by Pattern 1908 webbing bayonet frogs.
I also thought they might have been adapted from the even earlier 1888 Pattern bayonet for the Lee-Metford. But while they have a scroll to the front of their quillon/cross guard the shape of the pommel and the bayonet attachment point clearly differ.
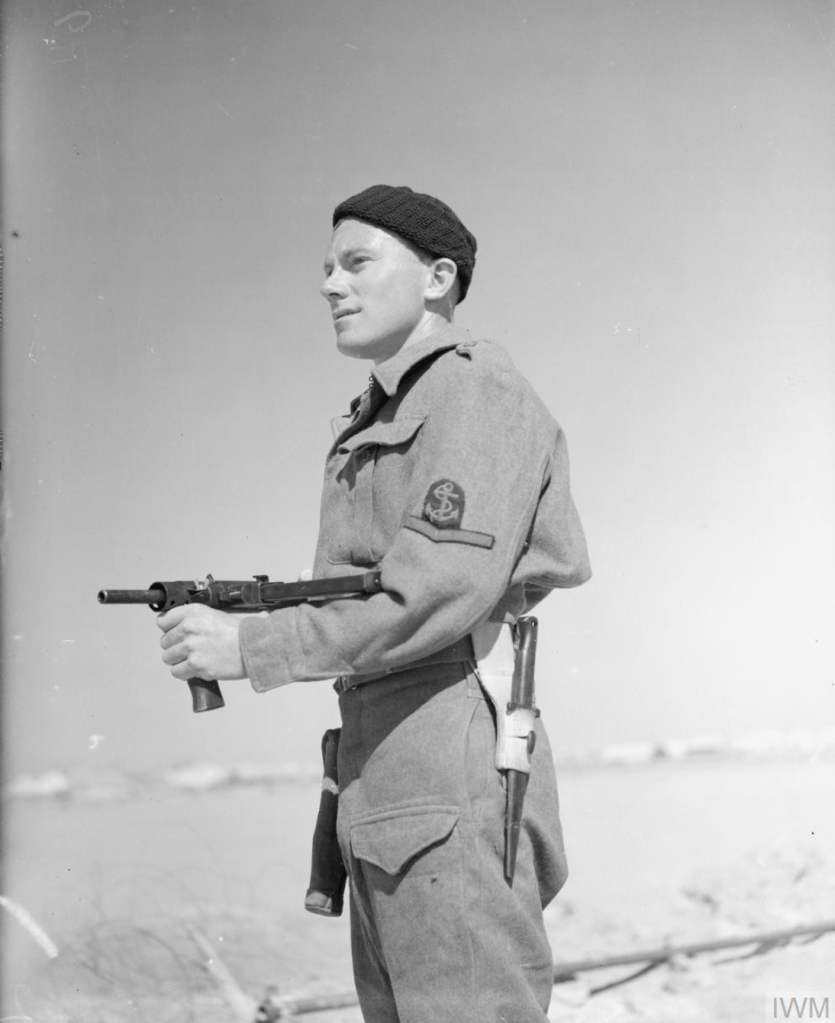
Naval commando with STEN MkII (with curious pistol grip) and a Commando knife made from a 1903 pattern bayonet (IWM)
Not being a bayonet expert I was a little stumped so posted about the photos on twitter and Kevin Dann was kind enough to mention that the knives are in Ron Flook’s book on British & Commonwealth Military Knives. Flook identified the knives as adapted 1903 Pattern Bayonets, originally introduced with the SMLE before the move to a longer bayonet.
Naval commando training June 1943 (IWM)
It seems that these knives were used by Commandos and they are also seen in some photos of SAS operating in the Aegean. I’m not sure who made these knives, some sources mention Wilkinson Sword making some F/S style knives from old 1888 and 1903 bayonet blades but state these had different grips. Perhaps these were put together by a unit armourer if proper issue knives weren’t available.
If you enjoyed this video and article please consider supporting our work here. We have some great perks available for Patreon Supporters. You can also support us via one-time donations here.Thank you for your support!
Bibliography:
British and Commonwealth Military Knives, R. Flook (1999)
Fairbairn-Sykes Commando Dagger, L. Thompson (2011)
On the 14th May 1940, the British Government announced the formation of the Local Defence Volunteers. By the summer of 1940 nearly 1.5 million men had volunteered to serve. The force was later renamed the Home Guard in July 1940 but remained under-equipped throughout the summer of 1940. Many of the newly raised militia units had just ‘LDV’ arm bands, some civilian firearms and improvised weapons, as uniforms and service weapons were in short supply.
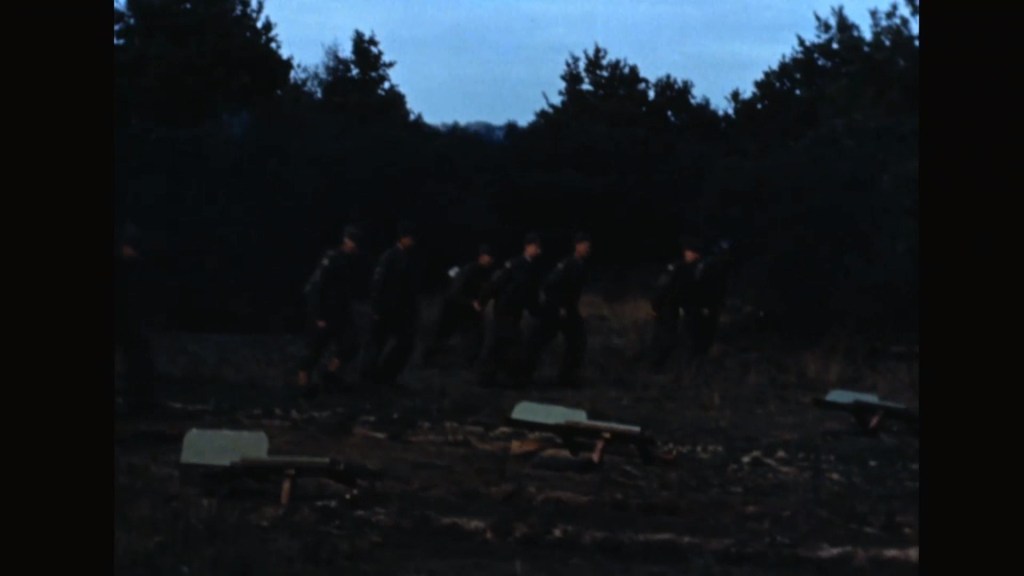
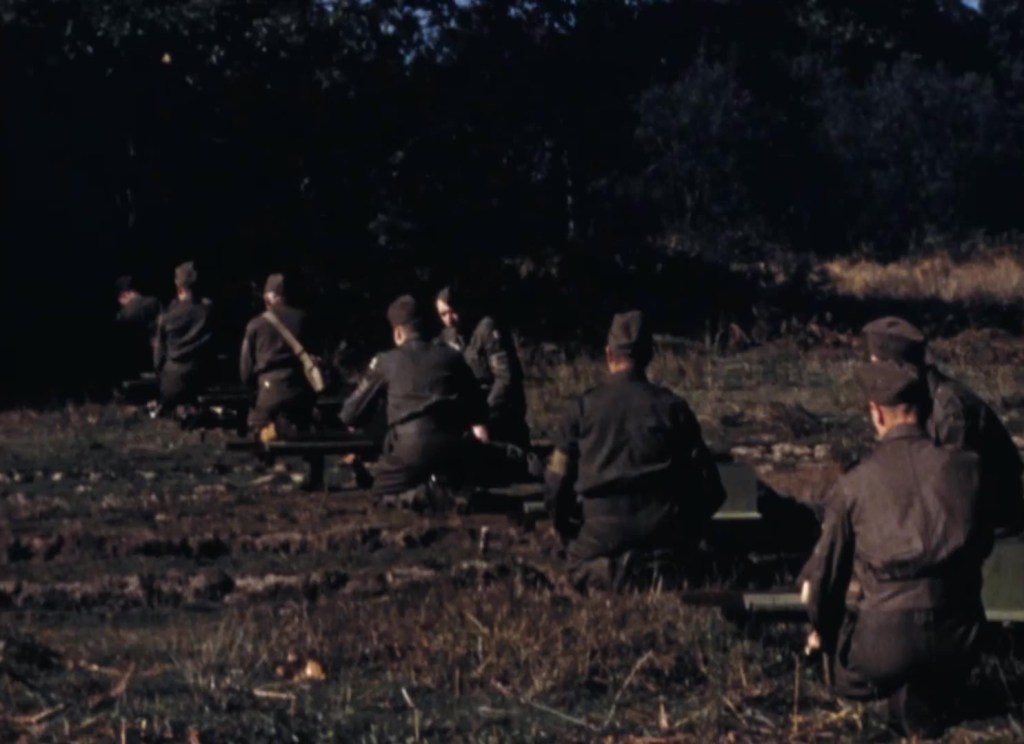
I recently came across a really interesting piece of footage showing a Hampshire Home Guard unit training with an ‘incendiary weapon’. With few heavy weapons available during 1940, some Home Guard units improvised. This remarkable original colour footage appears to show a reasonably effective incendiary weapon of some sort. But beyond what we can see we know very little about the weapon.
The footage shows a battery of five launchers, each seemingly with a 3 man crew. One man aiming, another loading and another firing. The footage is undated but from their arm bands we can see that the men are Home Guard so definitely post July 1940. The men also appear to be quite well equipped with caps, denim trousers and blouses and belts. No webbing is seen but we can potentially date the footage to between late 1940 and mid-1941.
Crews dash to their launchers. Note the rifle stock-shaped pieces to the side of the weapons which appear to have been used to aim the launcher
The incendiary weapon itself is extremely intriguing! I haven’t seen a similar weapon before and I couldn’t find any direct reference to it in the available original documents, newspapers or photos. The footage comes from the Wessex Film and Sound Archive, it is described as showing Home Guard men from Swanmore, a rural village in Hampshire, demonstrating the weapons. Before the incendiary weapon is demonstrated we see a company sized force of Home Guard parading, without rifles or other equipment, and then a single Home Guard member demonstrates loading an SMLE. From the footage we can get an idea of how the weapon would have worked.
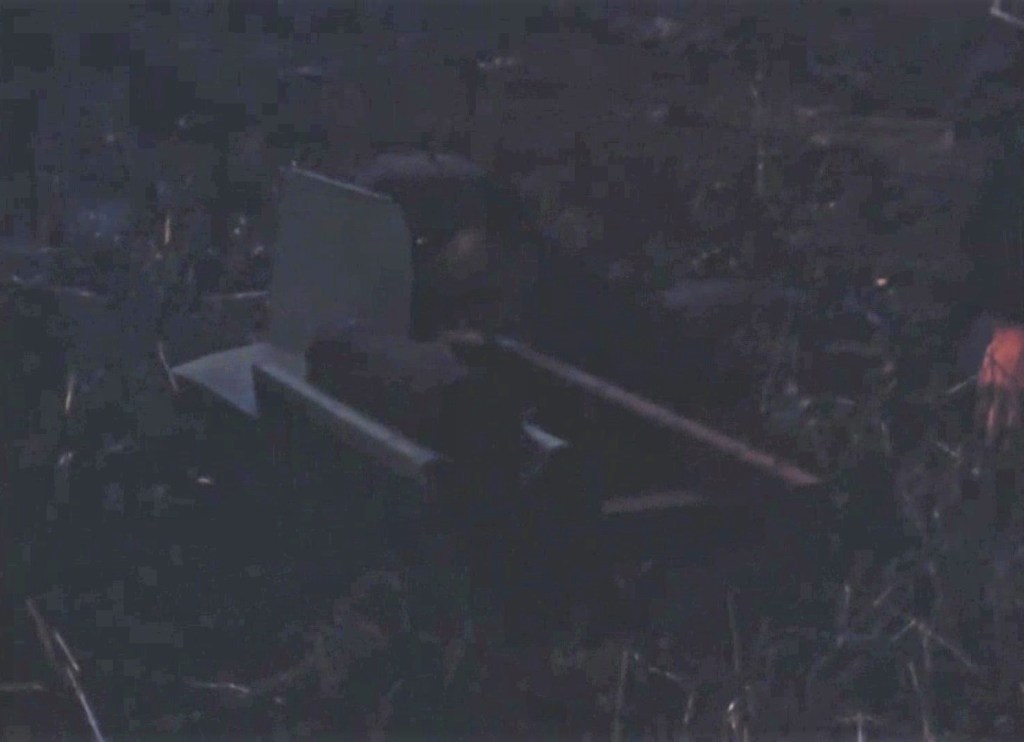
Three-man crews sit by their weapons note the troughs projecting from the front of the launchers
The men run to the launchers, which appear to be made of wooden boards. Beneath them are rifle stock shaped pieces which the man at the rear seems to shoulder – probably to aim the weapon. The other two crew members kneel either side of the launcher. The footage then cuts away to another angle from the other side and shows one of the kneeling men hitting the rear of the projectile with a hammer. Then with a flash and puff of smoke the projectile launches forward. The man who aimed the weapon appears to have moved away, out of shot. Frustratingly the footage is a bit underexposed and quite dark so we can see too much more detail but we can see that the chap with the hammer is definitely hitting the rear of what looks like a length cylinder. The cylinder shoots to the rear while a projectile fires forward and the launcher’s crew look downrange.
A somewhat low resolution close-up of the launcher. Note the crew member lying behind it aiming it along the wooden piece on the right. The projectile and launch cylinder sit in a trough while behind appears to be a shield to protect the crew member aiming
We then get footage showing what seem to be a series of impacts, likely from the projectile’s fired by the launchers. Then we get another clip of the men running to man the launchers and some more shots of the incendiary weapons exploding. From the available footage its pretty difficult to theorise how the launchers work. They appear to be using an almost proto-recoilless rifle-like principle with the launch cylinder shooting backwards and the projectile leaving the cylinder and firing towards the target. The crew member with a hammer may be hitting a percussion cap to detonate some black powder which projects the incendiary bomb. This system may have been developed to remove the need for a fixed, pressure bearing barrel. Making the weapon much simpler to manufacture.
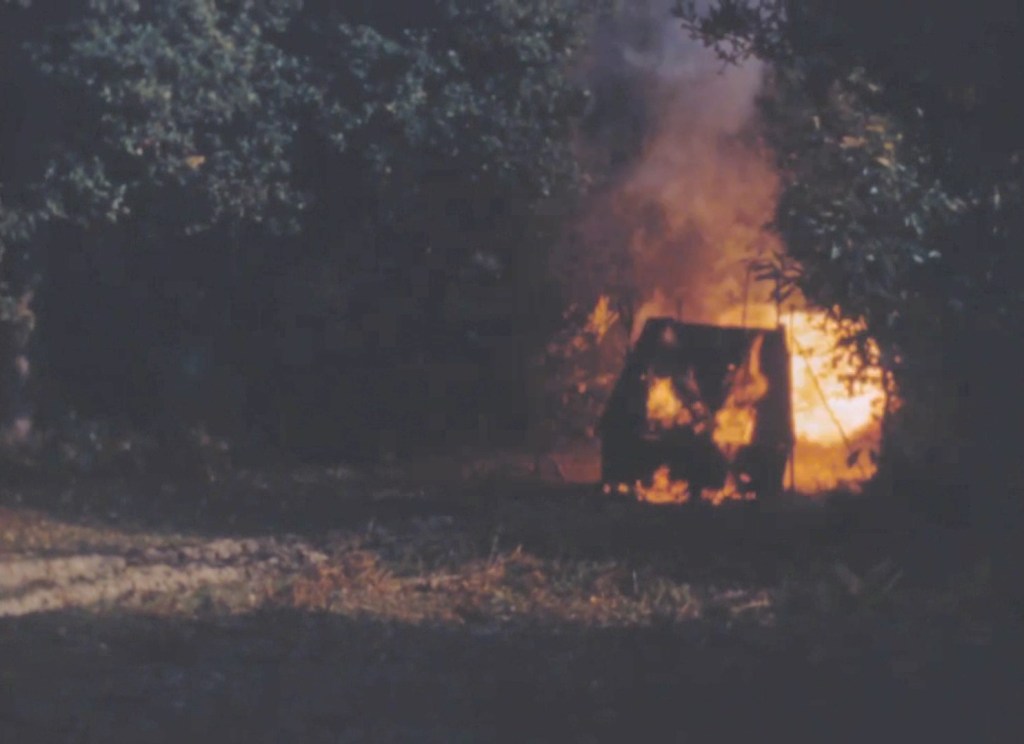
The effect down range – the target well alight
The footage doesn’t give us too much indication of the range of the weapon but it’s distant enough that the men firing the weapon don’t appear to recoil when the projectile hits the target. The incendiary effect downrange is actually quite impressive and a battery of five of the launchers would have been an impressive sight and perhaps quite useful as a road ambush weapon which was something the Home Guard focused heavily on at the time. It wasn’t until later in 1941 that sub-artillery like the Smith Gun, Northover Projector and the Blacker Bombard began to enter service with the Home Guard. Until then some of the units took it upon themselves to create their own weapons, improvising contraptions like the one featured in this video.
Update 28/07/21:
The weapon somewhat fits the description of the ‘Jones-Wise Projector’ shared by David Lister in his book Forgotten Tanks and Guns. Thanks to BettongMI who brought this to my attention in the comment section of the video. The weapon was apparently developed by a pair of Home Guard officers and while turned down for regular service was used by some elements of the Home Guard in southern England, at least until official sub-artillery began to enter service.
If you enjoyed this video and article please consider supporting our work here. We have some great perks available for Patreon Supporters. You can also support us via one-time donations here.Thank you for your support!
Bibliography
Home Guard and home-movies in Swanmore, Wessex Film and Sound Archive via the BFI, (source)
Britain’s Final Defence: Arming the Home Guard, 1940-1944, D. Clarke (2016)
Forgotten Tanks and Guns of the 1920s, 1930s and 1940s, D. Lister (2018)
Today we have a bit of an interesting unpacking/unwrapping video. I’ve saved up a few parcels with some new additions to the TAB reference collection and I thought I’d bring you along for the ride. The manuals we’ll be taking a look at span about 60 years of British Army doctrine and weapons. The materials range from a Hotchkiss machine gun manual from 1917 to an AFV identification handbook from the late 60s. There’s some quite interesting and rare stuff here including a 1951 provisional manual for the 3.5in rocket launcher.
These manuals and this sort of primary material is really important because we can learn how the weapons were actually intended to be used. It’s support from our Patreon supporters that enables us to pick up items like these to share in videos. So if you’d like to support our work, check out the TAB Patreon page here.