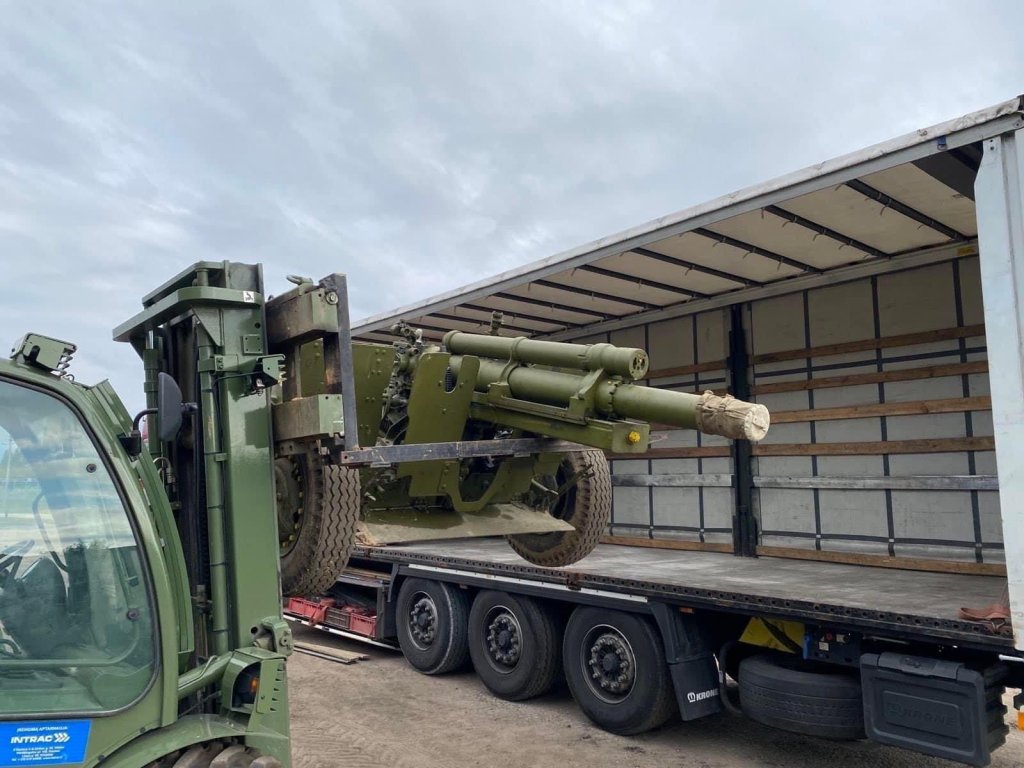
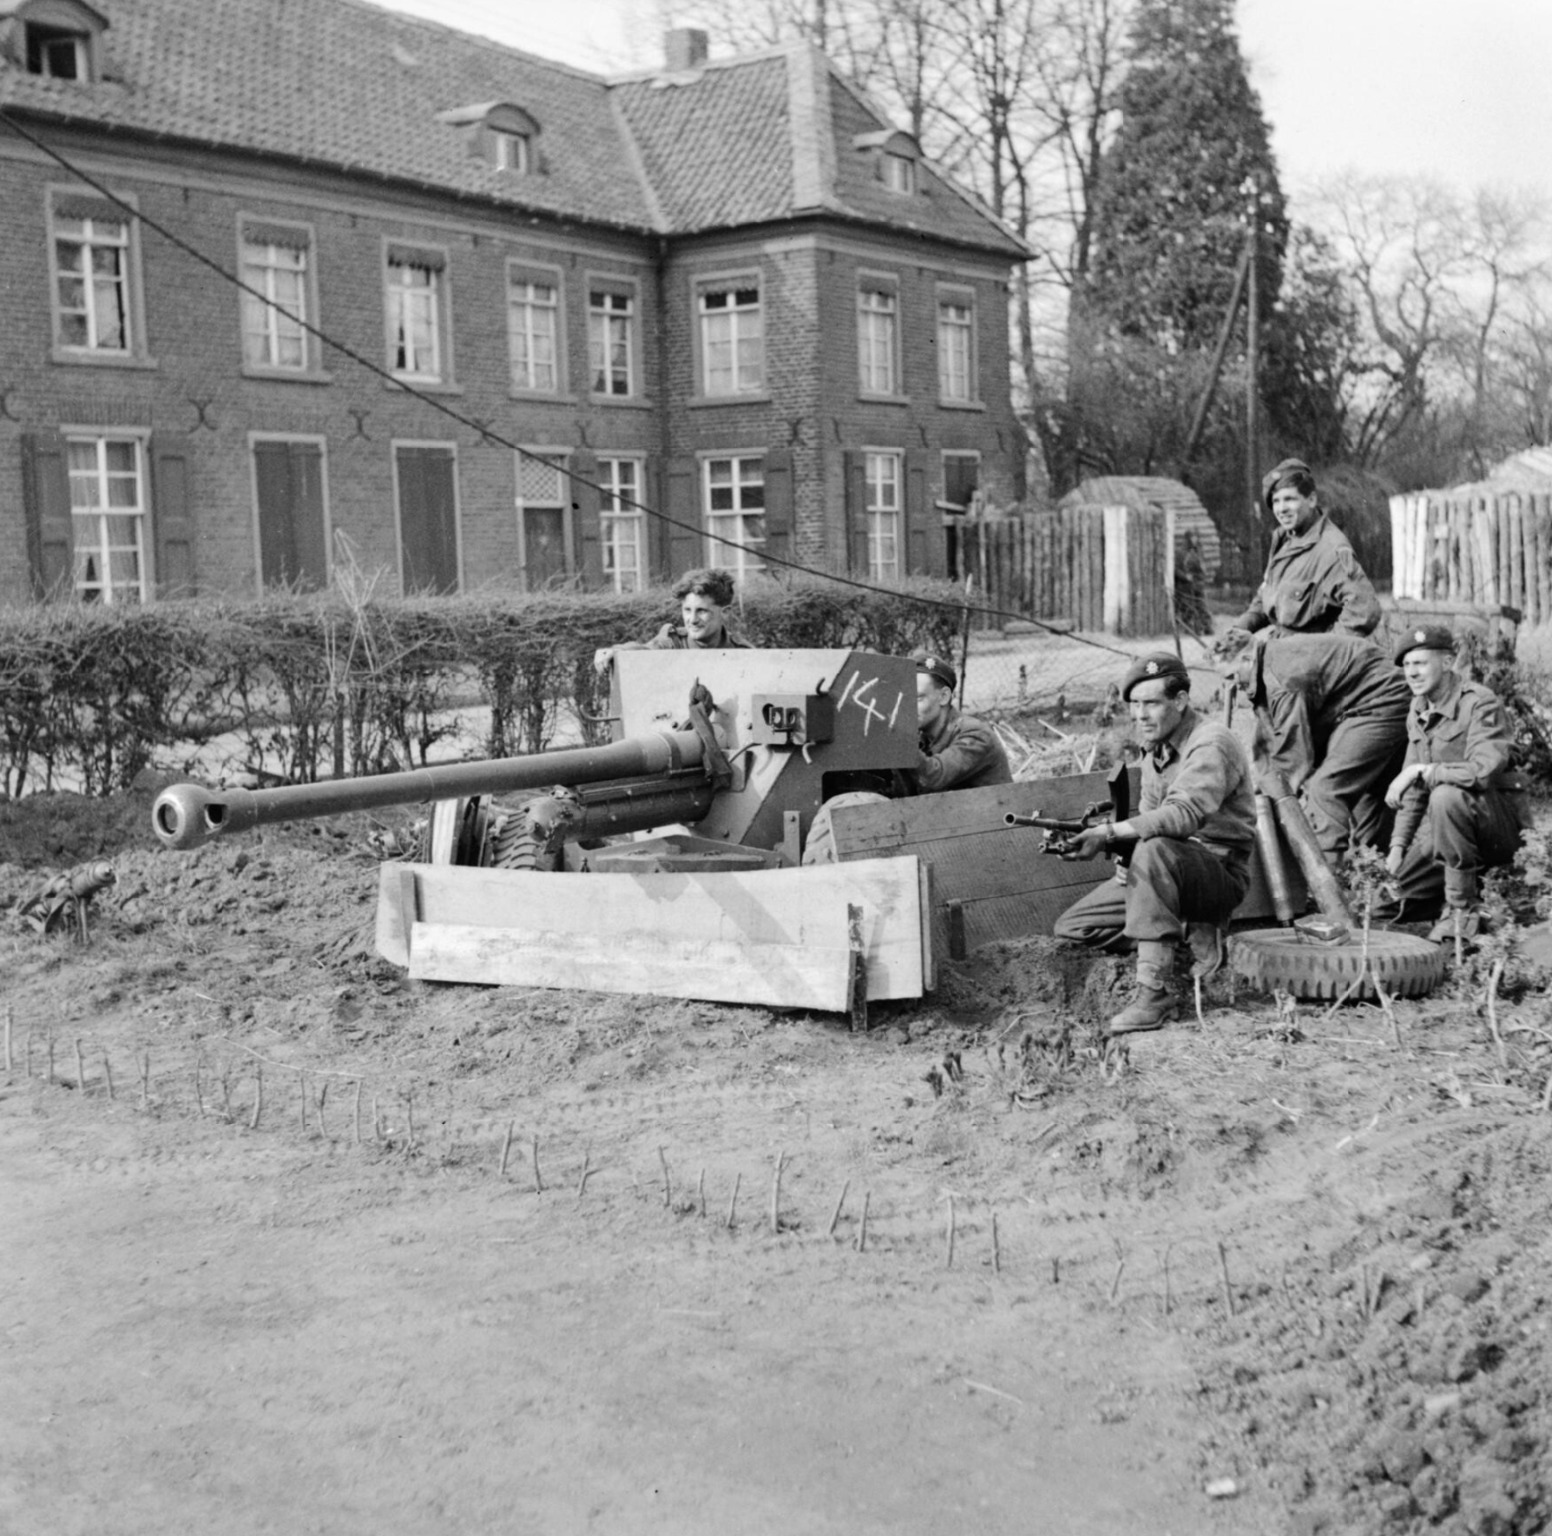
We’ve examined a number of artillery systems in use in Ukraine, including the venerable M101 howitzers and the MT-100s mounted on MT-LBs, one of the smallest and most interesting howitzers in use is the OTO Melara Mod 56.
The Mod 56 is a small 105mm pack howitzer. It weighs in at 1.29 metric tons and it can be towed by light vehicles. It has a split trail gun carriage and a hydro-pneumatic recuperator assembly. Developed by Italy’s OTO Melara the gun entered service in the mid-1950s and has seen service with countries around the world including Italy, the UK, Australia, Spain, Pakistan and the Philippines.
An OTO Melara Mod 56 (Ukraine National Guard)
Much like the heavier M101 howitzers, transferred to Ukraine by Lithuania, the Mod 56 can use any M1 105mm ammunition. With its short 1.47 metre-long barrel, the Mod 56 has a maximum effective range of around 10,000 metres (10km/6 miles). While this puts it at a severe disadvantage compared to the larger 155mm howitzers used by Ukraine and the 152mm guns used by Russia the small Mod 56 has the advantage of being lightweight and can be deployed forward under cover. The most useful role it could likely fulfil is as an infantry support gun.
In November 2022, Spain’s Defence Minister Margarita Robles confirmed that Spain would send a battery of six light howitzers and also provide training for Ukrainian gun crews. Subsequently, a brief clip of Ukrainian gunners training on the Mod 56 was shared in late November.
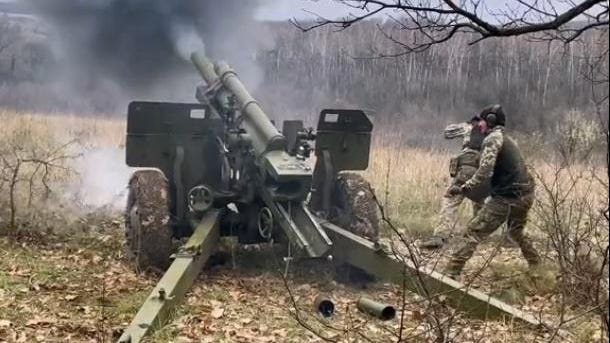
A Mod 56 in action (via social media)
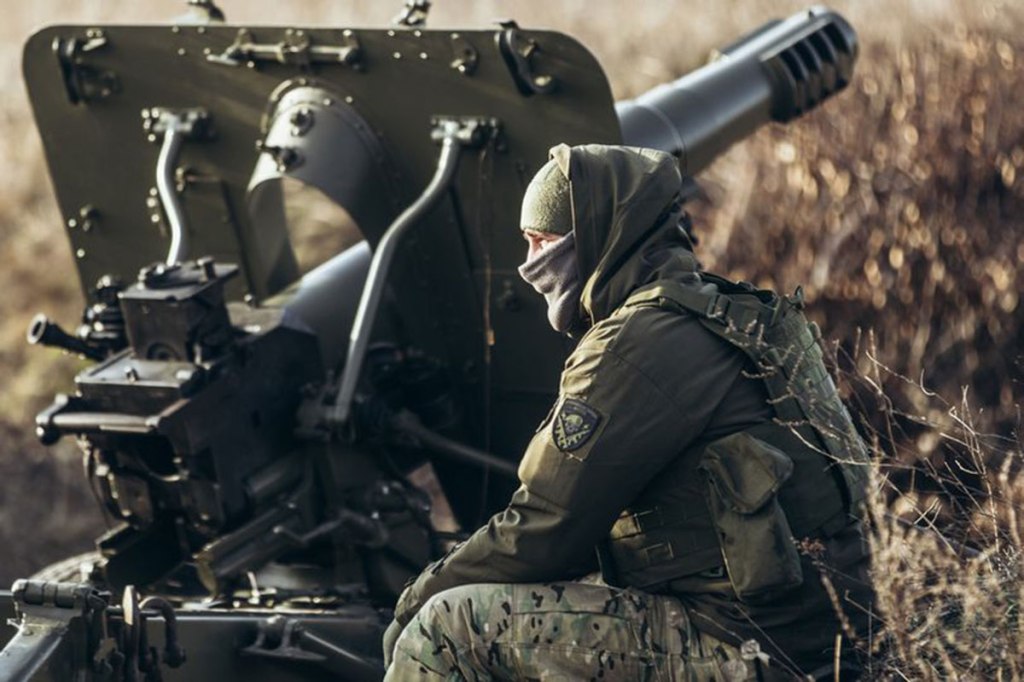
The guns were seen in Ukraine for the first time in early January, with a short clip of one of the guns firing being shared on 11 January. It appears the gunner is wearing a National Guard patch but its unclear which unit the gun belongs to. On 12 January, the 1st Mechanized Battalion of Ukraine’s 3rd Assault Brigade posted an info-graphic giving some basic detail on the Mod 56.
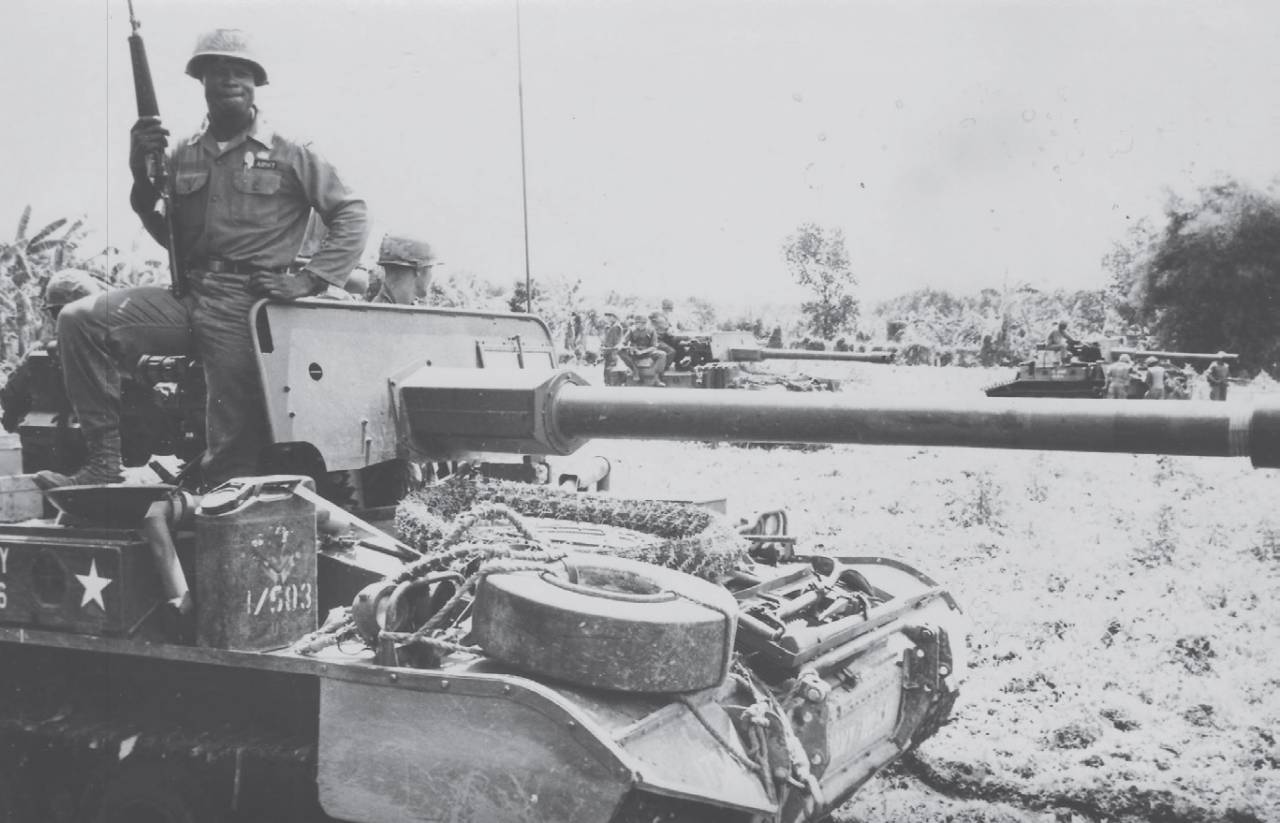
On 20 February, a brief clip of a Mod 56 was shared, the footage was believed to have been taken in the vicinity of Bakhmut. However, photographs taken by an AP photographer, Libkos, of the same gun showed that the gun was actually in action in Avdiivka, Donetsk. The series of photographs also showed that the gun was being operated by a National Guard unit and the crew was using drone footage to select their targets. One photograph was also shared by President Zelensky on 5 March. Interestingly, the gun is seen without its shield.
Another video of one of the guns in action was shared on 16 April. It was several months before more imagery of the Mod 56s in use appeared but on 1 June, the Ukrainian National Guard shared a photograph of one of the guns and several days later, on 3 June, a short video of a gun in action was shared.
A Mod 56 in action (via social media)
Most recently on 19 July, a Ukrainian National Guard unit shared a brief clip of a Mod 56 firing. It also nicely illustrates the gun’s breech mechanism.
From the available imagery, it appears that the guns are operated by Ukraine’s National Guard, though which artillery unit is unclear. While it has been confirmed that Spain has provided at least 6 Mod 56 howitzers, it remains unknown if any other countries, such as Italy, have provided the small guns.
Update – 29/12/23:
An undated sighting of a Mod 56 in operation in Ukraine. Notably half of the gun shield appears to be missing.
⚡️The 105-mm howitzer OTO Melara Mod 56 handed over by 🇪🇸Spain is in service with the Armed Forces of 🇺🇦Ukraine. pic.twitter.com/HyvMr6MWdE
— Matthew Moss | Historical Firearms (@historicfirearm) July 23, 2024
Support Us: If you enjoyed this video and article please consider supporting our work here. We have some great perks available for Patreon Supporters – including early access to custom stickers and early access to videos! Thank you for your support!
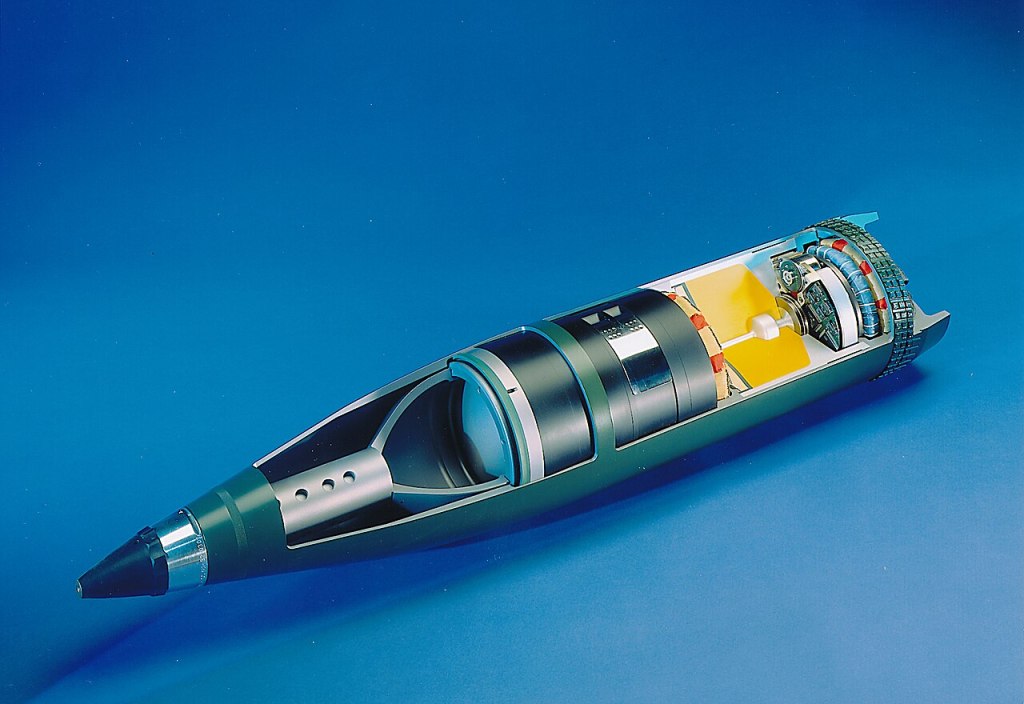
SMArt 155 is a Sensor Fuzed Munition (SFM), developed by Rheinmetall and Diehl BGT Defence in the late 1980s. It is a 155mm howitzer round which contains a pair of fire-and-forget top-attack submunitions. The submunitions use a ballute and parachute to slow their descent and allow the submunitions’ onboard infrared sensor and millimeter wave radar to locate its target and fire and explosively formed penetrator.
In a previous video/article we’ve looked at the 155 BONUS round which also carries two submunitions which are arrested by a pair of winglets which arrest the submunitions flight to enable their built-in sensors to detect targets within their search footprint before striking down on a target vehicle.
A cutaway of a SMArt 155 (Swiss Army)
The round is manufactured by GIWS, a joint venture between Diehl Defence and Rheinmetall, and entered service in the late 1990s. It is capable of being launched by NATO standard 155mm howitzers but in Ukraine appears to primarily be used in conjunction with Panzerhaubitze 2000 self-propelled howitzers. The round is also in British service as the Ballistic Sensor Fused Munition fired from AS-90s, the UK has recently provided Ukraine with a number of AS-90s but it is unclear if they will deploy SMArt155 rounds.
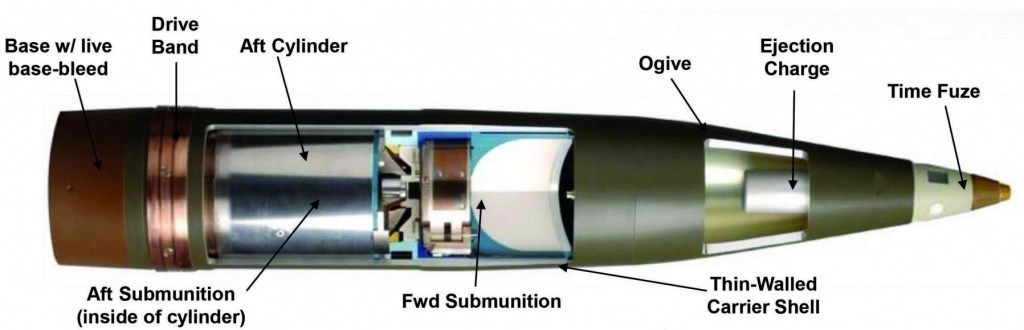
The manufacturer describes SMArt 155 projectile as consisting of: “a thin-walled shell body, a base plate, an ejection unit, time fuse, and two functionally identical submunitions.” The SMArt155 round allows a 155mm projectile to deliver two submunitions capable of penetrating any tank’s top armour with considerable accuracy. SMArt155 has a listed maximum range of 22km (13.6 miles) when fired from 155mm/39-calibre systems and 27.5km when fired from 155mm/52-calibre systems such as the PzH2000. Adding a base bleed unit would extend the round’s range further. The submunitions carry a shaped charge of 9.7lbs (4.2kg) of high explosive which create explosively formed penetrators (EFP). The manufacturer states that extensive German Army trials found that the round has a very low failure rate.
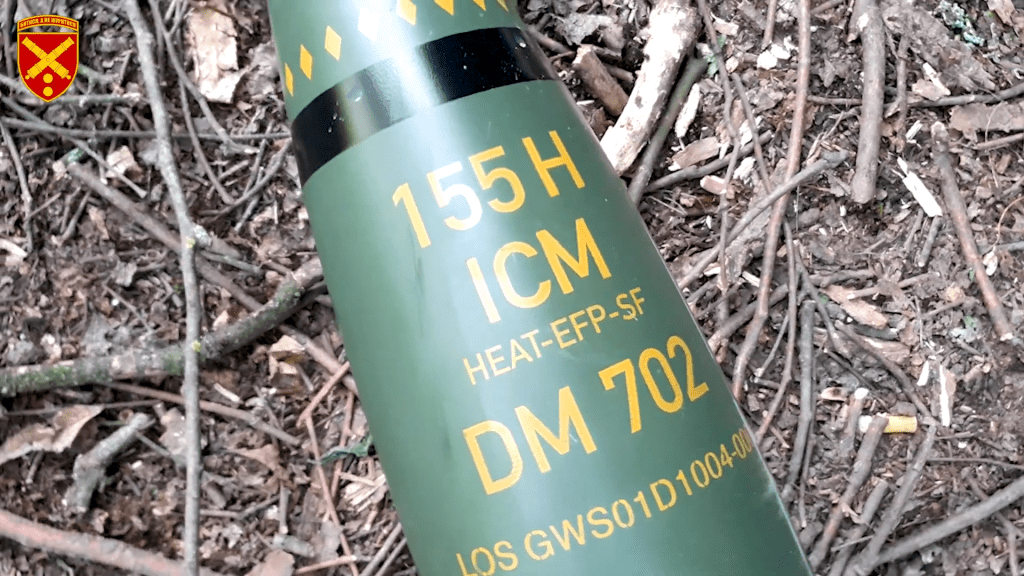
A DM702 shell seen briefly in a video posted by the 43 Separate Artillery Brigade, 16 May (via social media)
Once the round is fired an onboard timer fuze, set before firing, ignites an ejection charge in the shell’s nose which pulls the submunitions out of the shell body. Once clear the submunitions’ ballute and then parachute deploys they begin to spiral down over the target area using their onboard sensors to detect the target vehicle before detonating their payload.
Though there is controversy surrounding SMArt, and BONUS, the shells do not fall into the category of weapons banned under the 2008 Convention on Cluster Munitions as they comprise of just two submunitions and both have onboard self-destruction mechanisms.
The summer of 2022 saw a flurry of drone videos which showed strikes of Russian vehicles and equipment many of these were attributed to either BONUS or SMArt 155, but with most of the videos it is difficult to definitively identify which top attack munition was in use.
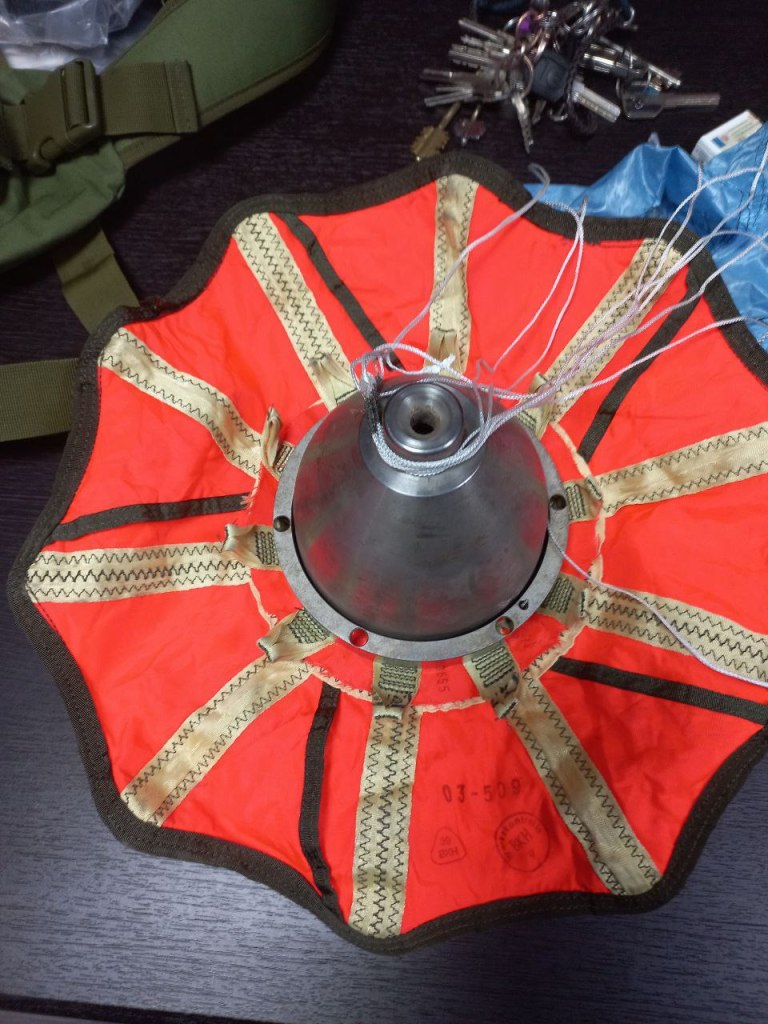
The ballute and parachute of a SMArt 155 (DM702A1) found near Kreminna in March 2023 (via social media)
On the 2 July, the first video believed to be a SMArt in action was shared online. In it a munition can be seen descening before detonating above. The framing and resolution of the video is too low to confirm if it is a parachute arrested submunition. Russian telegram channels shared a photograph of a ballute and parachute, said to have been seen near Kirovsky, in Donetsk in early August.
On the 13 September, another fairly low resolution video showed a top attack munition detonating above a Russian armoured vehicle. On 4 March 2023, photos of a ballute and parachute from a SMArt 155 were shared and said to have been found near Kreminna. Around the same time another video showing a potential SMArt 155 strike was shared. On 17 April, the 26th Artillery Brigade shared video showing what was claimed to be a SMArt munition striking two Russian vehicles. On 23 April, Ukrainian military journalist Andrii Tsaplienko shared a video from inside a PzH2000 showing some German DM702 SMArt 155 shells. The DM702 shells were again briefly seen in a video posted by the 43 Separate Artillery Brigade posted on the 16 May.
A ballute and parachute, said to have been seen near Kirovsky, August 2022 (via social media)
While the lack of easily verifiable videos of SMArt in use is frustrating it is impressive that we have any footage of top-attack munitions in use at all. Production of SMArt 155 paused in the late 2000s but even before the war in Ukraine began their had been plans to revive production. The war has, however, provided impetus for renewed production and in late 2022 the German government agreed to spend EUR 97.4 million to restart manufacture of the complex electronic components needed to manufacturer the round.
Update – 18/06/24:
Archive footage of the usage of SMArt 155 top-attack ammunition fired from a PzH 2000 of the 43rd Separate Artillery Brigade named after Hetman Taras Tryasyl. It's unclear how many of these DM 702 shells were delivered to Ukraine by Germany. pic.twitter.com/hVNeAuLBUJ
Support Us: If you enjoyed this video and article please consider supporting our work here. We have some great perks available for Patreon Supporters – including early access to custom stickers and early access to videos! Thank you for your support!
On Wednesday, 4 January, a Russian telegram channel shared several photos of what appear to be miniature satellites. These are in fact 155 BONUS submunitions, an advanced anti-armour, top attack artillery round. Each 155 BONUS round carries two submunitions capable of striking down on a target vehicle once over the target area.
As we’ve seen in other articles/videos including out look at Javelin, NLAW and Russia’s PTKM-1R mine that top-attack weapons can be extremely effective.
Salvaged 155 BONUS submunition (via social media)
Ukraine has received 155mm howitzer systems from Western countries (including DANA, CAESAR, PzH 2000, Zuzana 2 and AHS Krab), with conventional ammunition these are able to accurately engaging targets at considerable distances but the BONUS round allows a 155mm shell to deliver two submunitions capable of penetrating any tank’s top armour with impressive accuracy.
Development of BONUS or the BOfors NUtating Shell (nutating means rocking or swaying) began in the mid-1980s and was developed by Sweden’s Bofors and Nexter of France. Since Bofors’ heavy weapons division was bought out by BAE Systems in 2005, the system has been part of BAE’s portfolio.
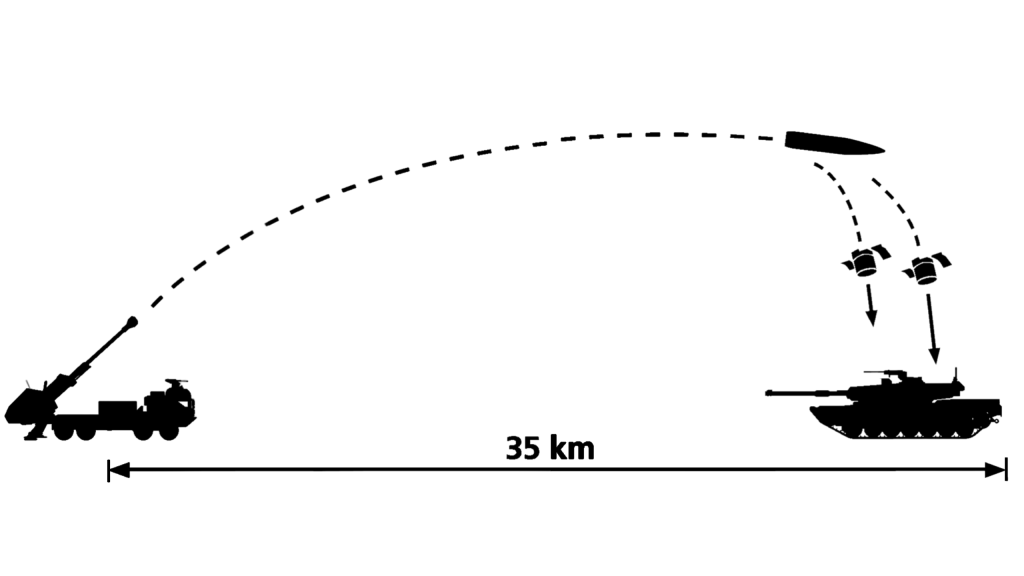
BONUS has a base bleed unit which extends its range out to 35km (nearly 22 miles). Once fired the shell separates to deploy two independent sensor-fuzed submunitions. Once separated these submunitions deploy a pair of winglets and rapidly rotate in flight to enable their built-in sensors to detect targets within their search footprint.
Labelled cutaway of a BONUS shell (US Army)
The search footprint can span up to 32,000 square meters with a diameter of 200m in a helical pattern. The munition uses multi-band passive infrared (IR) and LADAR (laser imaging, detection, and ranging) to detect its targets. Once detected the submunition fires its explosively formed penetrator, which can travel at more than 2000m/s. BAE states the penetrator can penetrate between 100 and 140mm of rolled homogenous armour.
BONUS has been in service with the French Army since the early 2000s and has also been procured by Sweden, Finland and Norway. Most recently in 2018 the US Army selected the round for their Cannon Delivered Area Effects Munition (C-DAEM) programme and has been actively procuring it through several contracts since.
A similar munition SMArt 155, developed by Rheinmetall and Diehl BGT Defence, which uses a parachute to slow the submunitions descent rather than winglets, is also believed to be in use in Ukraine. BONUS and SMArt do not fall into the category of weapons banned under the 2008 Convention on Cluster Munitions as they comprise of just two submunitions and both have onboard self-destruction mechanisms. The BONUS round seen in these photographs obviously did not engage a target and its self-destruction mechanism didn’t destroy the submunition before it landed.
The Russian telegram channel that shared the photographs of the munition state that it was found in the Donetsk region. The same post suggested some potential countermeasures, including covering heat signatures with polythene and obscuring the shapes of vehicles might help mitigate the risk posed by BONUS rounds.
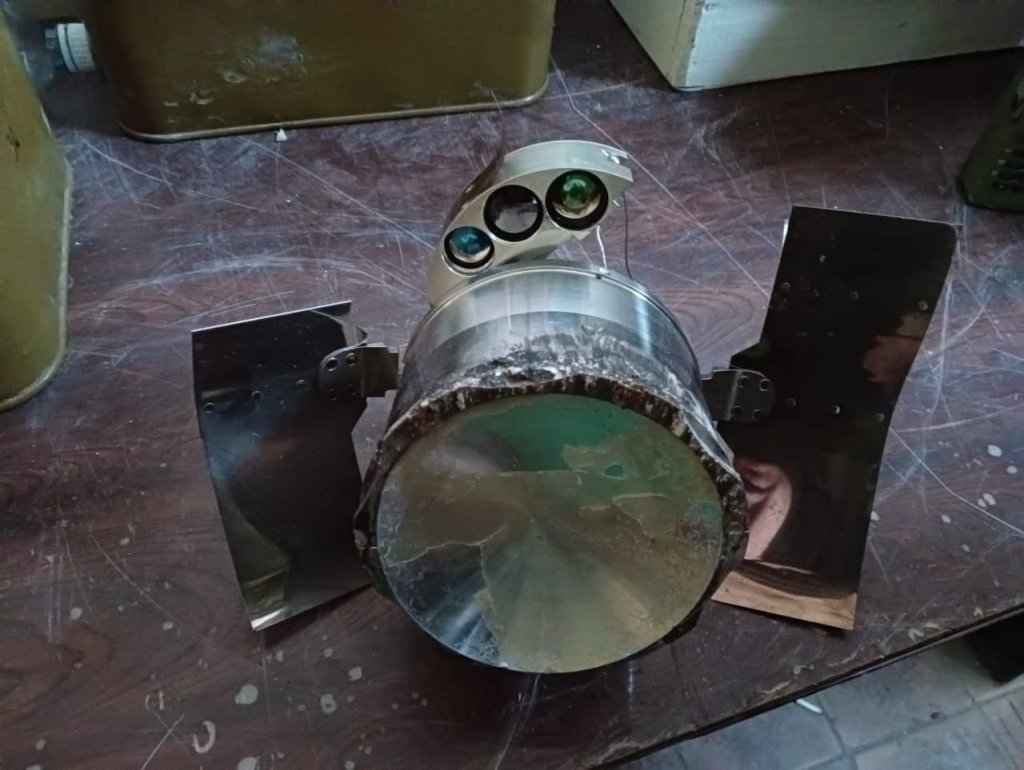
Salvaged 155 BONUS submunition (via social media)
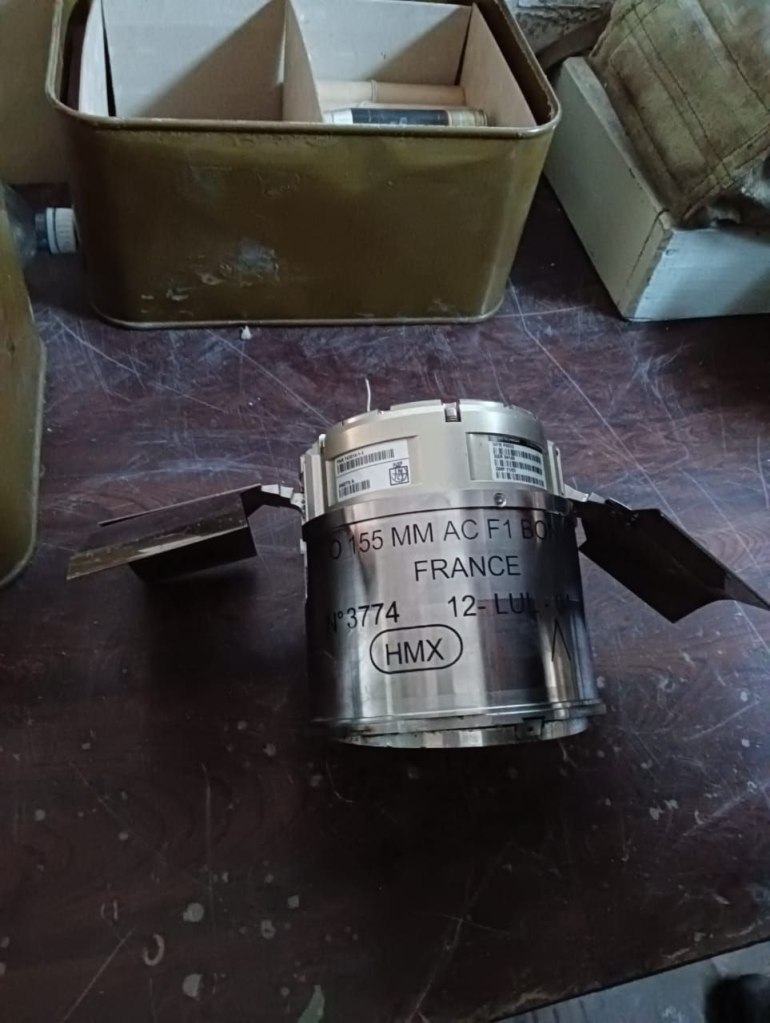
From the photographs themselves we can see the submunition is marked No.3774, France, and ‘HMX’ – a type of high explosive. At the top it is marked ‘155 MM AC F1 BON’. The ‘LUL’ marking likely refers to Luchaire Defense. In the second photo we can see the damaged face of the submunition, its EFP plate, the metal winglets and the pop-out sensor assembly with what appear to be three lenses.
In terms of videos from in theatre that show the use of BONUS there are a number of fairly low-resolution drone videos showing suspected uses of the shells – some of these have also been suggested to be SMArt 155. A video from July perhaps shows BONUS in action, there is no visible parachute, as used by the SMArt 155, visible but there are what appear to be two descending submunitions – the first of which detonates above the target, firing an EFP down onto targets.
Support Us: If you enjoyed this video and article please consider supporting our work here. We have some great perks available for Patreon Supporters – including early access to custom stickers and early access to videos! Thank you for your support!
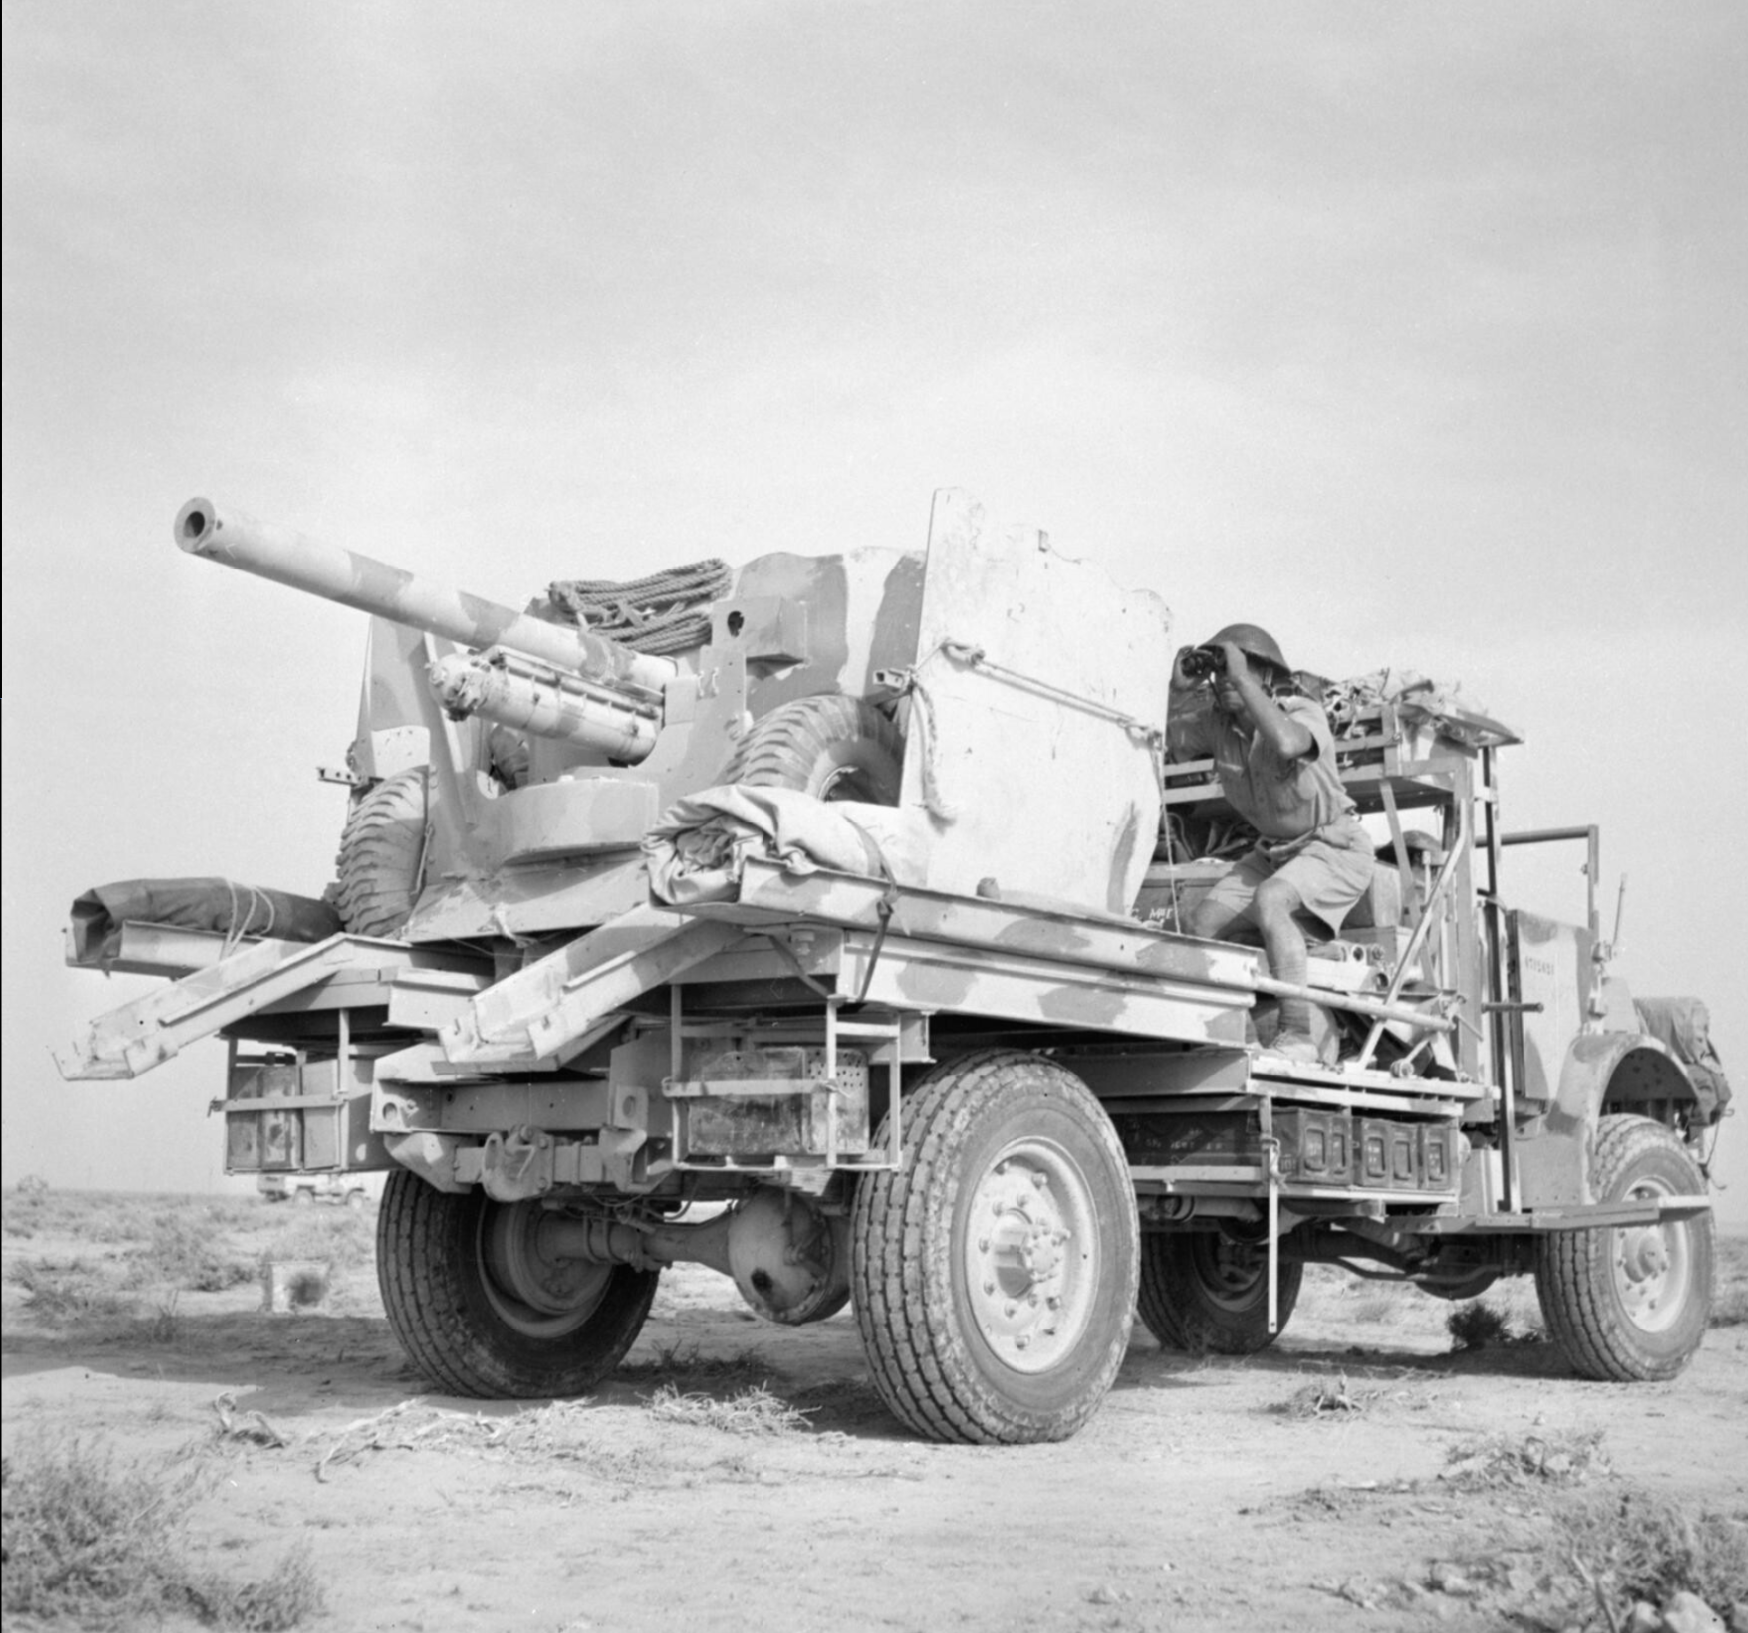
Plenty of old weapon systems are in use in Ukraine and artillery is no exception. This week the first footage of a batch of 105mm howitzers from Lithuania in action was shared online.
Lithuania has transferred an undisclosed number of M101 towed howitzers. While the 105mm gun lacks the range and punch of the 155mm M777s, Caesars, AHS Krabs and PzH 2000s which have made headlines in recent months, the venerable M101 is a proven weapon.
Introduced in 1941 as the M2A1, the gun has seen service around the world. First during the Second World War and later in Korea, Vietnam and in dozens of regional conflicts around the world. Now it finds itself equipping Ukrainian Army batteries.
The M101 weighs in at 2.5 tons or 2,260 kg and firing conventional M1 high explosive shells has a maximum range of 11,500 metres or just over 7 miles. The M1 round is made up of the the M1 High Explosive projectile, the M14 Cartridge Case, the M67 Propelling Charges and the M28 Percussion Primer.
The Baltic nation of Lithuania, has been a staunch supporter of Ukraine throughout the conflict providing equipment, arms and training. Lithuania originally received 54 of the guns from Denmark in 2002. Now, as Lithuania upgrades to 155mm systems the old guns have found a new home. While it is unconfirmed whether Ukrainian troops trained to use the guns in Lithuania, Ukrainian troops have been training in the Baltic nation.
The first guns were shipped in September, with the Lithuanian Minister of Defence announcing the transfer on his social media, but the first footage of them in action in Ukraine didn’t surface until late November.
While the M101 may be old it has the major advantage in that if fires the readily available family of 105mm NATO ammunition. This 105mm ammunition is used by a number of light artillery systems including the more modern US M119A3 and L119 towed 105mm howitzers. As of November 2022, the US has provided 180,000 rounds of 105mm.
While the M101 may seem like a step down from the 155mm systems in use it has a number of factors which mean the guns are still effective. Firstly, they are used in conjunction with drones which help adjust fire in real time to produce improve effect on target. Secondly, they can use M927 rocket-assisted projectiles which increase the gun’s range by 40%, around 17km. M927’s were first seen in late August being used in conjunction with L119 light guns.
The M101 is certainly an improvement over the 85mm D-44 guns that some Ukrainian Territorial Defense Force units have been seen using and the venerable 100mm MT-12 which has a range of just over 5 miles. While the M101 can’t hope to go toe to toe with Russian 152mm artillery, if used in its original role as an infantry support gun the venerable M101s will prove useful.
Update 07/12/22: Another short clip of an M101 in action was shared on the 7 December, showing the more closely than previous footage.
Here's the latest video of the M101's in action. Shared on telegram yesterday. Two guns are visible in the clip, location, date of filming unclear. Looks like it was filmed during training.
— Historical Firearms | Matthew Moss (@historicfirearm) June 11, 2023
Update – 11/11/23: Another siting of an M101 in action.
⚡️The 🇺🇸American 105-mm M101 howitzer in service with the Armed Forces of 🇺🇦Ukraine strikes 🇷🇺Russian positions. These howitzers were donated by friendly 🇱🇹Lithuania pic.twitter.com/xC4NqQETsk
Update – 13/12/24: An M101 was seen in service with the 28th OMBR in a series of photos recently shared by the Ukrainian army.
Support Us: If you enjoyed this video and article please consider supporting our work here. We have some great perks available for Patreon Supporters – including early access to custom stickers and early access to videos! Thank you for your support!
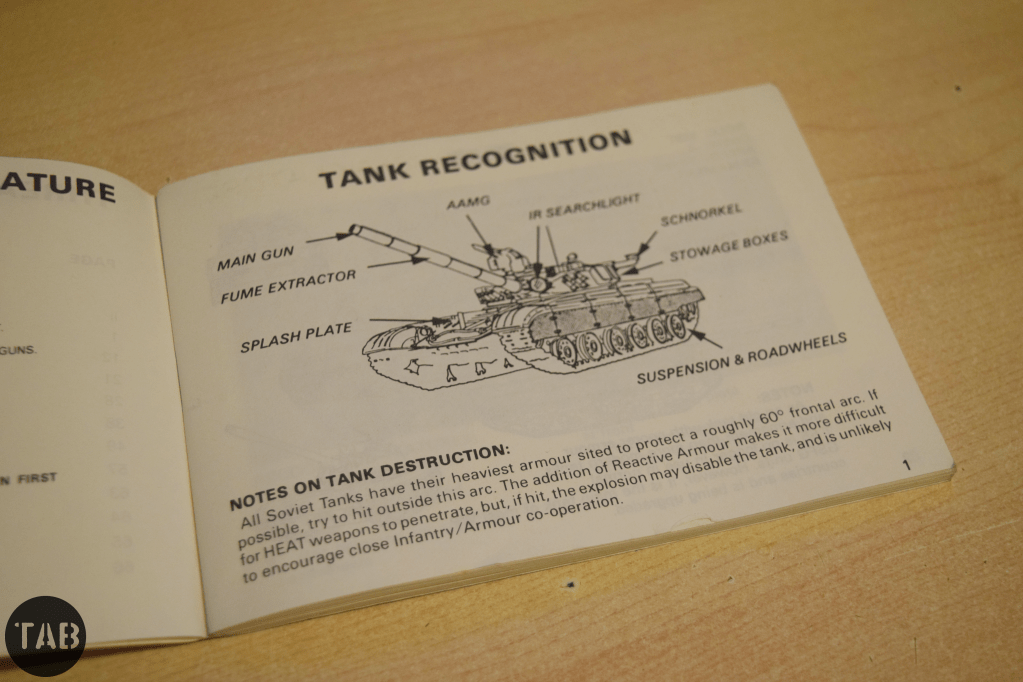
It’s the 1980s and the British Army Of the Rhine is still stationed in West Germany facing down the USSR’s forces. The Cold War has gotten hot and the 3rd Shock Army is approaching your dugout but how do you differentiate a BTR from a BMP? This handy British Army THREAT Recognition Guide booklet gives you everything you need to know about the Soviet armour, infantry and aircraft you’re facing!
Continuing on from our earlier look at a British Army threat Recognition Guide to Iraqi Ground Forces issued during the Gulf War, we dig into the TAB reference collection again and take a look at this Threat Recognition Guide looking at Soviet air and ground forces facing the British Army of the Rhine in the 1980s.
The Group of Soviet Forces in Germany (GSFG) in East Germany throughout the Cold War were an ever present threat to West Germany and NATO. This recognition guide covers all of the USSR’s main battle tanks, armoured personnel carriers, and infantry fighting vehicles, as well as artillery systems and some of the close support aircraft which would have accompanied the attacking Soviet forces.
The pages of the recognition guide include photographs, diagrams, basic specs and recognisable features of the various enemy vehicles. It was put together by the Intelligence Directorate of BAOR’s 1 Corps.
If you enjoyed these videos and this article please consider supporting our work here. We have some great perks available for Patreon Supporters. You can also support us via one-time donations here.Thank you for your support!
In this video we’ll be launching a brand new series where we’ll look at period small arms and light weapons manuals and other ephemera like infantry tactics handbooks and recognition guides.
This month marks the 30th anniversary of what the British Army called Operation Granby, better known as Desert Storm or the Gulf War. So I thought taking a look at a Recognition Guide to Iraqi Ground Forces issued during Granby would be a good place to start!
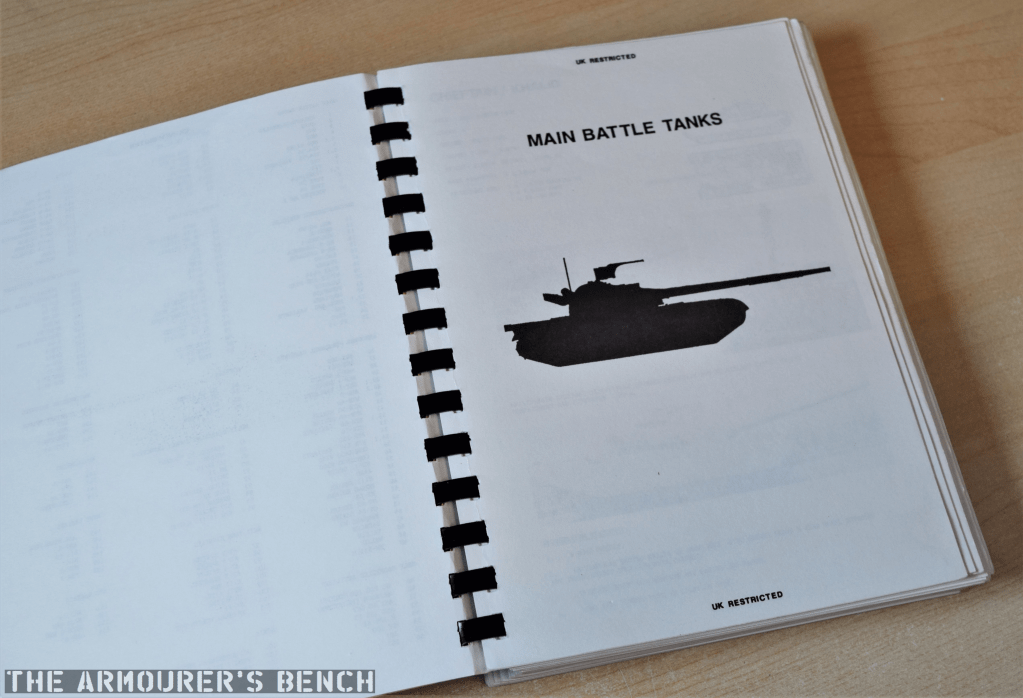
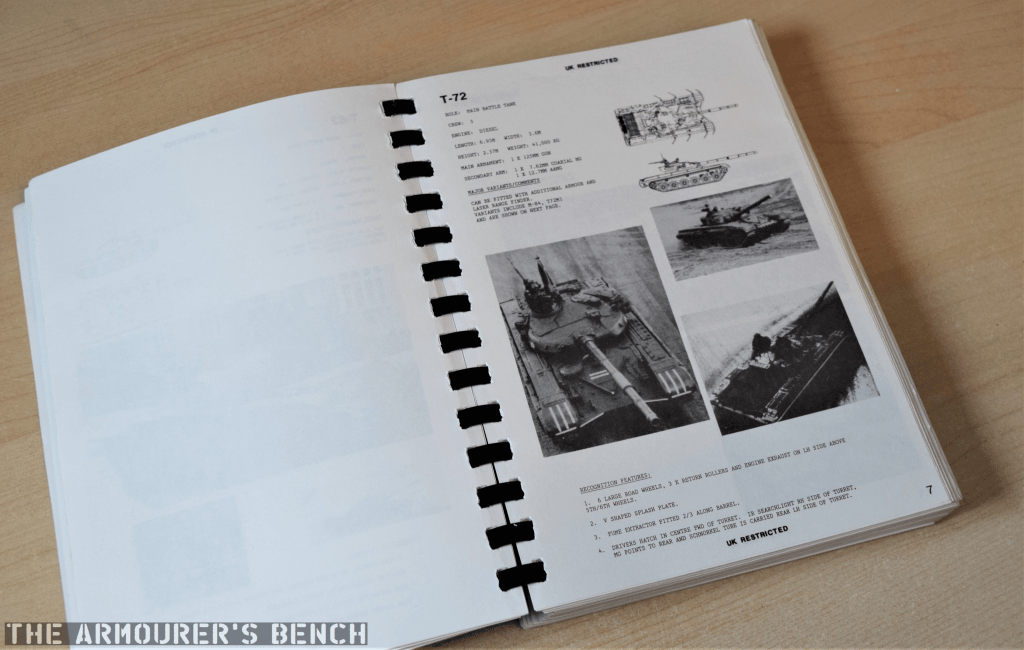
Chapter page for Main Battle Tanks (Matthew Moss)
Britain deployed more than 53,000 personnel during the operation, which began in August 1990, just after the invasion of Kuwait, with the arrival of 2 squadrons of Tornados in theatre. The first ground forces, elements from 7 Armoured Brigade began arriving in October. With no ready reaction force a division strength force was cobbled together from units deployed in Germany and the UK. Huge logistical constraints were overcome to provide a full armoured division, consisting of two brigades, for the liberation of Kuwait.
The guide’s entry for the AMX 155 F3 (Matthew Moss)
During the ground phase of the operation (Operation Desert Sabre), which began on 24th February 1991, British armoured and mechanised forces, part of VII Corps, provided the left-hook of the allied assault. The division’s two armoured brigades leapfrogging one another quickly taking successive objectives and sweeping west through occupied Kuwait, towards the Gulf Sea, neutralising Iraqi positions with relative ease. During less than 100 hours of ground combat British forces travelled 180 miles and destroyed approximately 300 Iraqi vehicles while allied forces as a whole captured an estimated 80,000 Iraqi troops. A total of 47 British troops were killed during Granby. A ceasefire was declared on 28 February with Iraqi forces collapsed and Kuwait liberated.
The guide’s entry for the T72 tank (Matthew Moss)
The guide was compiled by the Recognition Materials Cell at the Joint Air Reconnaissance Intelligence Centre (or JARIC). Formed in 1953, from the Central Interpretation Unit and based at RAF Brampton from 1957 to 2013, JARIC was the UK’s strategic imagery intelligence provider – providing analysis of aerial and later satellite photography or enemy assets.
With war with Iraq looking imminent and substantial British forces deployed from the UK and Germany, JARIC were tasked with putting together a recognition guide covering Iraqi and Kuwaiti ground assets captured by Iraq during the invasion of Kuwait.
The infamous SCUD (Matthew Moss)
This included everything from main battle tanks, reconnaissance vehicles and armoured personnel carriers to self-propelled artillery, mortars, artillery and multi-barrelled rocket launchers. It also included anti-tank missiles, surface to air missile systems and anti-aircraft assets as well as engineering equipment. All of which might be encountered during upcoming operations to liberate Kuwait. Let’s take a look.
The guide sadly doesn’t have a scale of issue list so it’s difficult to know how many were printed or which units received them. But the first page does give us some indication of the material’s sources – noting they are from unclassified and restricted sources – giving the book a restricted classification overall.
If you enjoyed these videos and this article please consider supporting our work here. We have some great perks available for Patreon Supporters. You can also support us via one-time donations here.Thank you for your support!
Bibliography
The Gulf War 1991, A. Finlan (2003)
Hot War, Cold War, C. McInnes, (1996)
‘Joint Air Reconnaissance Intelligence Centre (JARIC)’, National Collection of Aerial Photograph, (source)
‘Unit History: Joint Air Reconnaisance Intelligence Centre’, Forces War Records, (source)
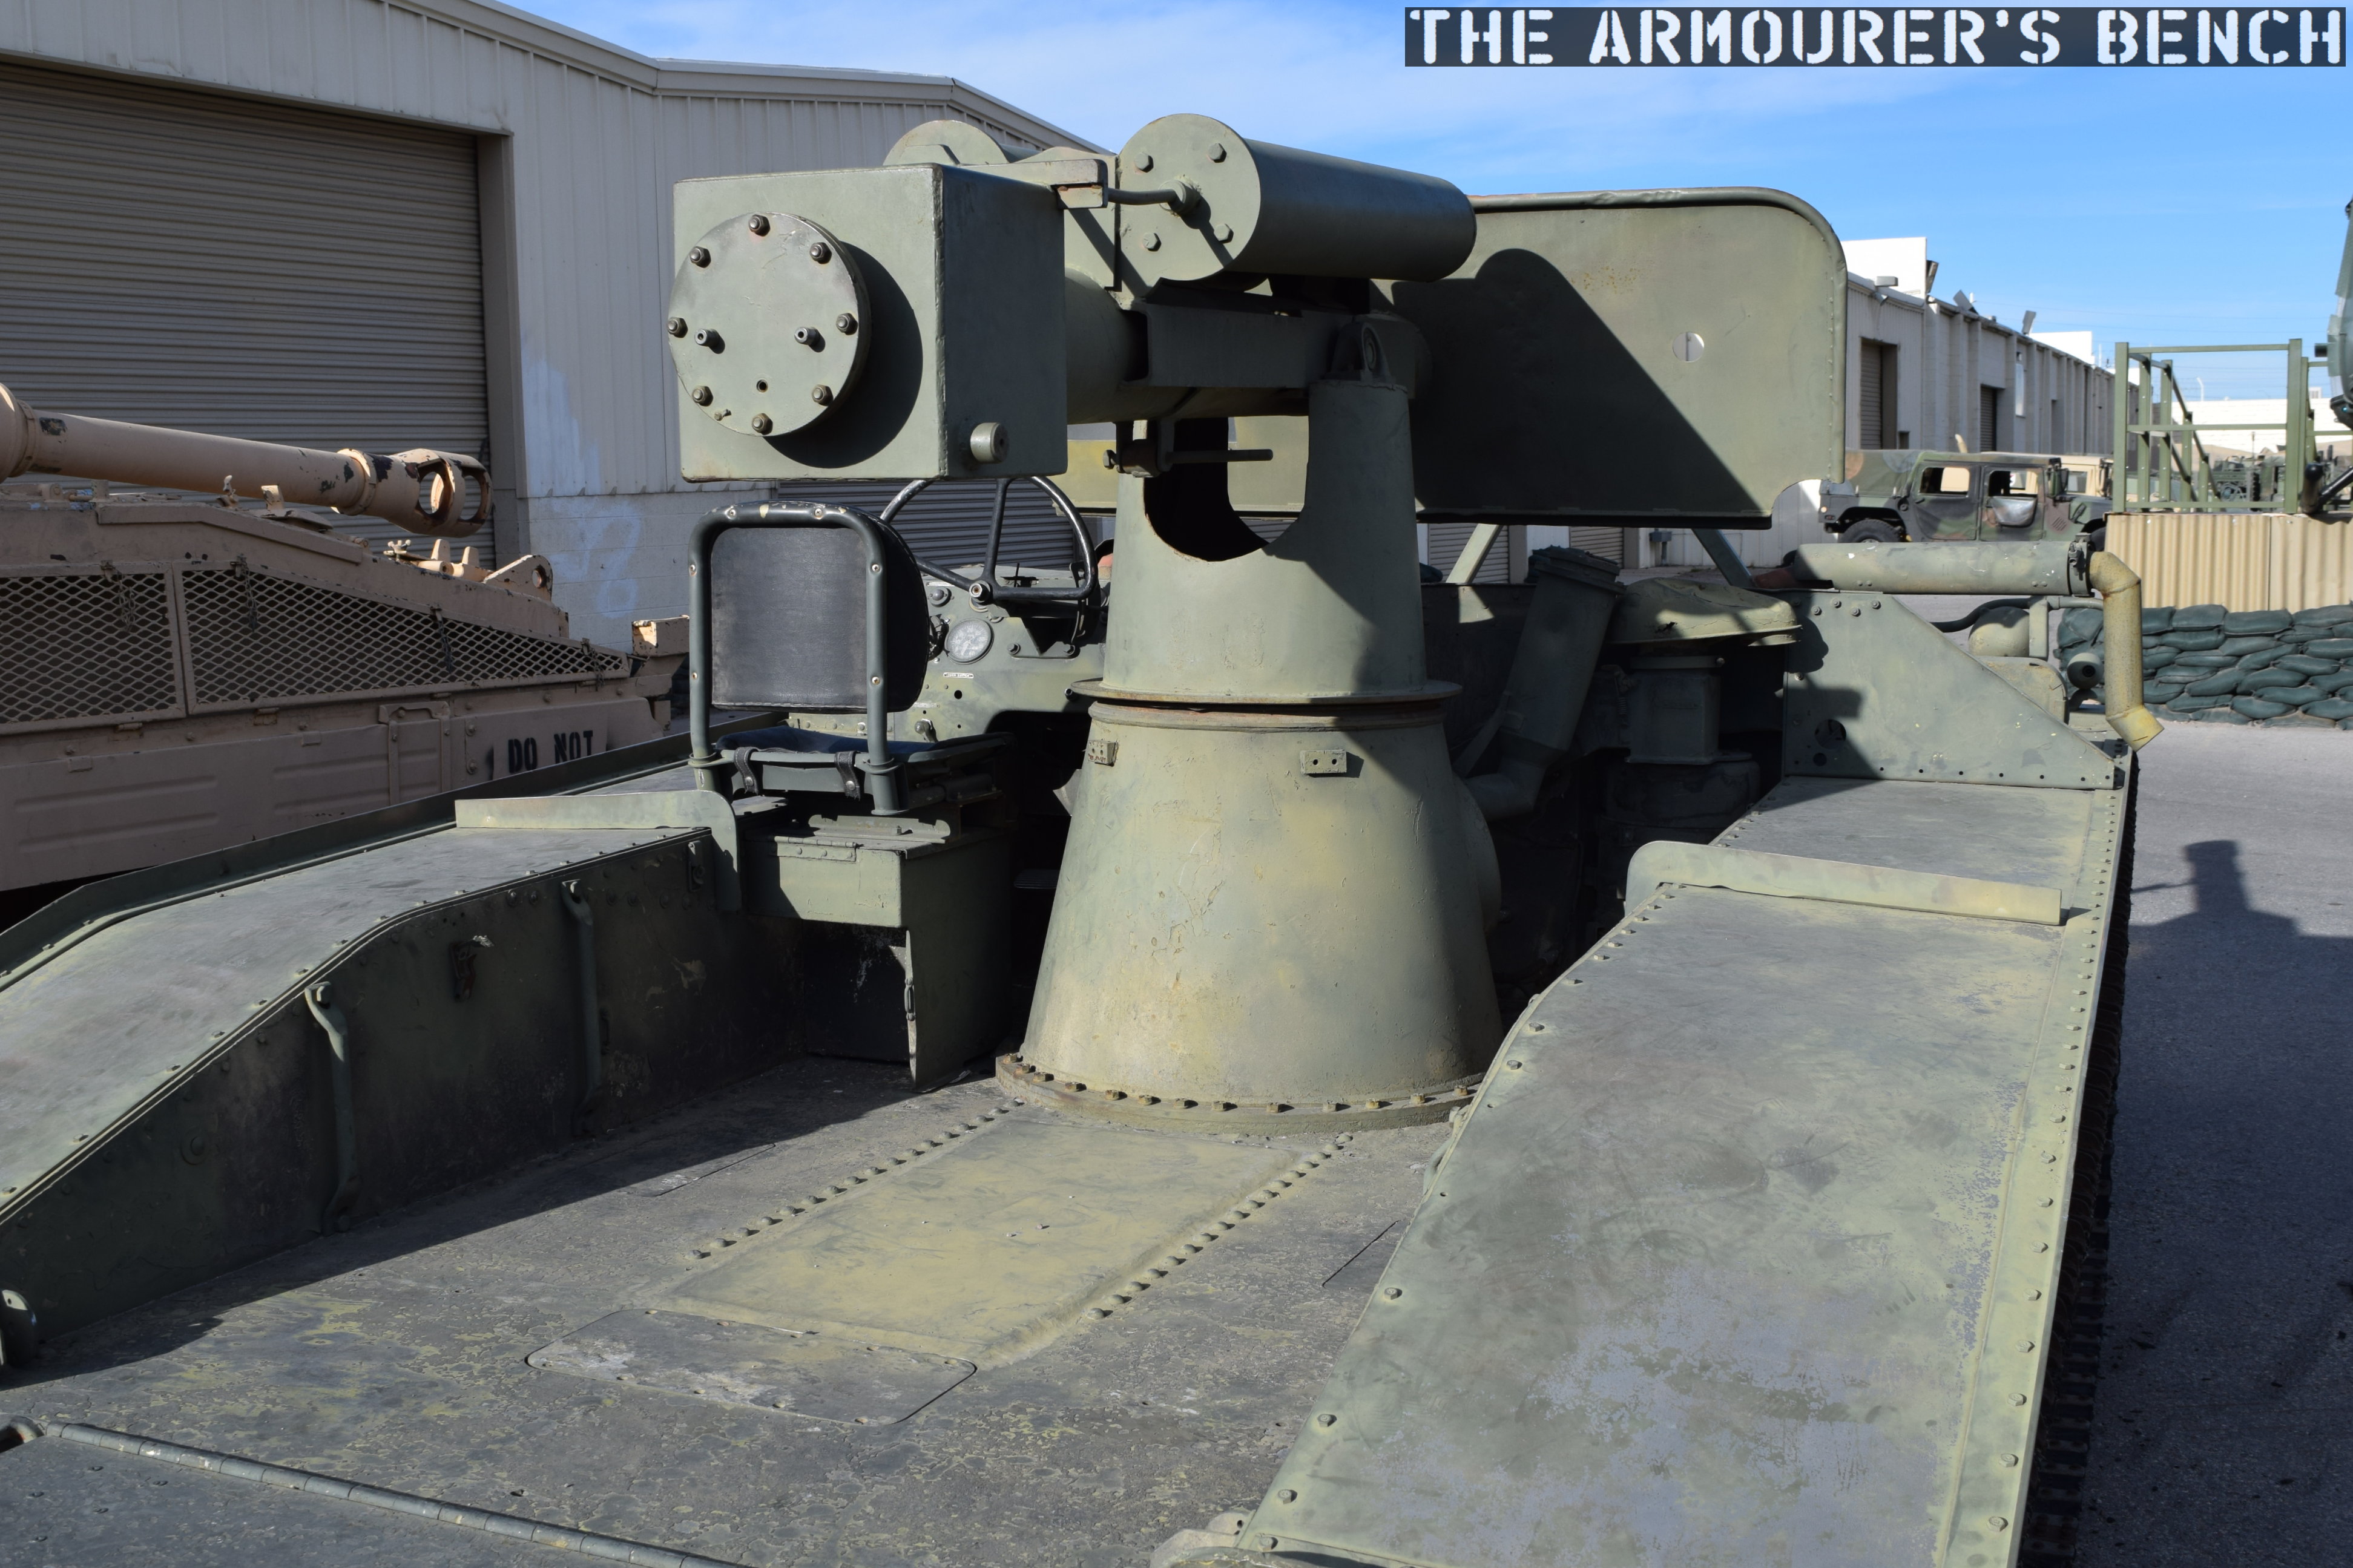
The need for a lightweight self-propelled anti-tank gun was identified in the late 1940s. The T101 development program took just over 5 years and $2.5 million dollars to develop what became the M56.
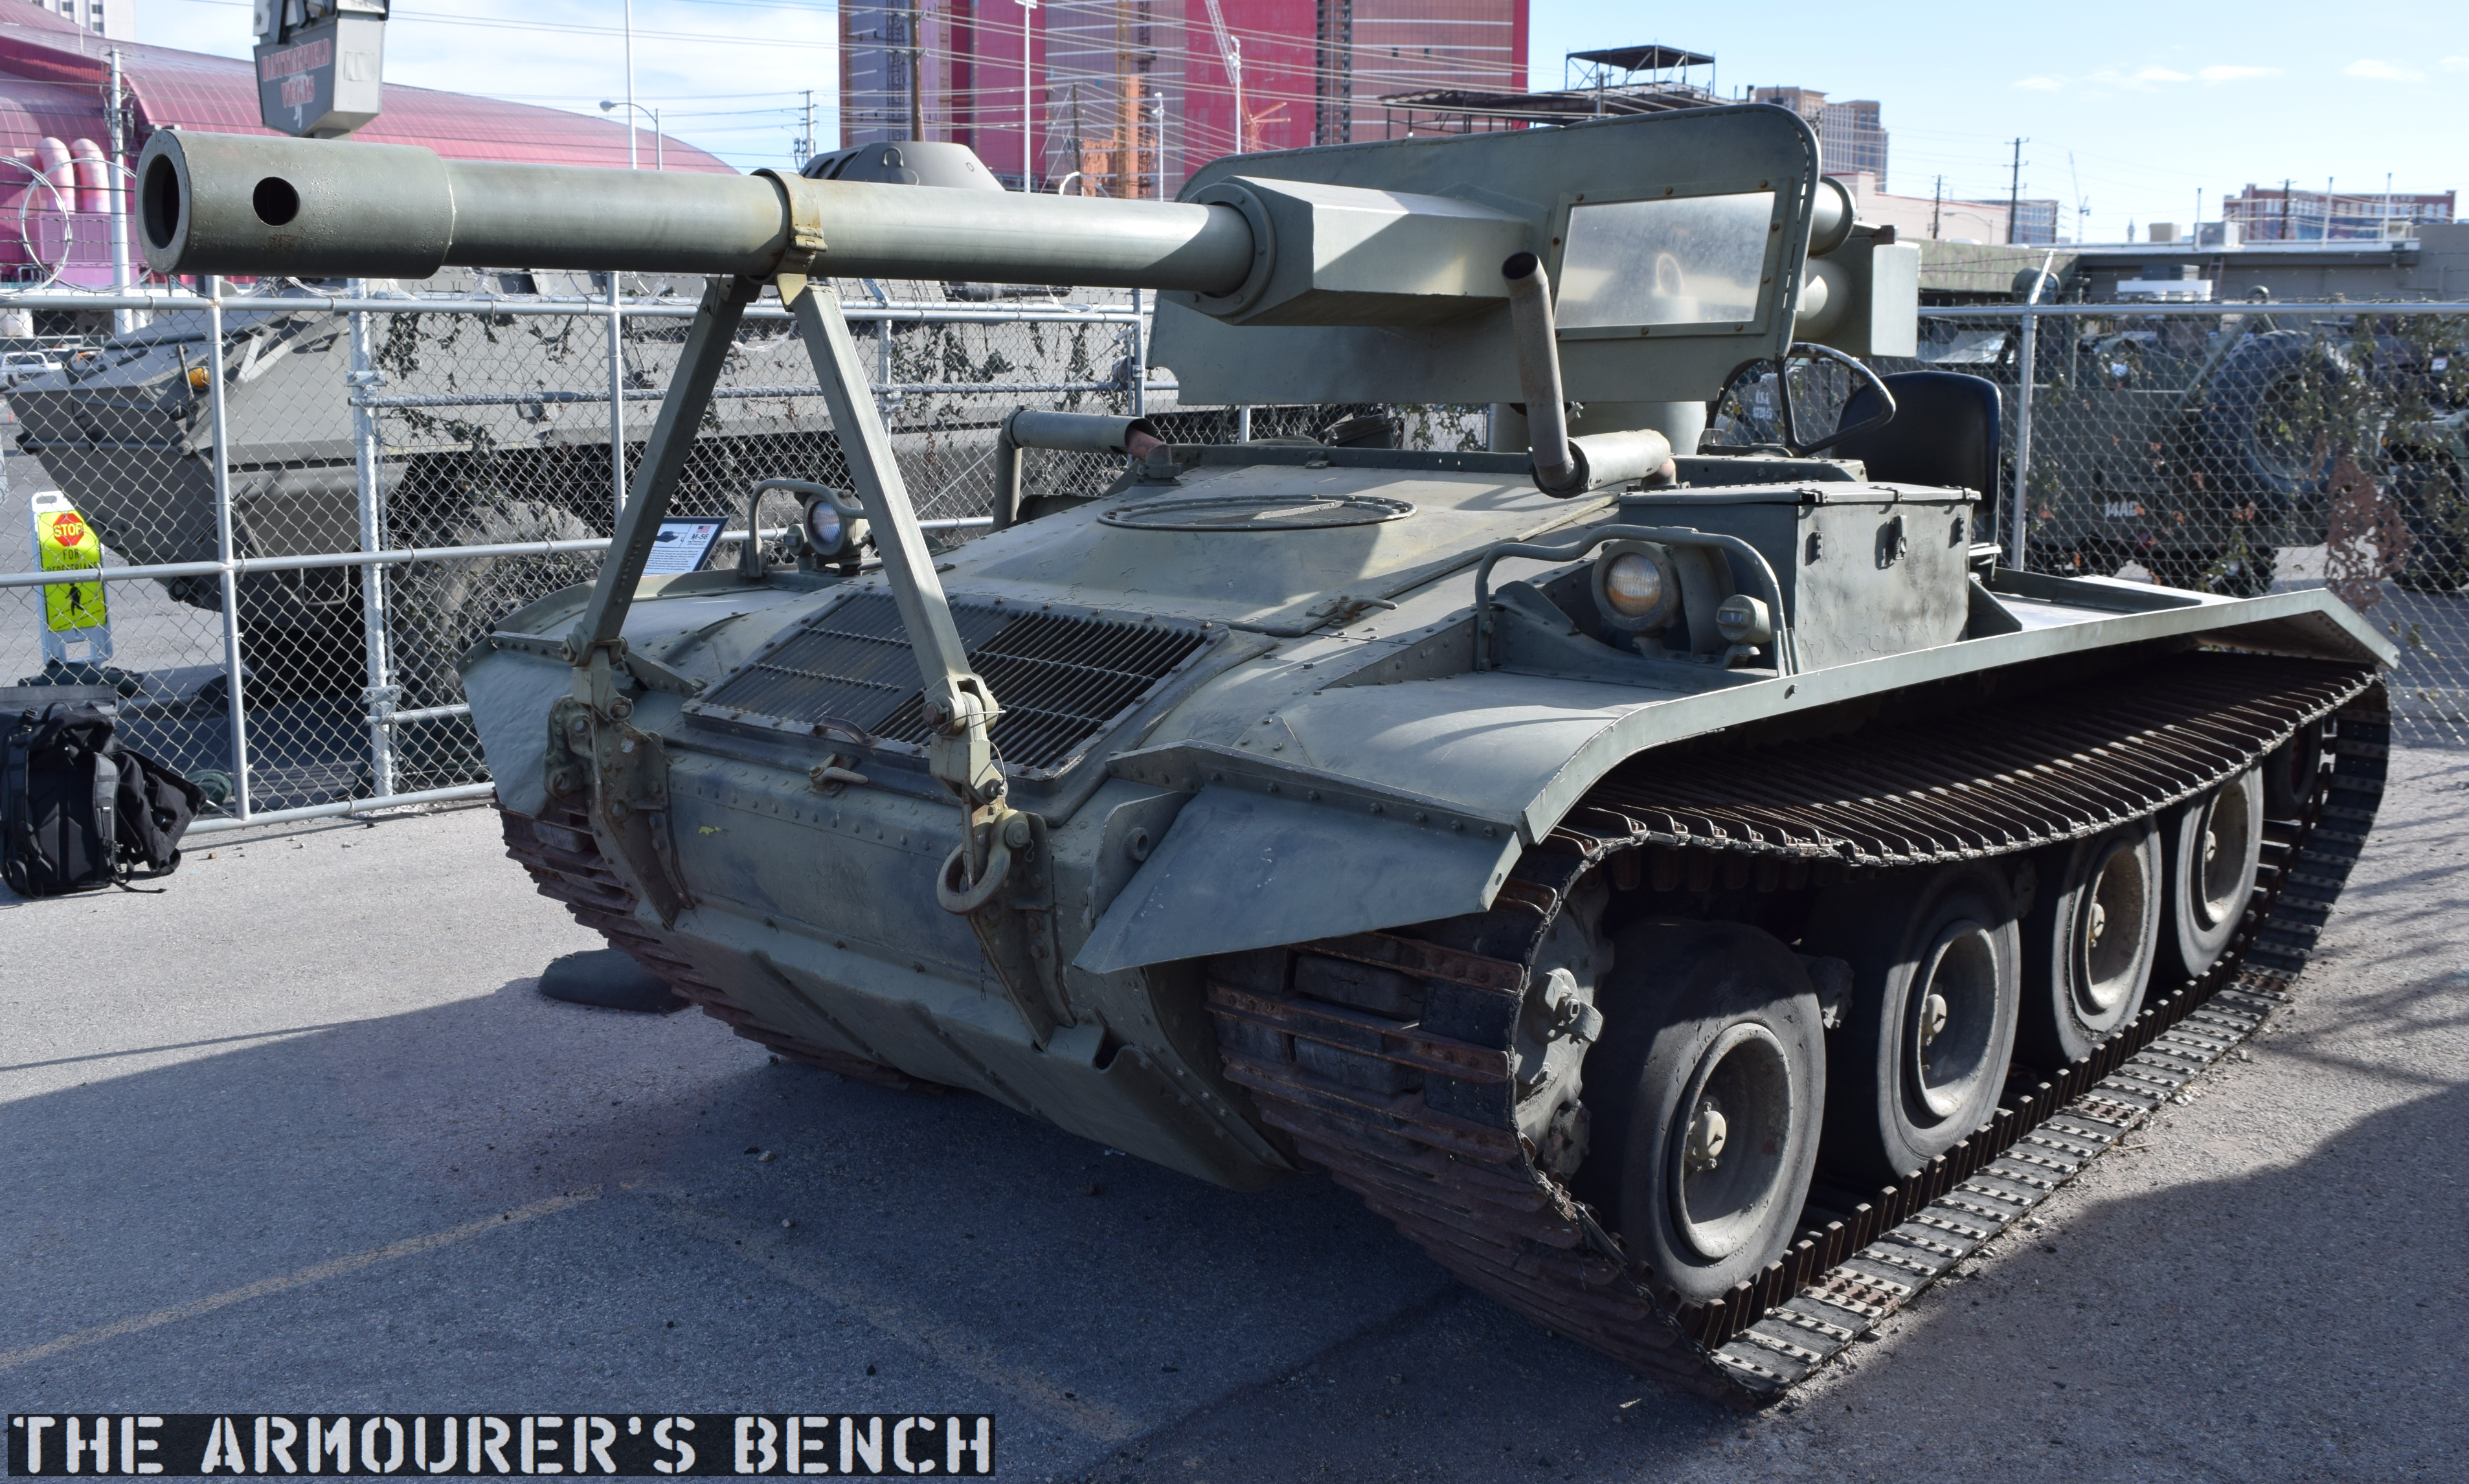
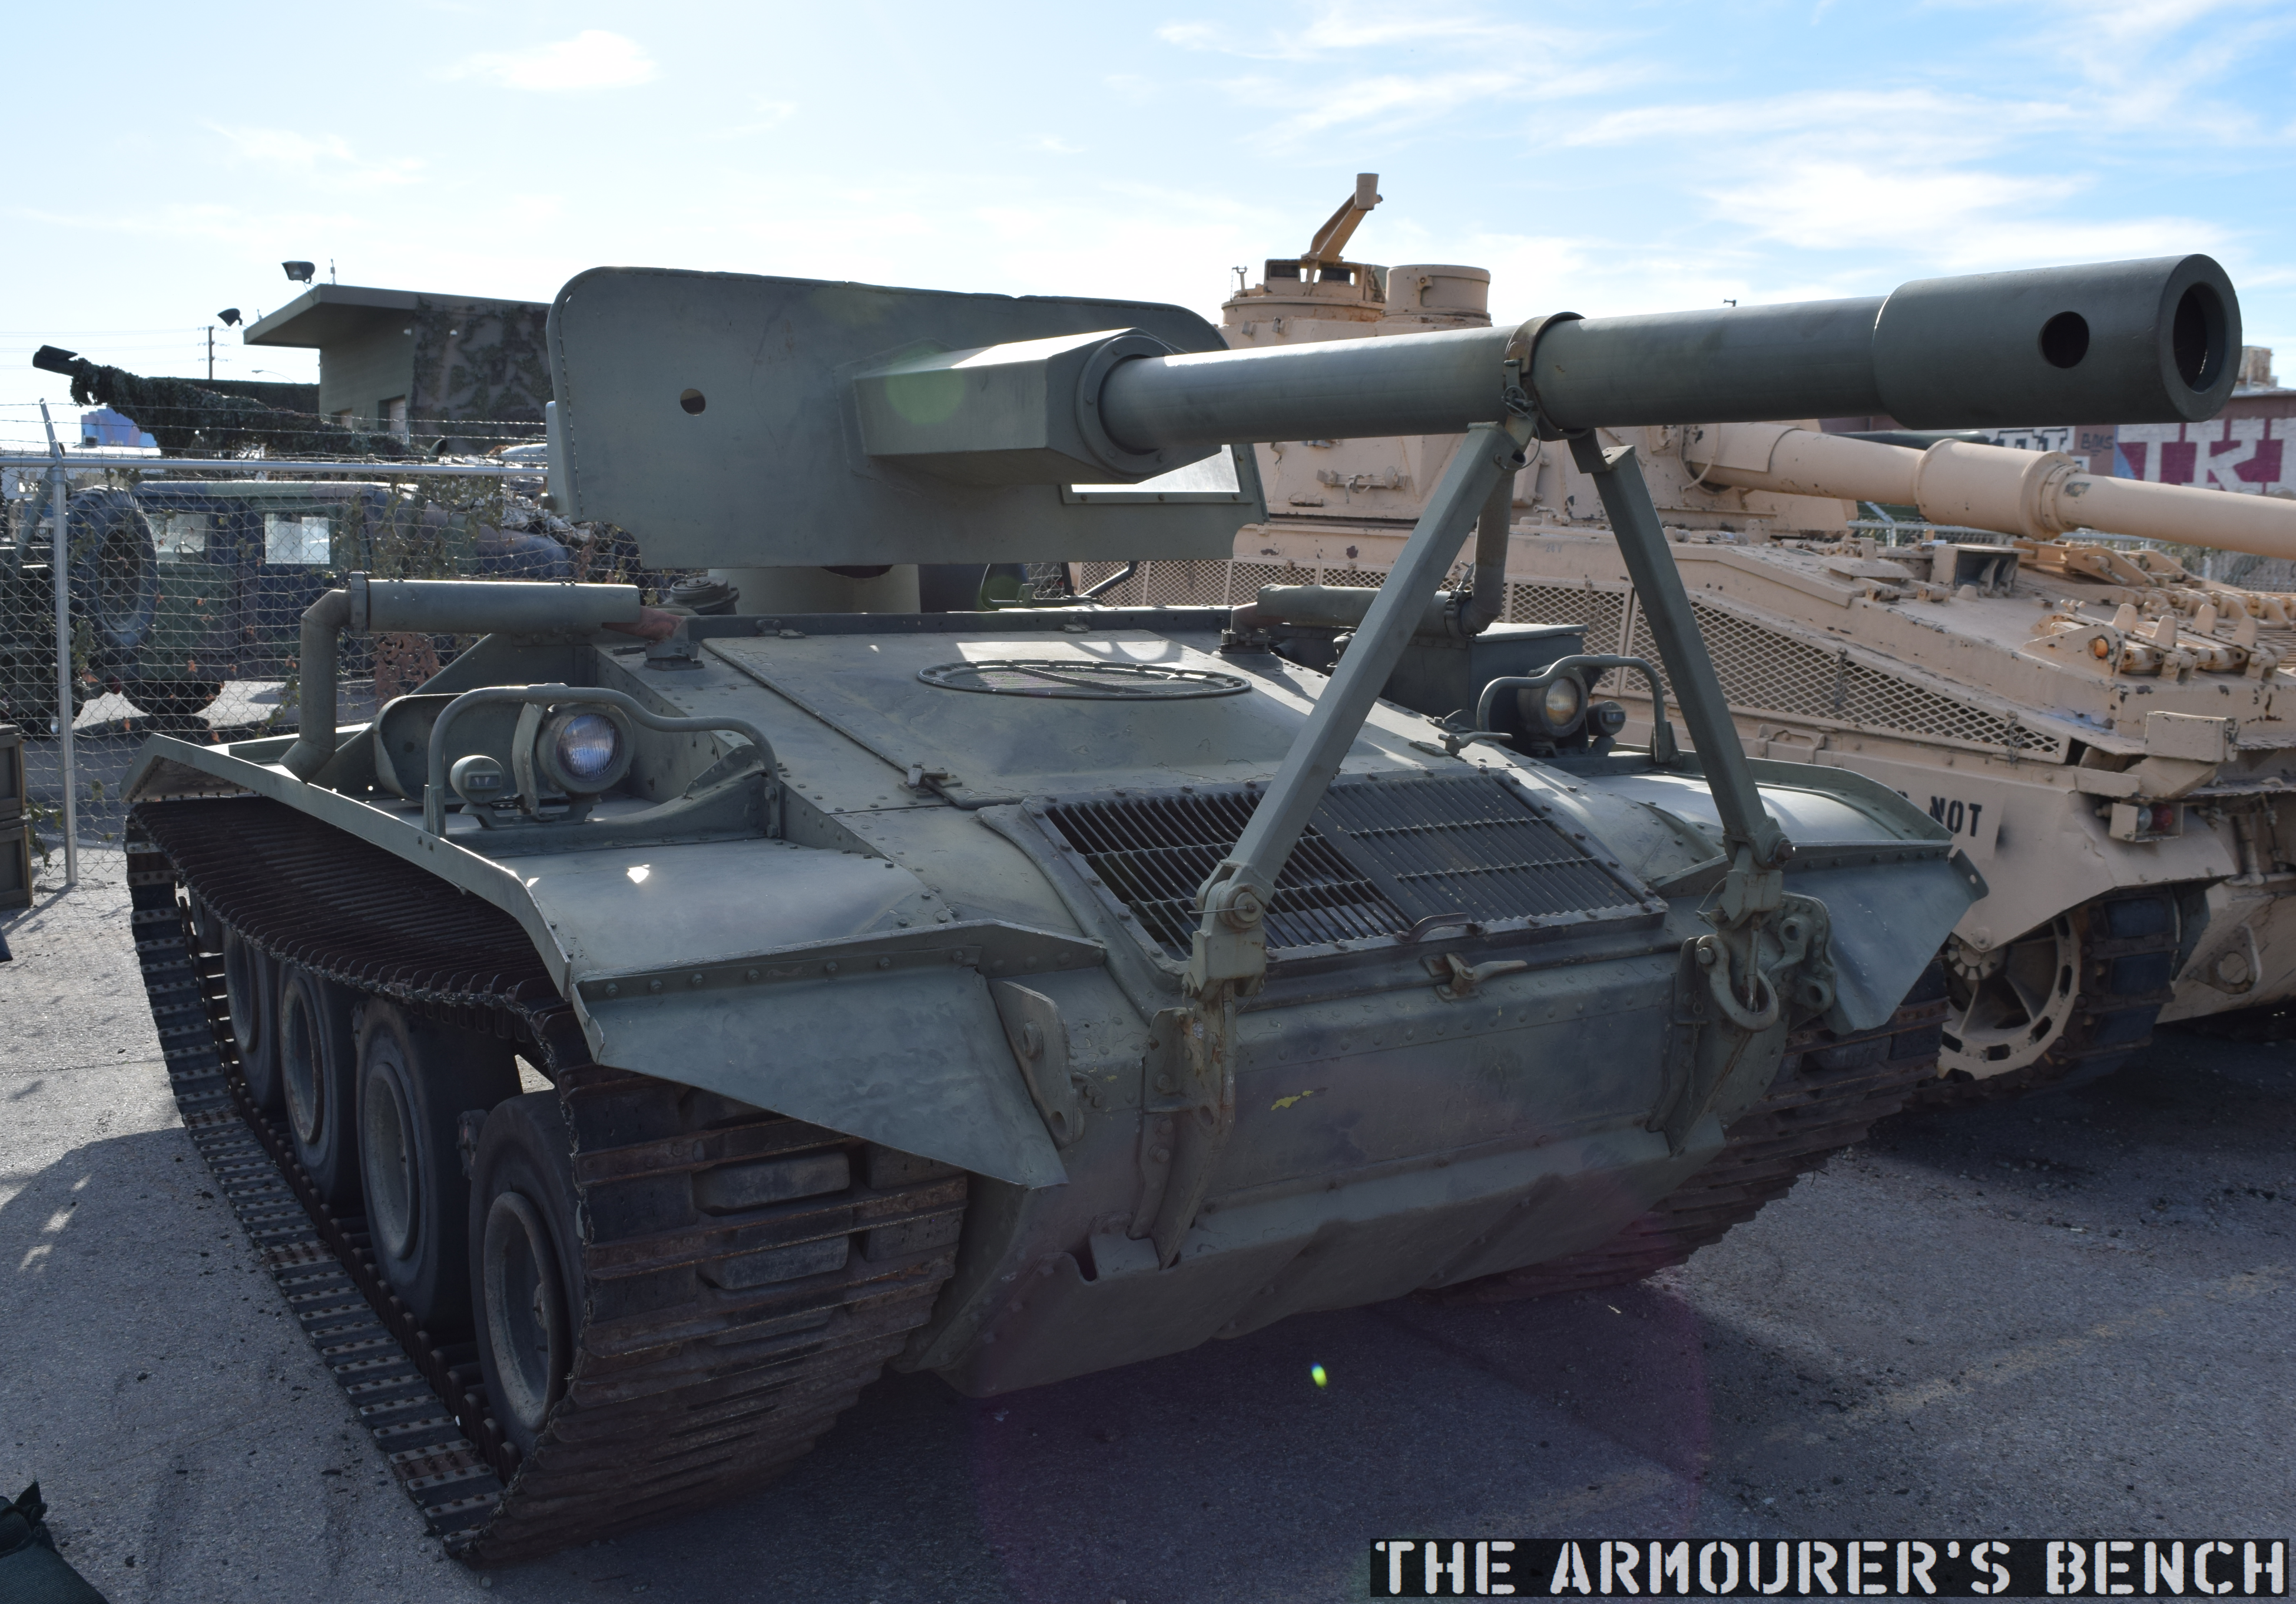
Front, right view of the M56 Scorpion (Matthew Moss)
The M56 was intended to act as an airmobile support weapon for the US Army’s airborne forces that was capable of traversing muddy, marshy, sandy and snowy terrain. Airborne infantry have historically been lightly armed and sometimes struggled against enemy forces equipped with armour. Attempts to level the playing field with glider transported anti-tank guns or even super light tanks could only do so much. Airborne operations during world war two proved light tanks, like the M22 Locust, were out-gunned, under-armoured and largely useless. While light artillery proved effective it lacked mobility and while infantry anti-tank weapons like the Bazooka were extremely useful they were close quarter weapons.
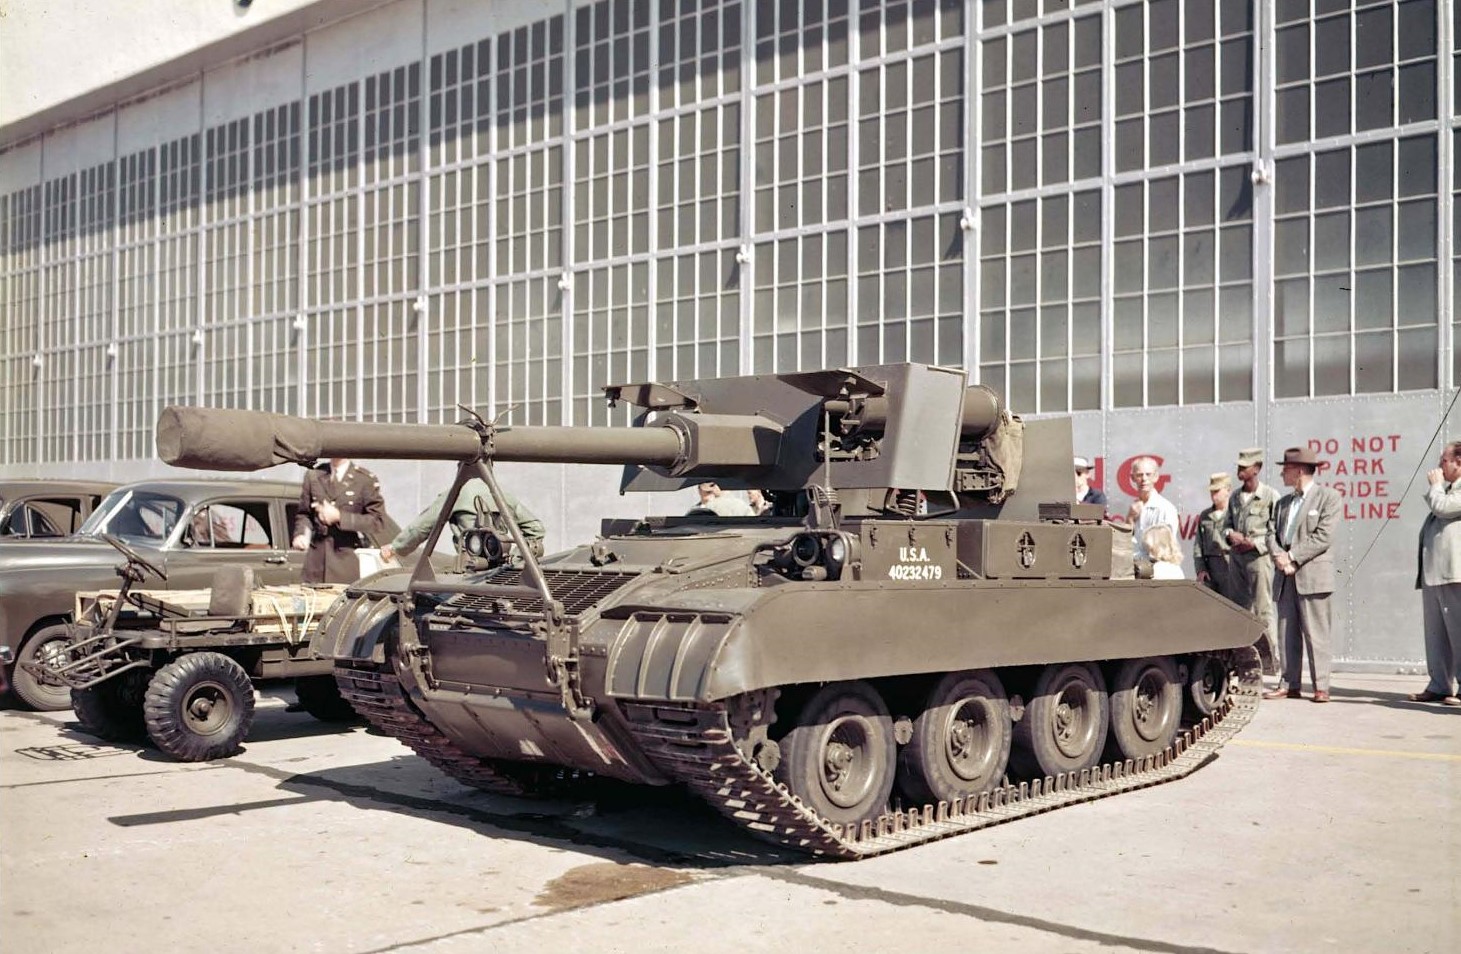
The T101 – Prototype M56 (US National Archive)
In response the US Army decided to abandon one of the points of the classic ‘iron triangle’ of armoured vehicle design all together, sacrificing protection for firepower and mobility. The unarmoured 16,000 lb (7 tonne) vehicle could be dropped from a transport plane to support paratroops and later heliborne air cav units.
An M56 (US Army)
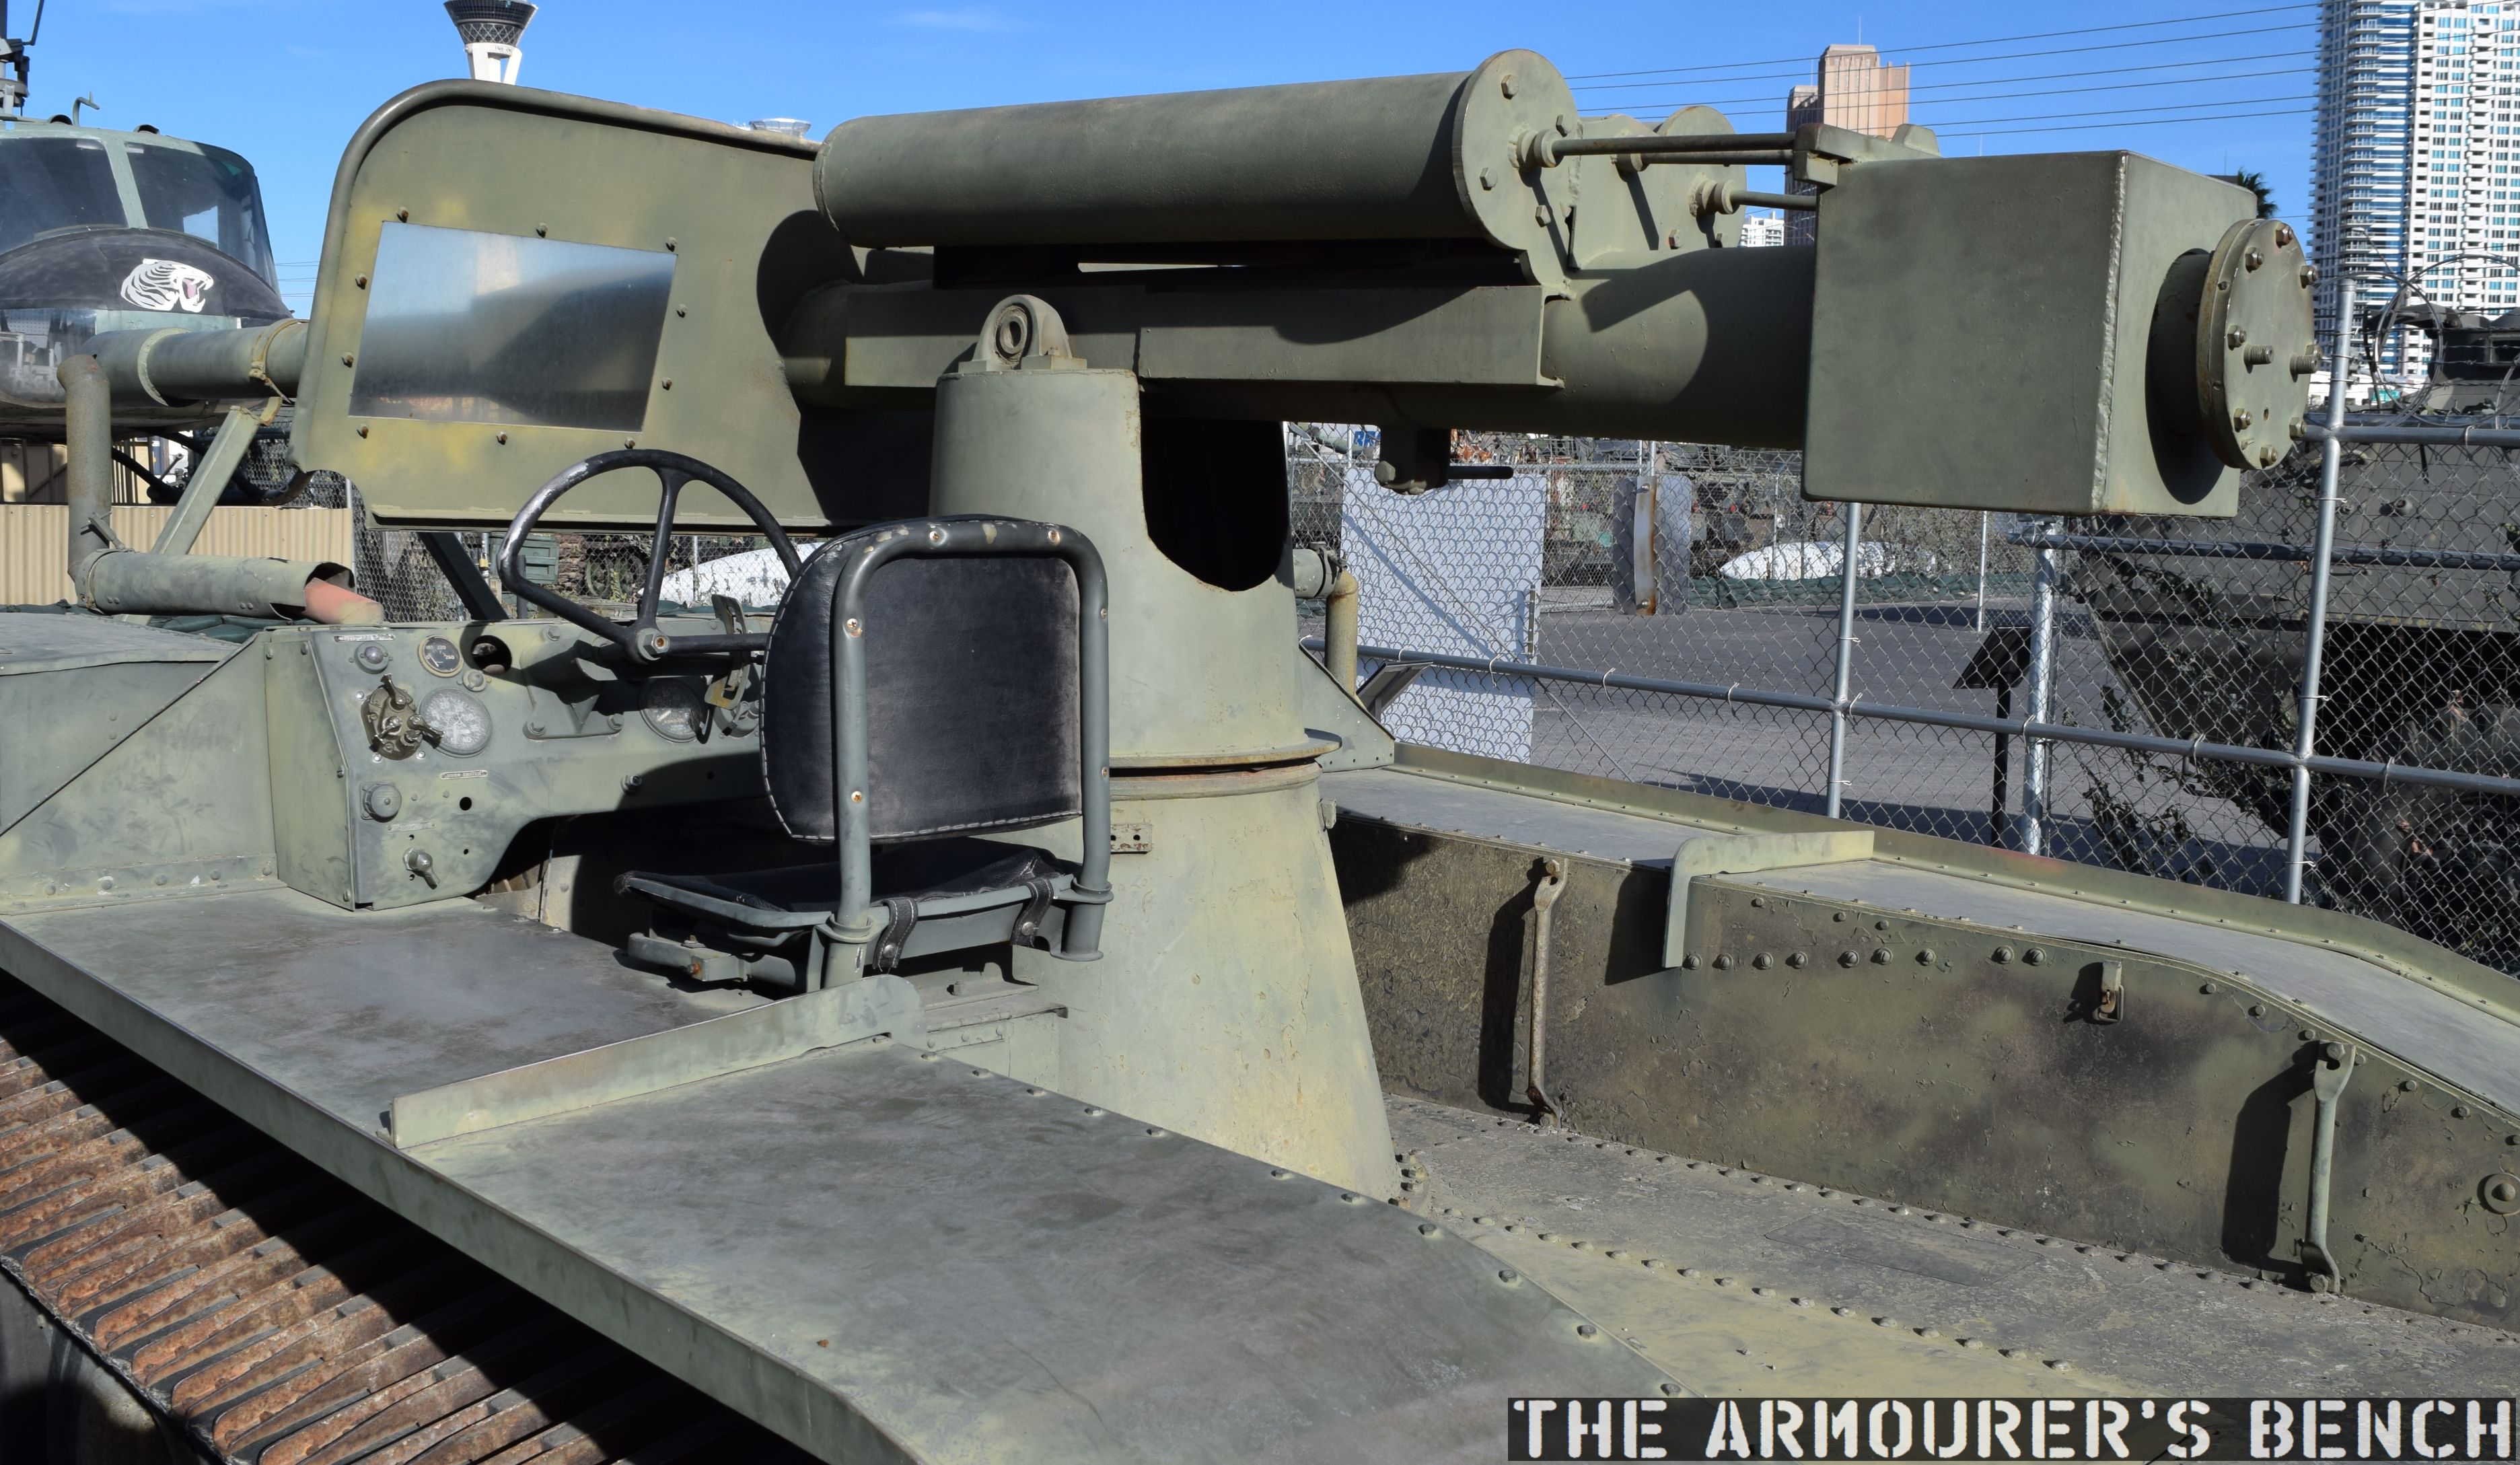
The M56 was developed and manufactured by the Cadillac Motor Car Division of General Motors, a pilot version was completed by 1955. The pilot model, designated the Full-Tracked Self-Proppelled Gun T101 is seen in this photograph from October 1955. When the vehicle finally entered production in 1957 it was largely identical to the T101 except for changes to the location of the radio, the design of the gun’s muzzle device, the hinged flaps on the gun shield were abandoned and the sand skirts were also abandoned. The Scorpion had no secondary armament and no armour. Protection for its 4-man crew amounted to nothing more than a gun shield, which also has a window for the driver.
A view of the ‘fighting compartment’ of the M56, the ammunition storage rack is missing(Matthew Moss)
View of the driver’s position (Matthew Moss)
The 90mm M54 high velocity gun was mounted on a pintle in the centre of the vehicle with the driver on the left and the vehicle commander, loader and gunner sat around the gun. The gun could be traversed 30-degrees left and right and had 10-degrees depression and up to 15-degrees elevation. At the rear of the vehicle was an ammunition store that held 29 90mm rounds. The main ammunition used with the M54 would have been the M318 armour piercing round but it could chamber any of the other 90mm ammunition then in US service. Sadly the ammunition store and breech of the gun aren’t present on this example.
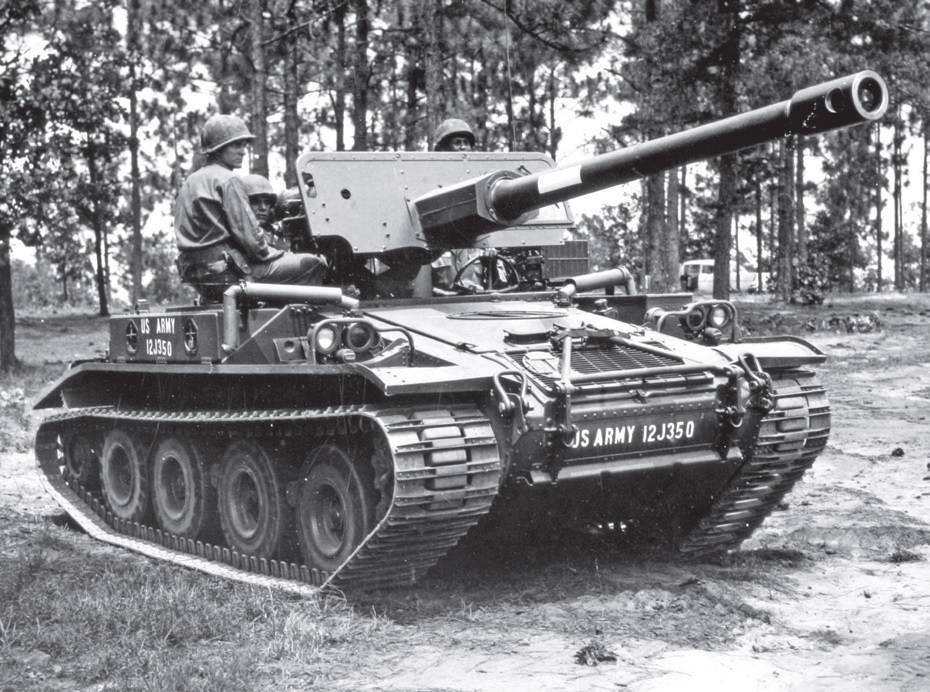
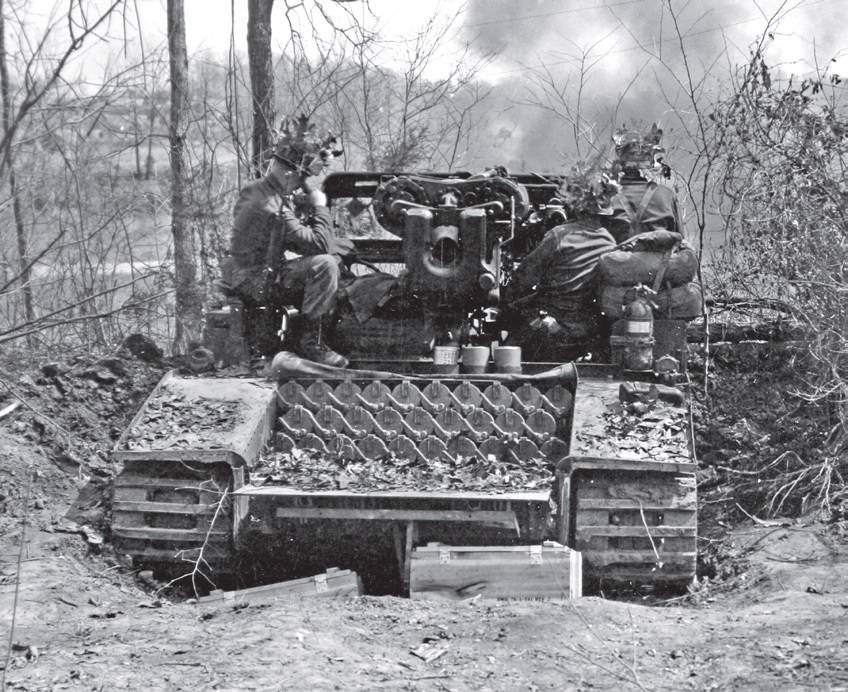
An M56 in action, note the ammunition storage racks (US Army)
The gun’s impressive recoil, even with a pair of recuperators, hit the Scorpion and the crew manning it hard, the footage shows just how powerful the recoil was. In this contemporary footage we can see that the front wheel almost bounces off the ground. Note also the semi-automatic action that opens the breech and ejects the spent shell casing after the gun is fired.
The vehicle was powered by an air-cooled petrol engine that produced 200hp. Capable of a maximum speed of just over 28mph.
Front, left view of the M56 (Matthew Moss)
Perhaps its most interesting feature is that it runs on four pneumatic road tyres, rather than metal road wheels, enclosed in a 20in wide track. The track was made up of two bands of rubber and steel cross pieces. There’s a sprocket at the front and an idler at the rear for tensioning the track. This configuration was chosen to reduce weight and it also minimised the ground pressure of the vehicle.
Production of the M56 ended in 1959, after around 325 had been produced. While most of these entered US service, 87 were purchased by Morocco in 1966 while a further 5 were used by the Spanish Marine Corps.
M56s in Vietnam (US Army)
While the M56 was slightly more mobile across country, in reality it wasn’t much better than a standard jeep equipped with a M40 recoilless rifle. Despite the Scorpion’s shortcomings it remained in service into the early 1970s and saw action during the Vietnam War with the 173 Airborne Brigade, which had a company of 16 M56s. In Vietnam the more capable and better protected M551 Sheridan saw wider use and what action the Scorpions did see was largely acting in direct fire support.
Special thanks to Battlefield Vegas for allowing us to film and feature their M56.
While doing some research in the US National Archives’ online catalogue I came across a very interesting video composed of footage from a couple of US Army Ordnance demonstrations so I thought I’d take the opportunity to talk about some very big guns.
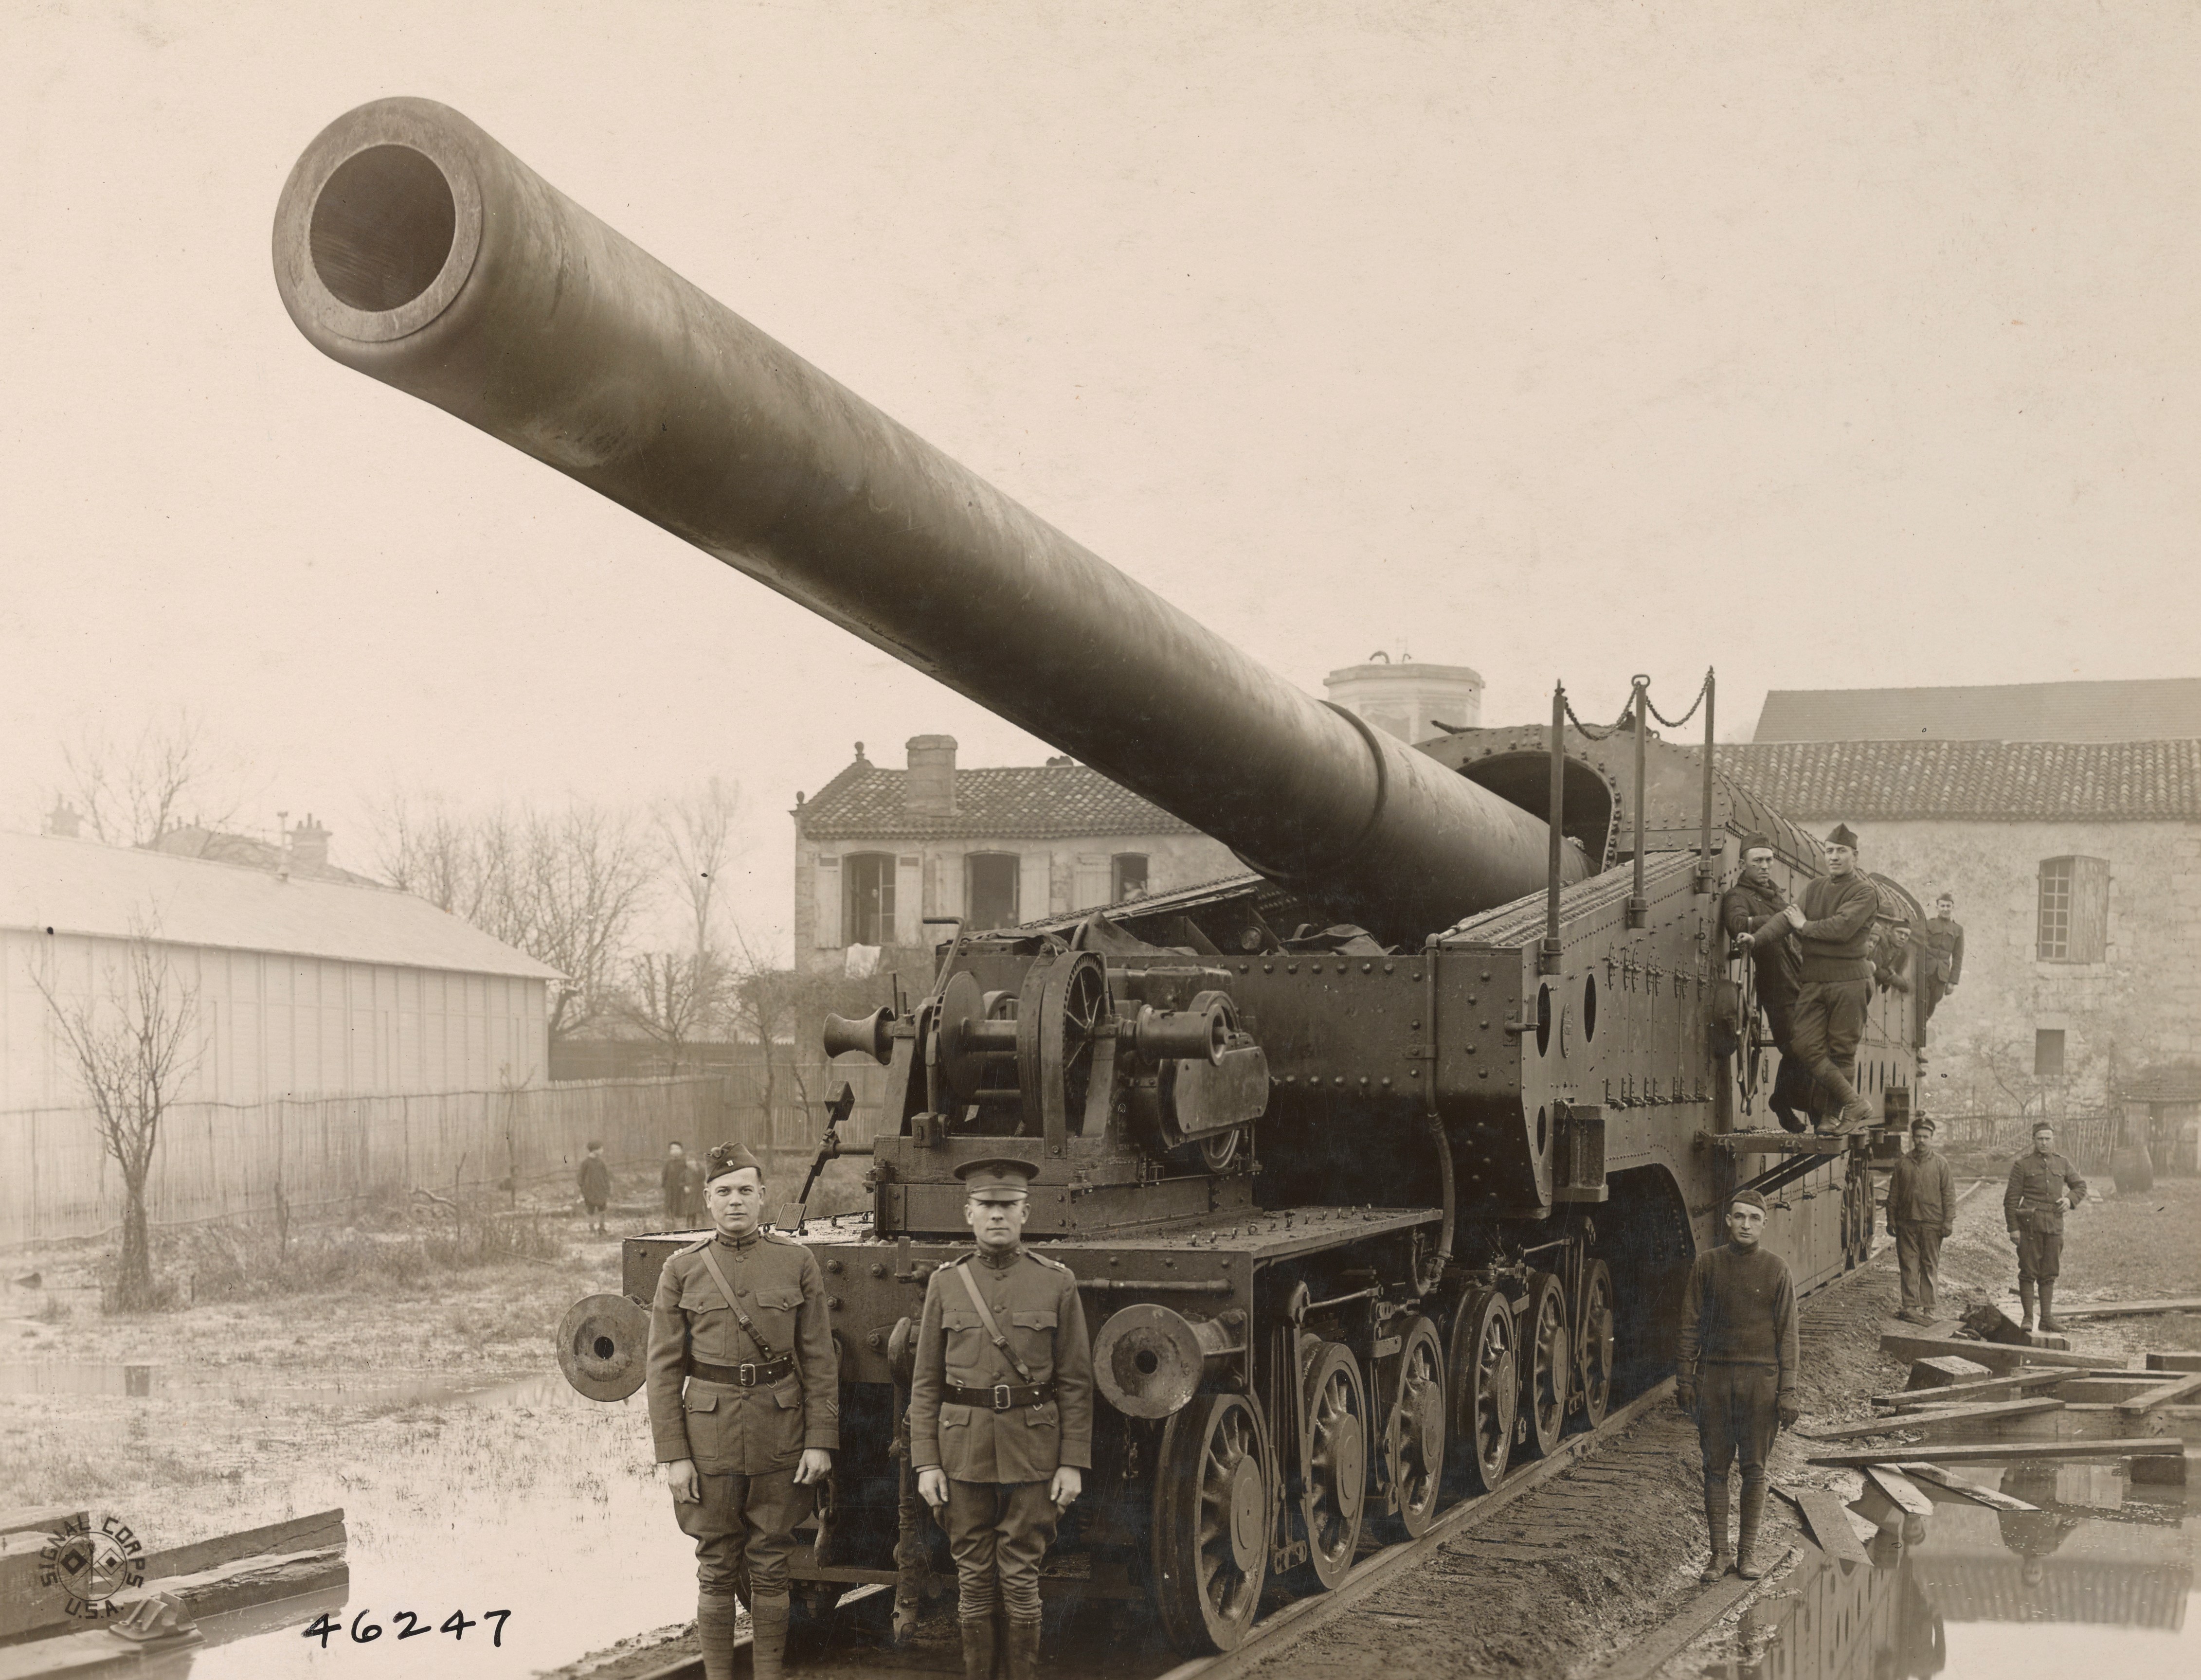
Railway guns emerged during the late 19th century as a way of moving massive, large calibre guns which had a reach far beyond that of field artillery. Before aircraft were able to effectively attack behind enemy lines railways allowed armies to bring huge guns within range and harass their enemies lines of communication and supply.
This footage comes from Ordnance demonstrations at the Aberdeen Proving Ground in the early 1920s.
16in Coastal Gun (US National Archives)
First up we have a US-built copy of the French 305mm Canon de 305 modèle 1893/96 à glissement, which according the original footage notes, was a 10in sliding mount for a gun firing a 150lb projectile. I also found some contemporary images of the gun being built at the US Watertown Arsenal, in Massachusetts, which describes it as the Model 1919. It may be the only example built by the US, Schneider built 8 of these guns for France during the war. When the gun fires we can see the whole gun and carriage recoil back a meter or so. Guns on sliding mounts cant be traversed and have to be aimed with specially laid track.
Next we have a 12 inch M1895 gun, mounted on a M1918 railway carriage which was based on the French Batignolles mount, with 360-degree traverse. Originally designed as a coastal defence gun, here’s a photograph taken in 1918 of the gun firing from a disappearing mount.
The M1895 had long been used as a coastal defence gun, and with US entry into the war surplus or unnecessary coastal guns were remounted as railway guns. The railway mounted M1895s had a large recuperator to mitigate the gun’s recoil. 12 were mounted, however, none reached France before the end of the war. We also get a nice shot of the shell hitting its target in the distance.
The 14 inch railway guns were the only big US guns to see action during WW1. Taking spare US Navy 14in naval guns, the 14″/50 caliber Mk 4 gun, which had been mounted in the New Mexico and Tennessee-class battleships, and mounting them in a carriage built by the Baldwin Locomotive Works. Once in position the guns had to have a recoil pit dug out beneath the carriage to allow space for the gun to recoil when it was at high elevation. They had a range of up to 25 miles.
Five Mk1 guns made it to France operating as single gun batteries manned by US Navy Sailors. The guns fired a total of 782 shells during the war, with Battery 4 firing its last shell at 10:57:30 a.m. on 11 November 1918.
Unlike the MkI guns that made it to France in this footage we see the gun without an armoured gun house, with the gunners working the gun in the open.
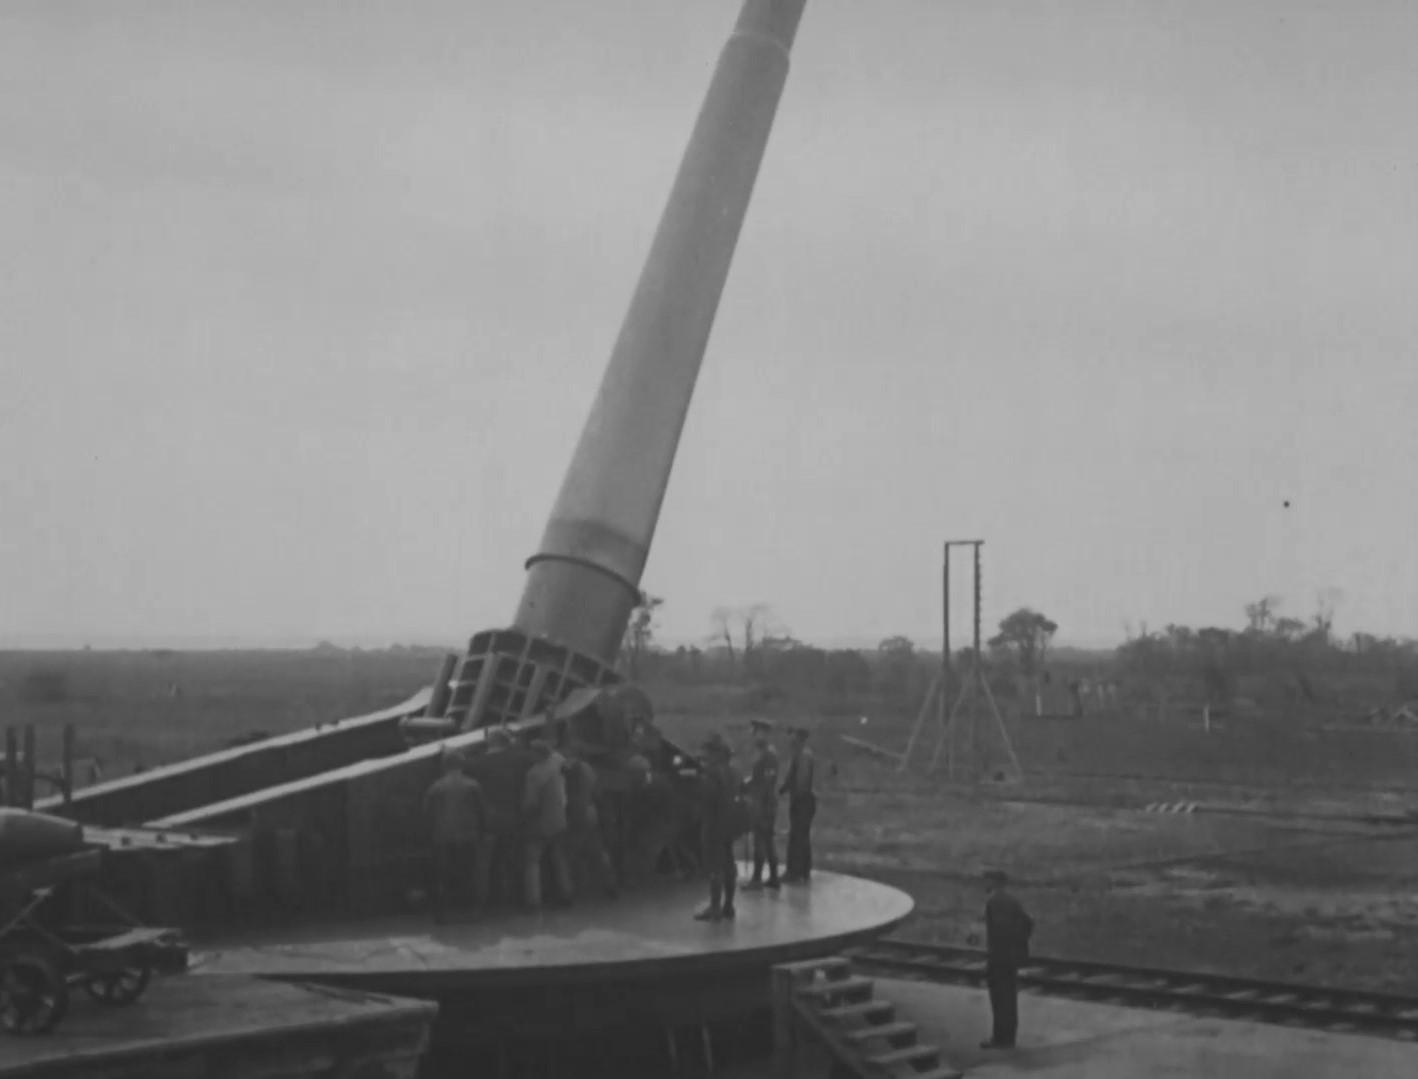
An M1919 16in Coastal Gun in a Barbette mount (US National Archives)
Finally, we have the truly massive 16 inch M1919 coastal gun . Designed for the Army Coast Artillery Corps to defend the US’ major coastal ports the 16-inch gun could throw a 2,340 lb shell up to 28 miles. In this footage we can see the gun mounted on an M1919 barbette carriage which could be elevated up to 65-degrees.
This second piece of footage dates from between 1929 and 1931, with dozens of West Point cadets gathered eagerly to see the gun in action.
Demonstration of Ordnance Materiel at Aberdeen Proving Grounds, 1920-1926 (source)
Railway Artillery: A Report on the Characteristics, Scope of Utility, Etc., of Railway Artillery, Vo.1, H.W. Miller & US Ordnance Dept. (1921) (source)
Railway Artillery: A Report on the Characteristics, Scope of Utility, Etc., of Railway Artillery Vol.2, H.W. Miller & US Ordnance Dept. (1922) (source)
The United States Naval Railway Batteries in France, E. Breck (1922) (source)
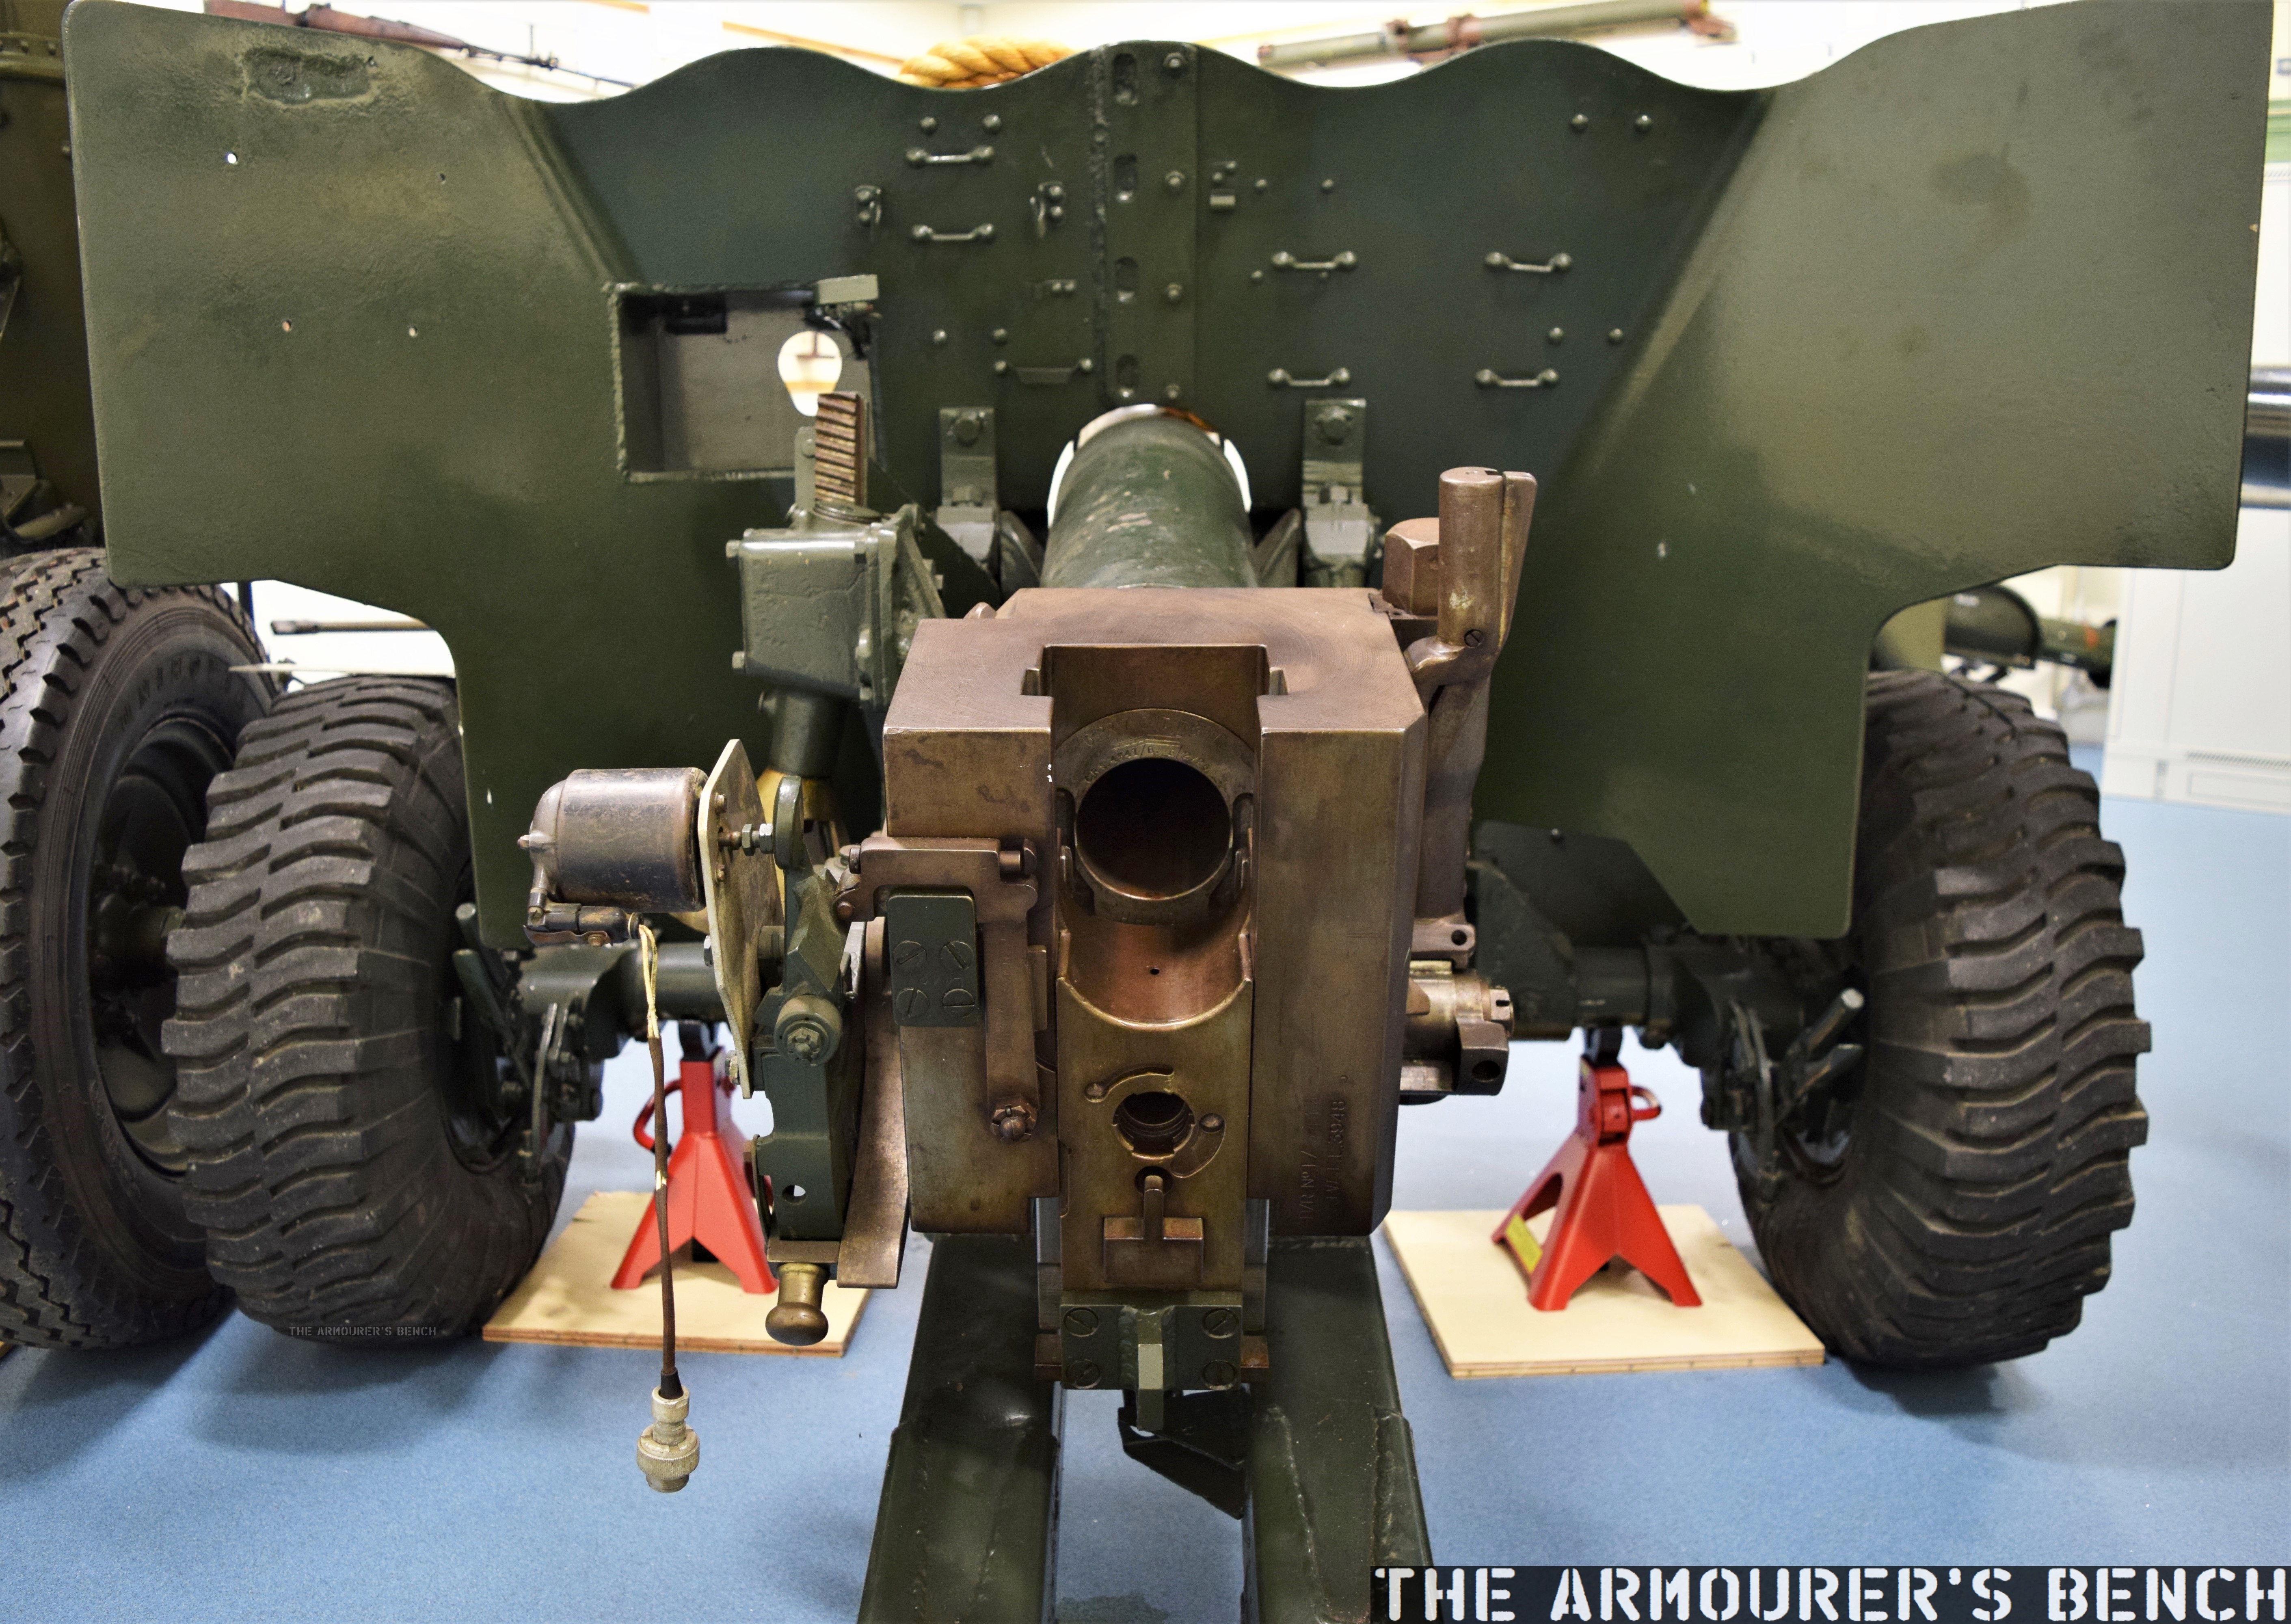
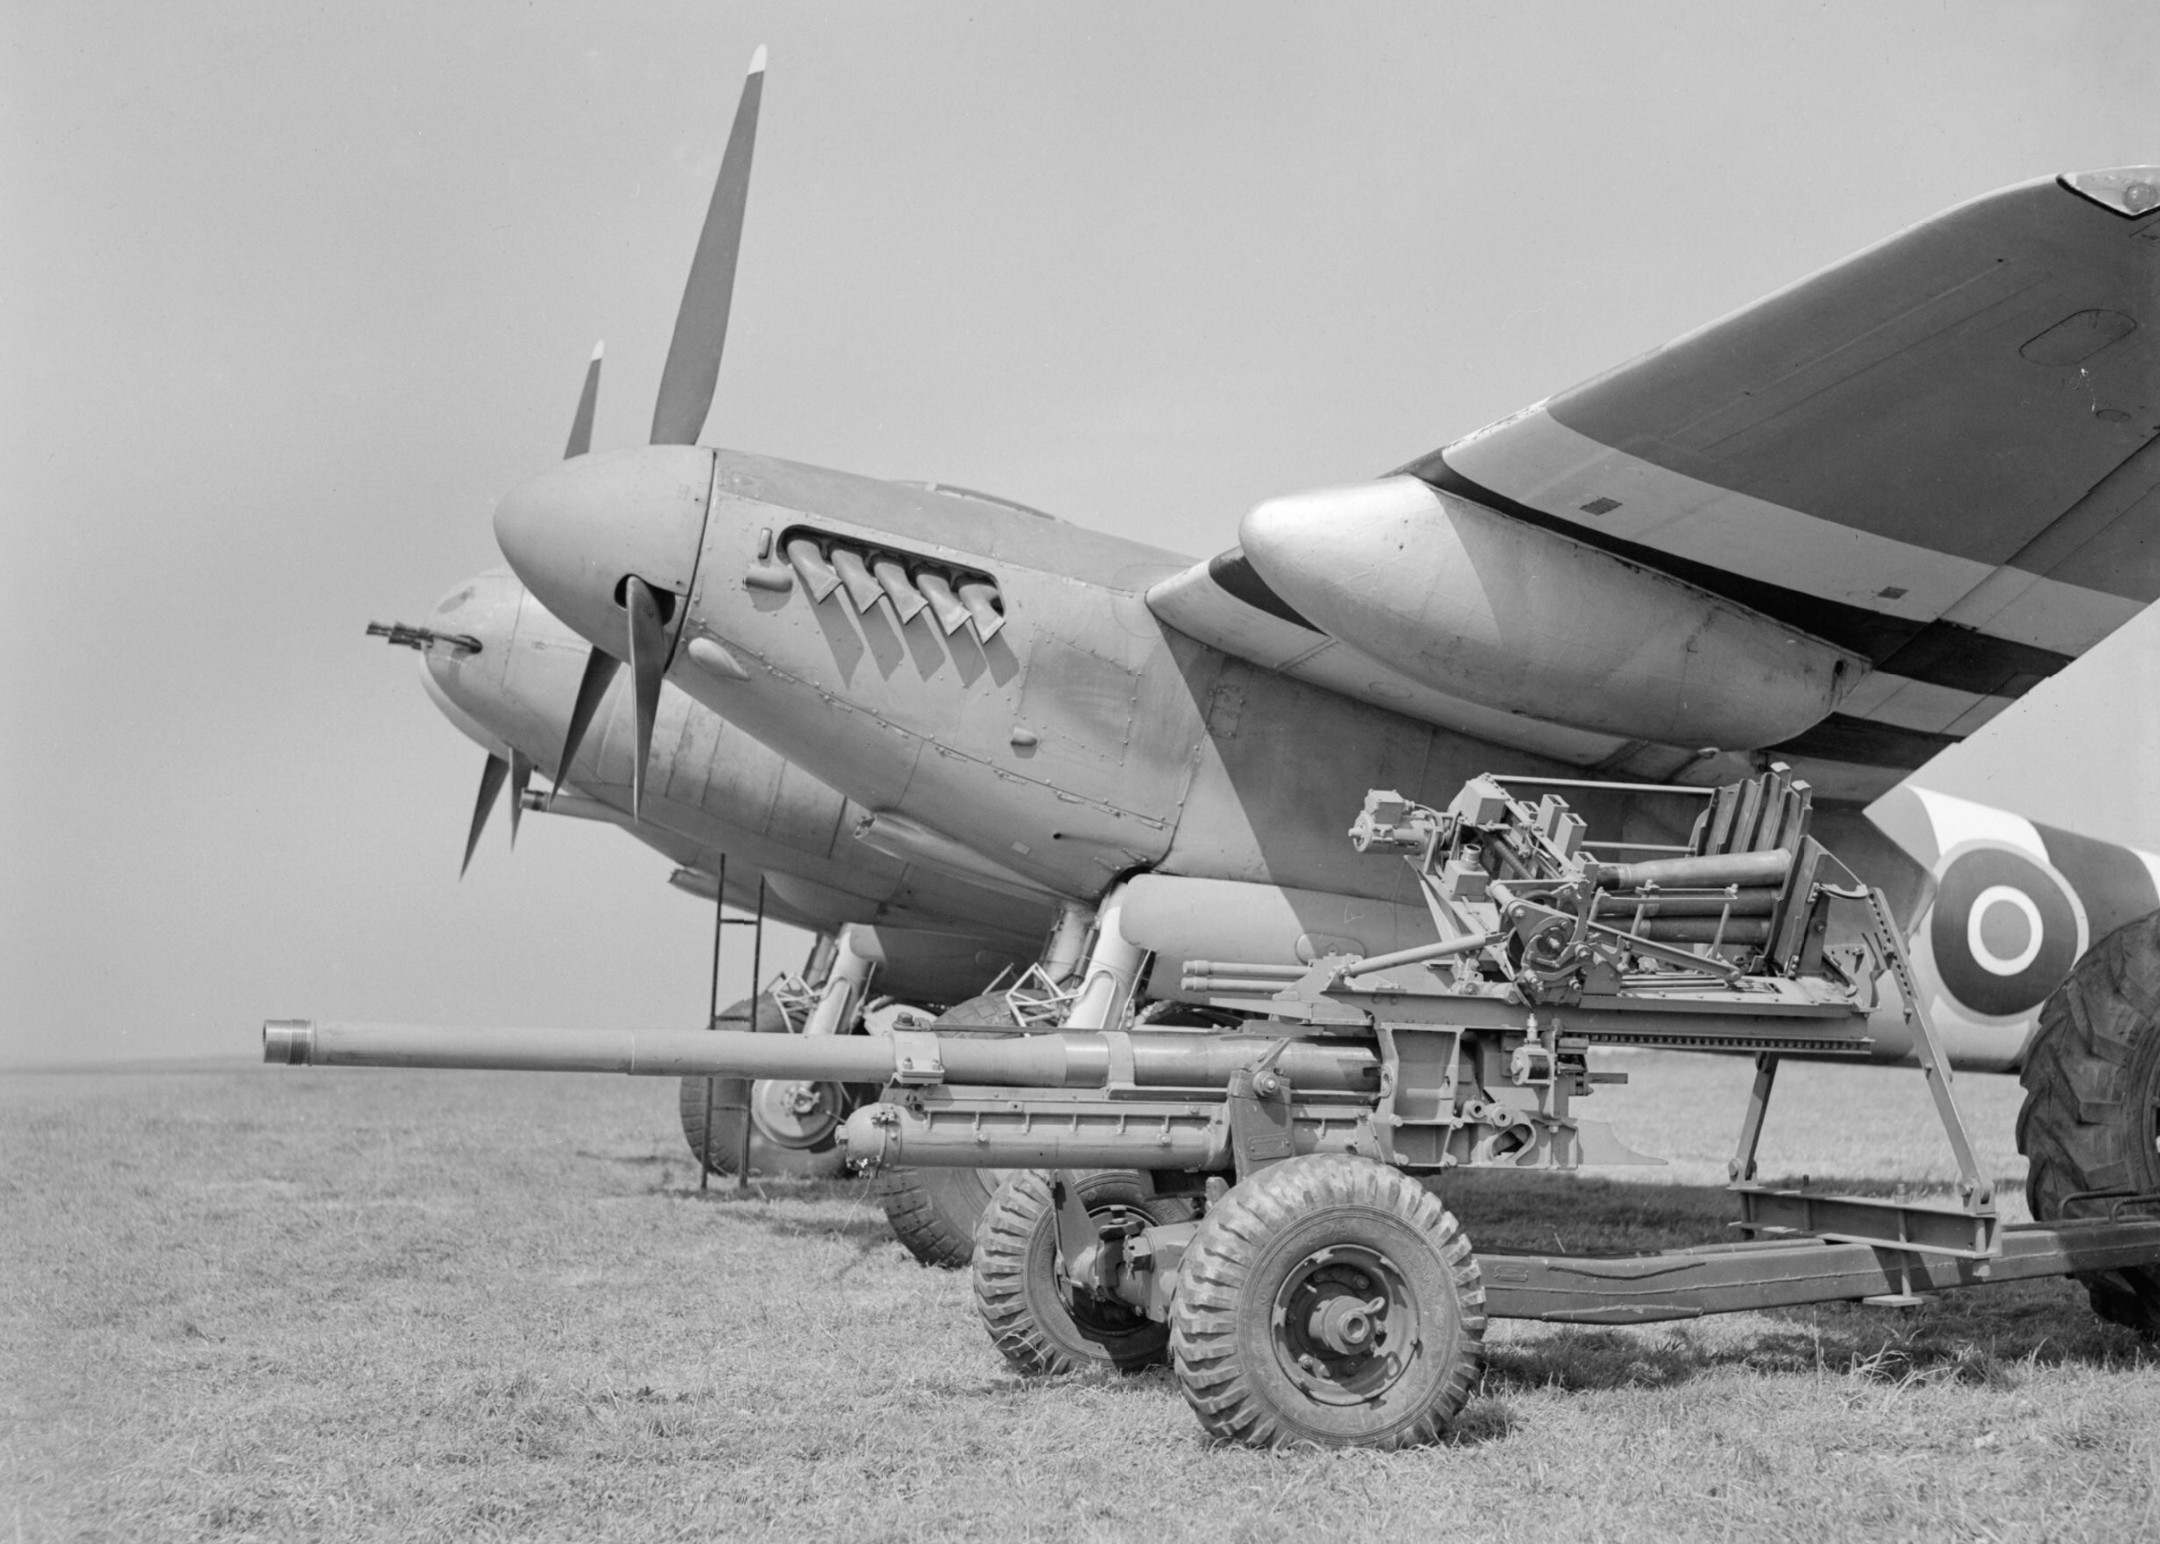
Development of the gun actually began before the war in 1938, but the QF 6pdr MkII Anti-Tank gun didn’t enter full production until 1942. After the evacuation from Dunkirk in the summer of 1940, and the loss of nearly 600 AT guns, it was decided to focus on the 2pdr which was then already in production. The 6pdr saw action for the first time in the Western Desert against the Afrika Korps, serving alongside its predecessor the 2pdr.
QF 6pdr AT Gun (Matthew Moss)
The 6pdr was a 57mm gun, firing a 57x441mmR shell effective out to 1,700 yards or 1,500m – with a rated maximum range of 5,000 yd. Unlike its predecessor the 6pdr could fire both armour piercing and high explosive rounds. The gun weighed in at 2,520 lb or just under 1,150 kg. Manned by a six man crew the gun had a vertically sliding breechblock and could fire up to 15 rounds per minute.
Breech View of the QF 6pdr (Matthew Moss)
The 6pdr had a Hydro-pneumatic recuperator which mitigated some of the gun’s recoil. The barrel recoiled around 30 inches along its cradle immediately after firing. It was mounted on a variety of carriages with the most common being a split trail carriage with 45-degrees of traverse left and right. The 6pdr could be fired with its split trail deployed or closed. The gun could be elevated 15-degrees and depressed 5-degrees – less than its predecessor, although elevation was not a key requirement for a direct fire weapon like an anti-tank gun.
Five Marks of 6pdr were produced, the MkI development model was declared obsolete and didn’t enter production. Production of the MkII began in late 1941, it had a shorter barrel and was later replaced by the longer barrelled MkIV, which also had a single-baffle muzzle brake, one of the first British guns to have one. The MkIII and V variants had special lugs to enable them to be mounted in tanks. The first guns produced were MkIIIs, while these could be carriage mounted they were earmarked for tanks.
Airborne troops with a 6-pdr anti-tank gun in Hamminkeln, March 1945 (IWM)
The MkIII Airborne carriage was designed to be lighter so it could be transported aboard gliders and aircraft. Its trail legs were jointed in order to save room and the carriage was narrower which restricted the traverse to 37-degrees left or right. The shield was also redesigned with an even smaller profile. Identifiable by its straight, rather than wavy, top edge.
The gun was aimed using a No.22C 2 or 3-power sighting telescope, located on the left side of the gun, which projected through a sight box in the shield. The gunner also had an elevation wheel to his right and, unlike the 2pdr, the 6pdr used a free traverse rather than a geared wheel system. This was controlled by the gunner pushing or pulling the gun. The gun was fired by a firing lever on the left side of the breech. On the right side of the gun, an ammunition box with space for three rounds could be attached to the shield for emergency use. The gun shield consisted of two/four sections, made of bulletproof steel plate, which had a lower profile than the earlier 2pdr.
A New Zealand 6-pdr anti-tank gun in action against enemy positions at Cassino, March 1944 (IWM)
Unlike the 2pdr, the 6pdr had an array of ammunition that continued to evolve during the war. The initial armour piercing round could penetrate 70mm or 2.8in of armour at 1,600 yards / 1,500m while the Armour-Piercing Capped Ballistic Cap (APCBC) introduced in early 1943 increased this to 3.1in, while the Armour-Piercing, Discarding Sabot (APDS) shot introduced in Spring 1944, enabled it to effectively engage Tiger I and Panther frontal armour, penetrating 4.8 inches of armour at 1,500m. It is worth noting that figures on penetration vary somewhat from source to source. A high explosive shell that allowed the guns to engage non-armoured targets more effectively was introduced in 1943.
Initially used solely by the Royal Artillery’s anti-tank regiments comprising of four batteries, each with 12 guns. By 1944 an infantry division would be equipped with as many as 78 6pdrs and more than 30 heavier 17pdrs while an armoured divisions was equipped with 30 6pdrs.
British 6pdr anti-tank gun in action in the desert, 3 September 1942 (IWM)
The 6pdrs first saw action in North Africa proving to be highly effective against both Italian and German armour. During the Second Battle of El Alamein, 19 6pdrs were instrumental in the defence of Outpost Snipe. The 2nd Rifle Brigade and their supporting 6pdrs managed to knock out more than 55 Axis armoured vehicles including Panzer IIIs, Semovente 75/18 self-propelled guns and a number of Panzer IVs. The gunners used enfilading fire to target weaker side armour and interlocked fields of fire caught advancing tanks in killing grounds.
During Operation Market Garden, the airborne 6pdrs of the Airlanding Anti-Tank Batteries proved critical in beating back German armoured counter attacks around Oosterbeek and at the bridge in Arnhem itself. They were instrumental in repulsing the SS reconnaissance battalion which attempted to cross the bridge on the second day of the battle.
One desperate action involving a section of two 6pdrs saw three StuG-III self-propelled guns knocked out before the crews of both guns were killed. The last survivor, Lance-Sergeant Baskeyfield managed to man on of the guns alone and destroy a fourth StuG-III before he was killed. For his actions he was awarded the Victoria Cross.
Churchill MkIII tanks armed with QF 6pdrs, North Africa, 1942 (IWM)
Like its predecessor the 6pdr was also used as a vehicle gun, mounted in the Churchill Mks III & IV, Valentine Mk IX and the Crusader Mk III tanks as well as the Canadian MkII Ram and the MkII AEC Armoured Car. These vehicles had previously been designed to mount the 2pdr, but were adapted to fit the new 6pdr, in some cases having to remove a crew member from the turret to make enough room to fit the new gun. The Cavalier, Cromwell and Centaur tanks were designed to mount the new larger gun from scratch.
The first tank, equipped with a 6pdr, to go into action was the Mk III Churchill, which took part in the disastrous Dieppe Raid in August 1942. The new tanks, assigned to the 14th Army Tank Regiment (The Calgary Regiment (Tank)), were all abandoned or destroyed during the raid.
In North Africa, like the 2pdr, the heavier guns were mounted on trucks as Portees. Additionally AEC produced the Mk1 Gun Carrier or Deacon self-propelled gun – a 6pdr mounted in an armoured turret on the back of an AEC Matador truck chassis. These performed well in the desert but more enclosed country made them vulnerable and they were removed from service after the North African campaign.
A truck mounted 6-pdr anti-tank gun (Portee) in the Western Desert, 31 May 1942 (IWM)
It was not only tanks the 6pdr found itself mounted in. Coupled with the Molins automatic loading system it was also mounted in the RAF’s De Havilland Mosquito Mark XVIII ‘Tstetse’ and the Royal Navy’s motor torpedo boats. The Navy’s Molins auto-loader allowed the gun to fire a 6-round burst at a rate of 1 round per second. Nearly 600 naval versions of the gun, the QF 6pdr MkIIA, were produced. The RAF’s use was more short-lived with only 17 6pdr Tstetses built before 3in rockets were standardised. Despite this two Tsetse of 248 Squadron sank the German submarine U-976 in March 1944.
The US also adopted the 6pdr to replace their 37mm M3 anti-tank gun. It had initially been planned to produce the 6pdr in the US under the lend-lease agreement (4,242 guns were eventually delivered for British use) but in May 1941 the US approved the production of the 6pdr as the 57mm M1 Gun. The US M1 guns had a longer barrel than their British counterparts and many smaller differences in manufacture. The US, like Britain, mounted the gun on vehicles such as the M3 half-track – the T48 Gun Motor Carriage. By the end of the war the US has produced over 15,600 M1 anti-tank guns.
Ordnance QF 75mm was developed from the 6pdr, the 75mm guns were manufacture by boring out the 6pdr’s barrel to enable it to fire the US 75mm M46 HE round. The QF 75mm was fitted to a number of British armoured vehicles from 1943 onwards.
RAF De Havilland Mosquito Mark XVIII ‘Tstetse’ with Molins QF 6pdr (IWM)
The 6pdr was a simpler gun to manufacture than its predecessor but despite being effective throughout the war it too was surpassed by a heavier gun, the QF 17pdr AT gun, which was developed in the early 1940s, the 17pdr was accepted for service in May 1942 but the 6pdr remained in service alongside the heavier guns.
After the end of the war the 6pdr continued to see use with a number of countries including Israel during the 1950s, the Irish Army and South Korea during the Korean War. The 6pdr remained in British service until 1951, before being replaced entirely by the 17pdr.
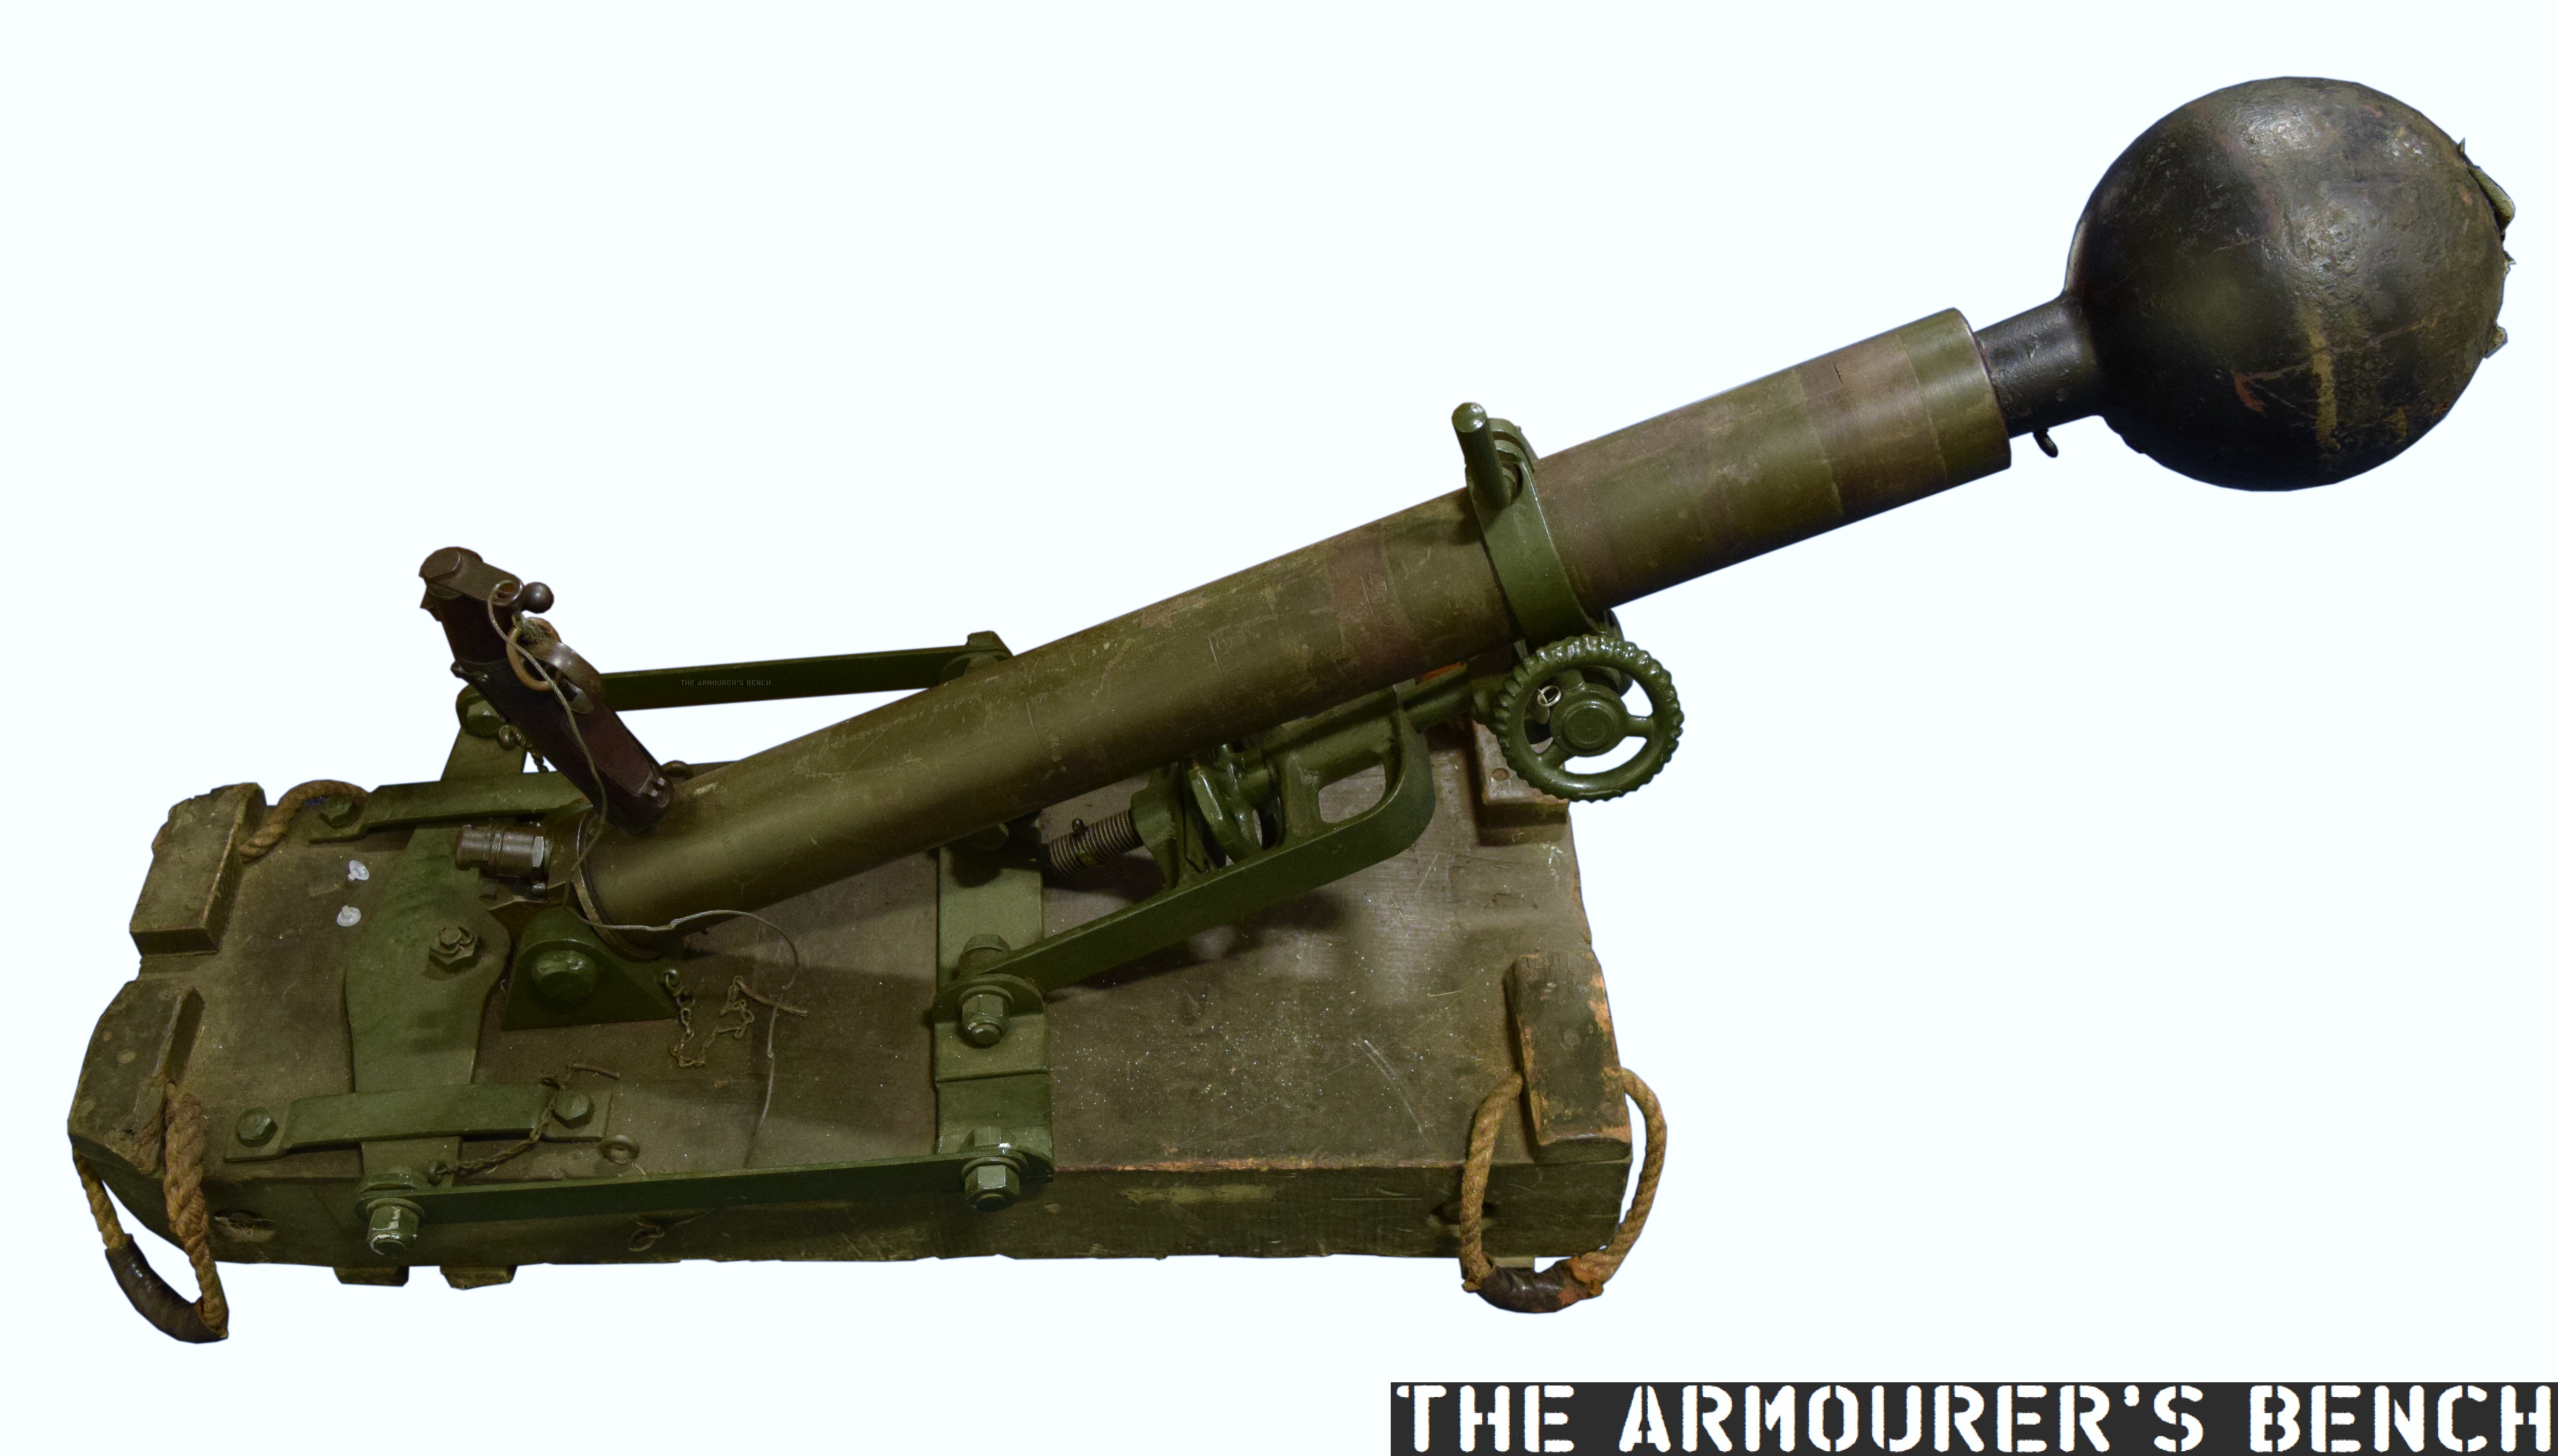
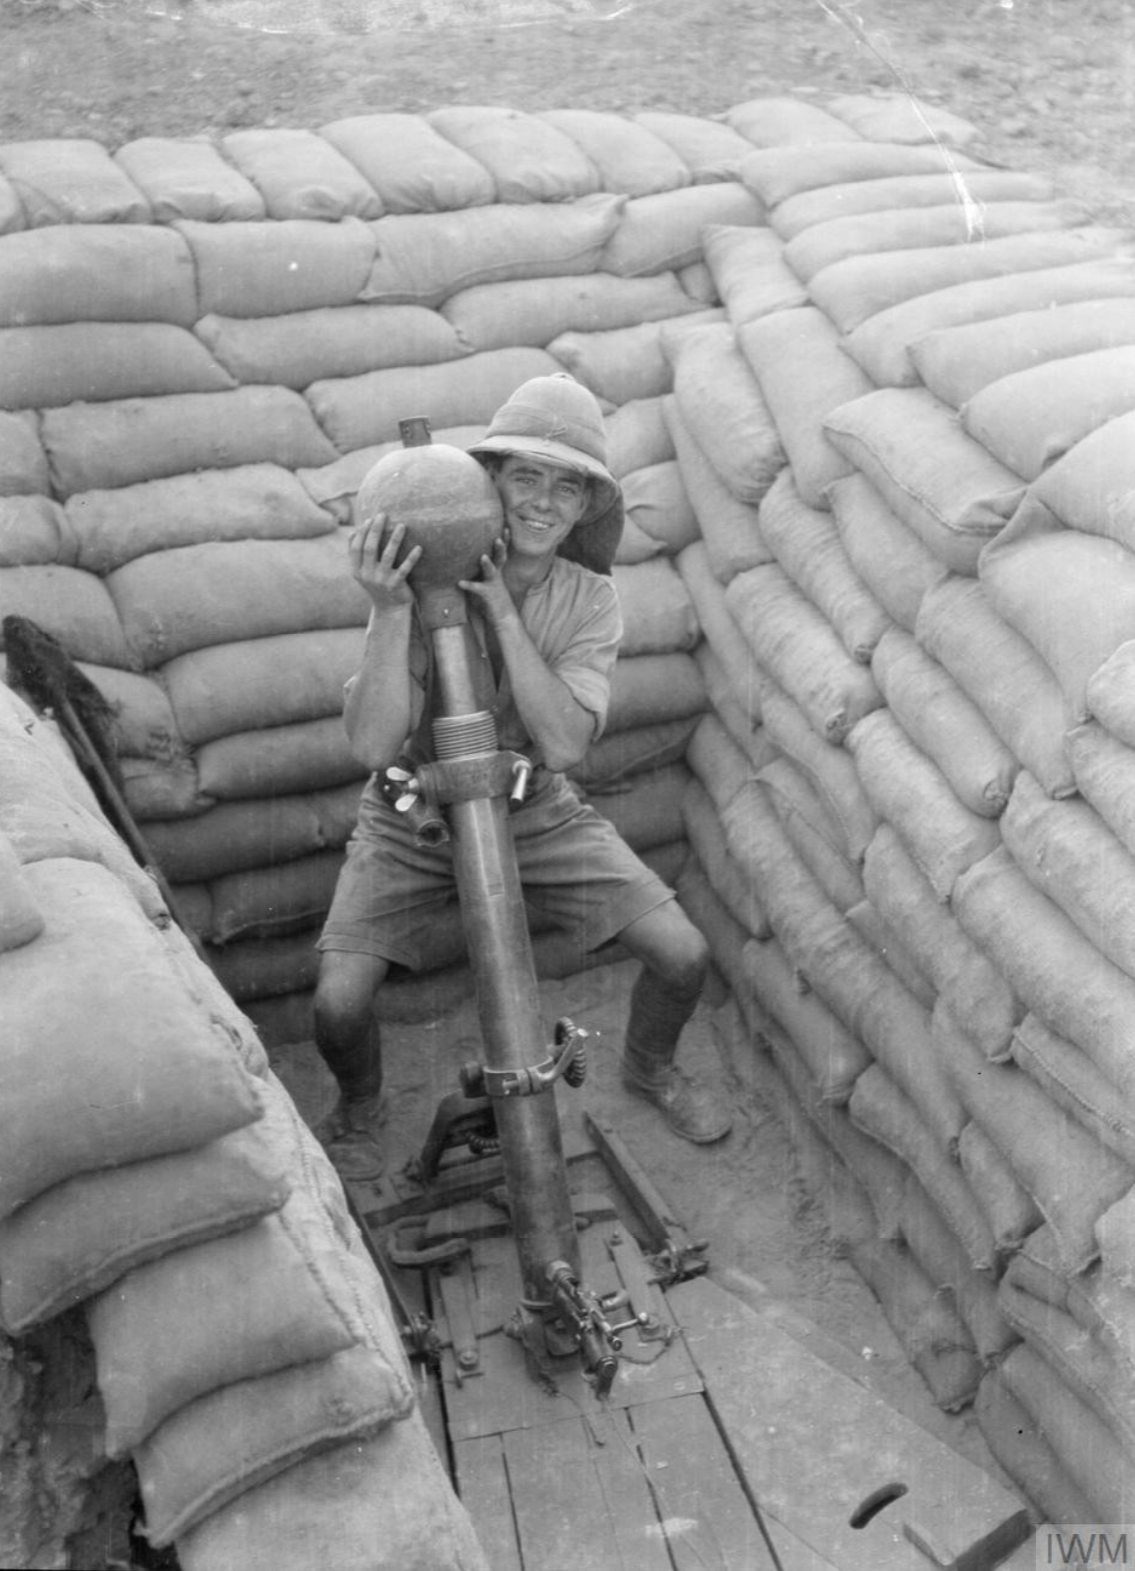
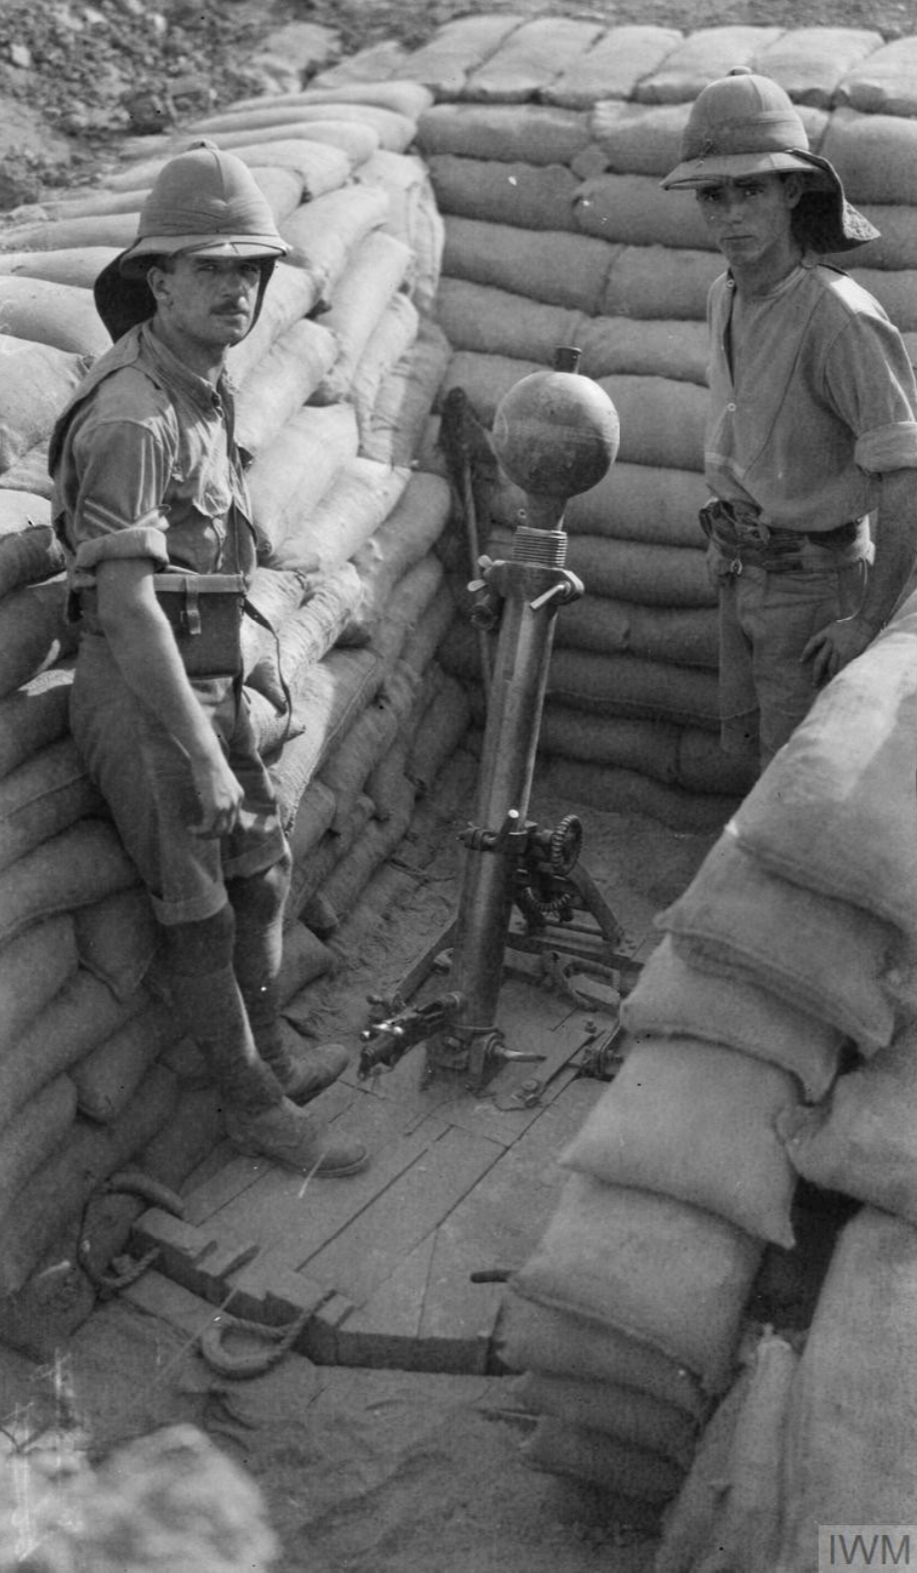
The British Army entered the First World War with very few mortars, and certainly none at the battalion level. As the stalemate of trench warfare set in and the effectiveness of enemy mortars became clear it was decided that trench mortars of various sizes would be needed.
Nicknamed ‘plum pudding’ or ‘toffee apple’ mortars after their projectile’s characteristic shape, the 2 inch Medium Mortar or 2 inch Trench Howitzer, was one of Britain’s first effective light trench mortars to be introduced.
Right-side view of the 2in Trench Mortar (Matthew Moss)
Trench mortars were the army’s most forward artillery, right up on the front line. These short range weapons were able to throw large, high explosive projectiles, short distances across No Man’s Land at the enemy trench system opposite. The 2 inch mortar was considered accurate out to 350 yards with a maximum effective range out to just under 600 yards.
Introduced in 1915, the 2 inch mortar was originally crewed by men taken from the battalion it was stationed with, along with some specialists from the Royal Artillery. However, with the introduction of the 3 inch Stokes mortar which was operated by the infantry themselves the 2 inch mortars became the sole responsibility of the Royal Field Artillery.
A young gunner loads a 2in spigot mortar bomb into his mortar (Imperial War Museum)
Mortar positions were often in secondary trenches just behind the infantry’s frontline. This was to help protect the infantry from potential counter-battery fire. The trench mortars were often deployed to sectors to provide counter battery fire against German minenwerfers or in the run up to an offensive or local action. A British Army report on artillery use, drawn up in February 1917, noted that “Owing to their liability to be destroyed by hostile artillery fire it may often be advisable to defer opening fire with these mortars till the last day of bombardment.” The mortars were also tasked with keeping gaps made in the wire clear and with supporting any feint attacks made by infantry during gaps in the bombardment running up to a larger offensive.
Llewelyn Wyn Griffith, a captain with the 15th Royal Welch Fusiliers and later a novelist, recalled in his war memoir:
“At night a trench mortar officer set his guns in a derelict trench about twenty yards behind the line and carried up his ammunition, heavy globes of iron with a little cylindrical projection like a broken handle. In the morning I moved the men from the bays between the trench mortars and their target, to lighten the risk of loss from retaliatory fire.”
Sometimes the width of No Man’s Land required saps to be cut extending out from the frontline so the mortar rounds didn’t fall short. The 50 lb lollipop-like projectile had a maximum effective range of 570 yards (depending on the size of cordite charge used), and could create a crater 5 feet deep and 14 feet wide. The ideal mortar position was a 6 feet wide by 9 feet deep sandbagged pit with the weapon’s heavy wooden bed at the bottom and room for the crew to load the mortar.
A British 2in Mortar position in Mesopotamia, note the ignitor’s breech is open (Imperial War Museum)
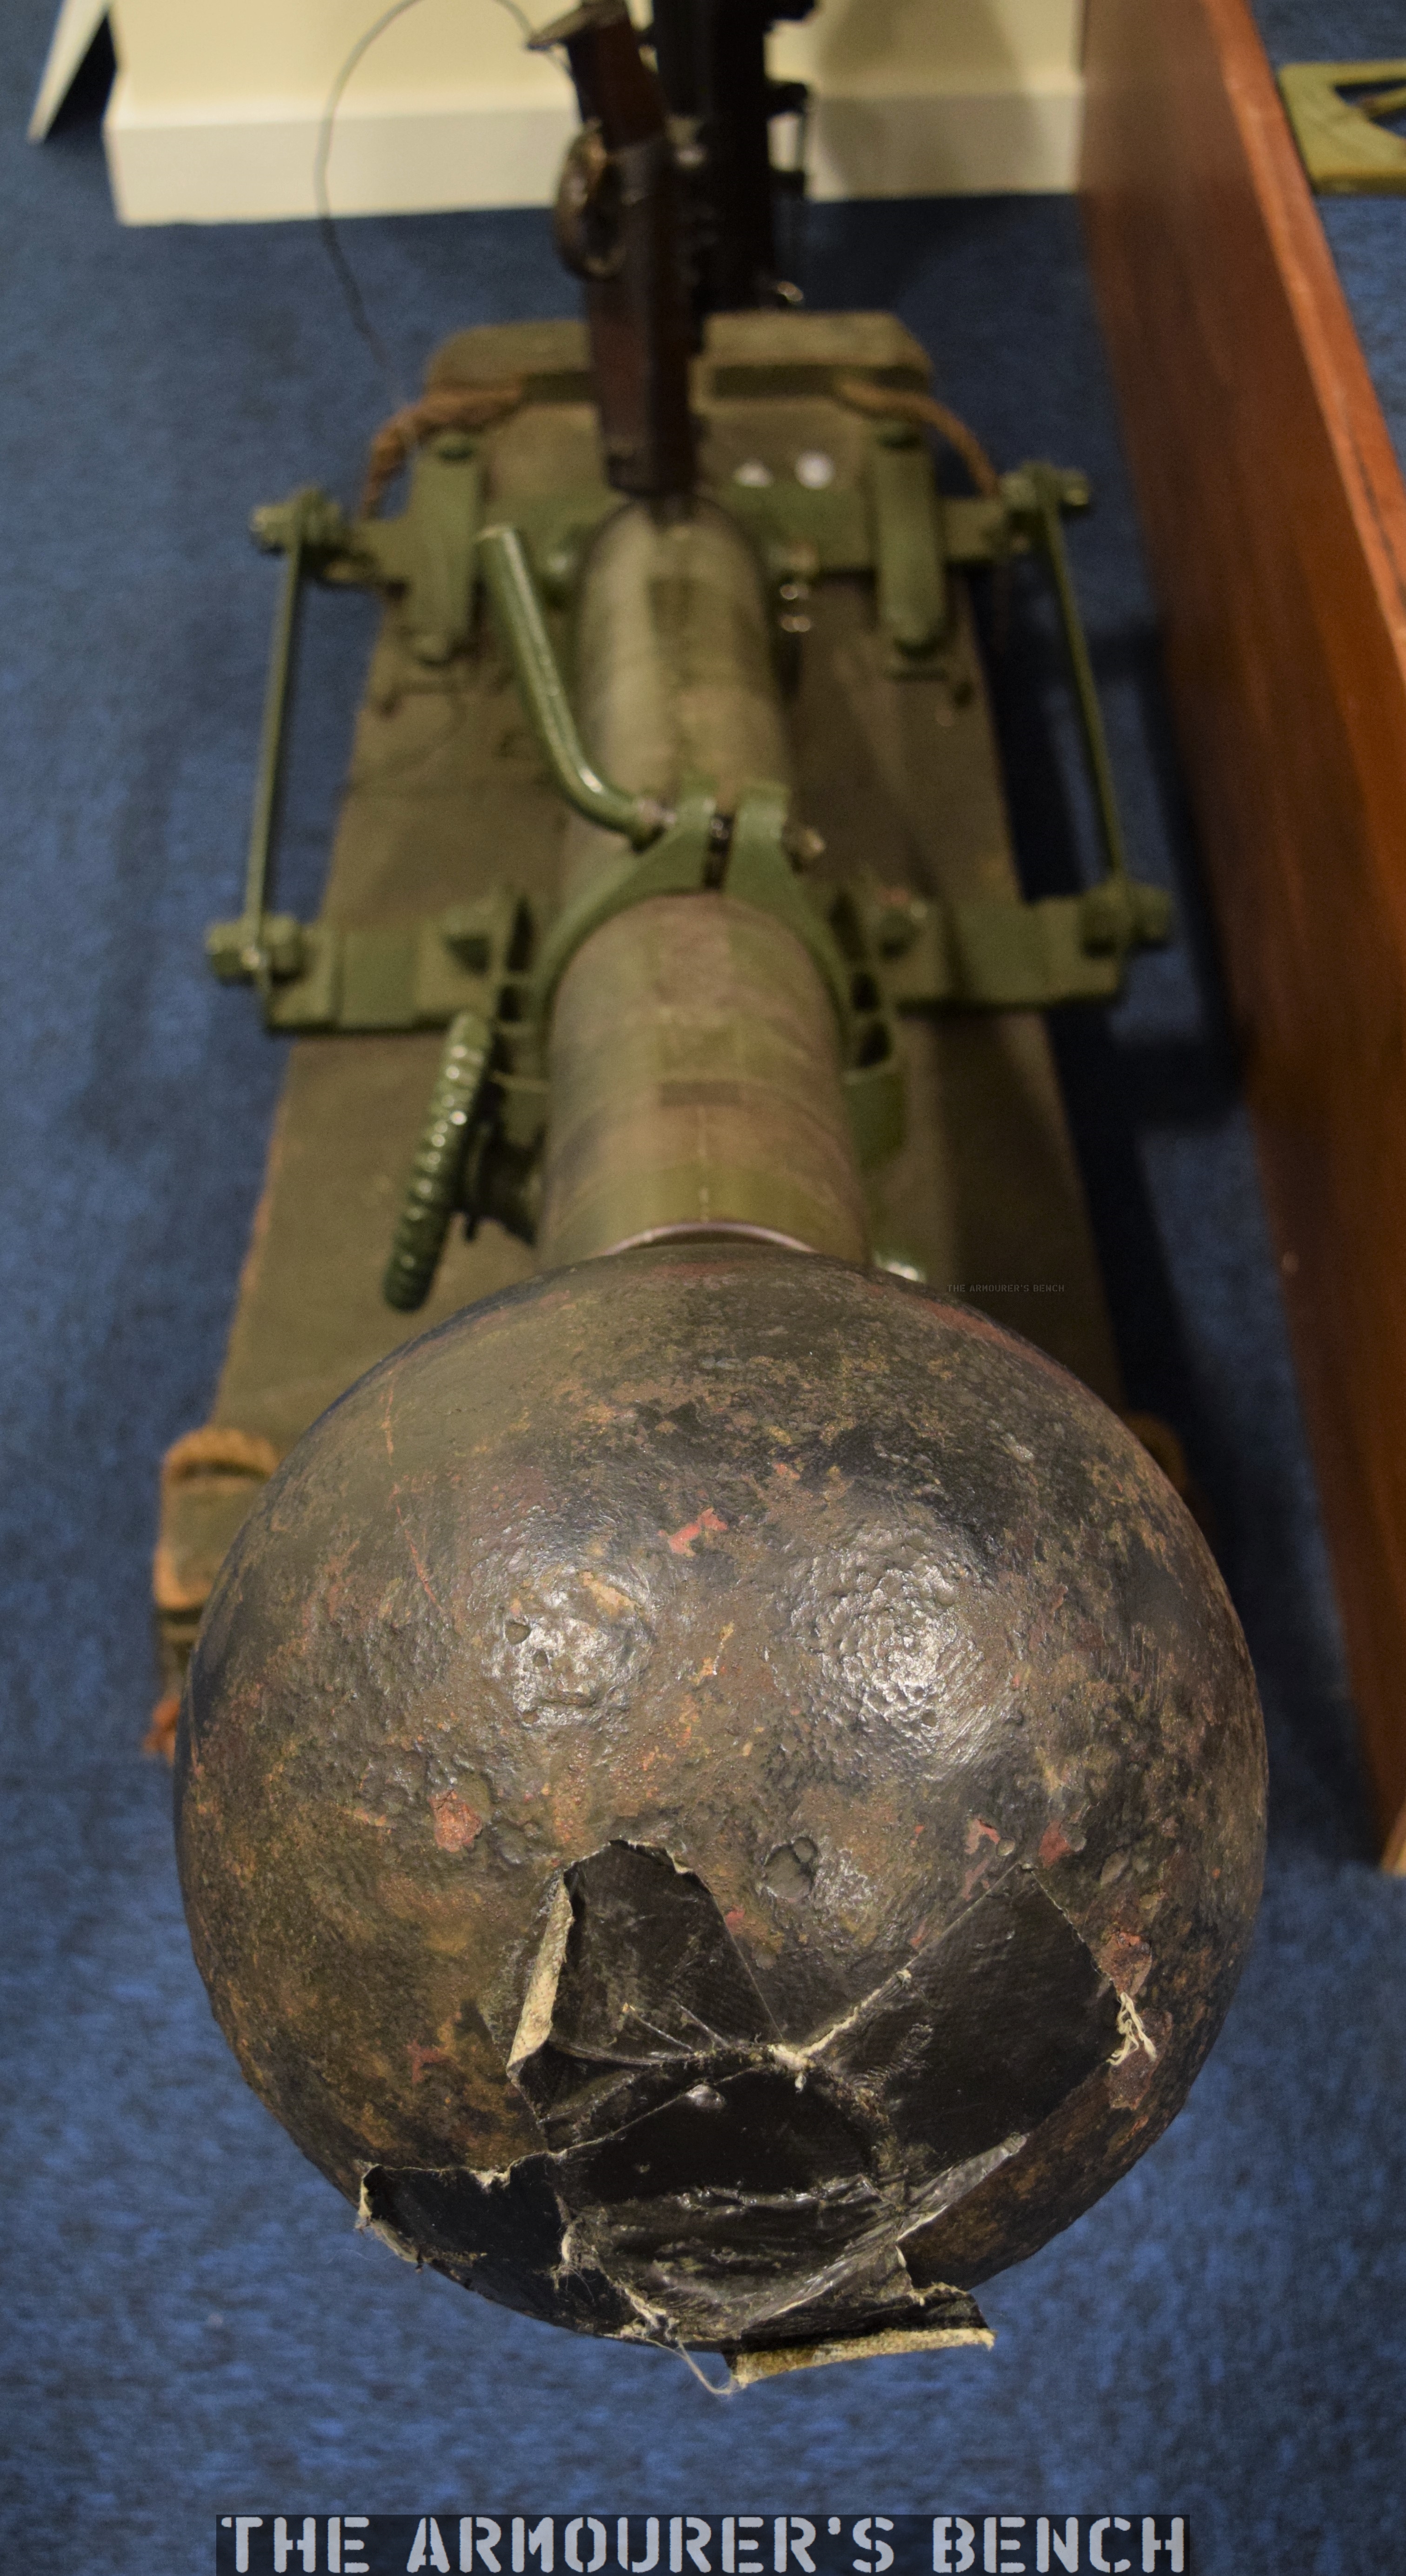
Crews could manage to fire approximately once every two minutes. Much slower than the lighter 3 inch Stokes Mortar and but faster than the heavy 9.45 inch Heavy Mortar. The mortar comprising of just its tube, bed, stand and ignition system weighed 320 lbs (145kg), not including the accompanying tools and the Temple silencer system which could be fitted (which weighed 47 lbs or 21 kg alone).
Typically manned by a 5 man mortar crew comprising of an NCO, gunners, and ammunition bearers. To operate the 2 inch mortar a cordite charge was first placed down the tube, the projectile’s shaft was then inserted on top of the charge, the projectile’s fuse was set and checked and a new blank cartridge chambered in the ignition system. The crew then got clear of the weapon and pulled the lanyard to fire the mortar. To reload the crew ran a clearing stick down the tube and then repeated the loading process.
The business end, a view down the length of the mortar (Matthew Moss)
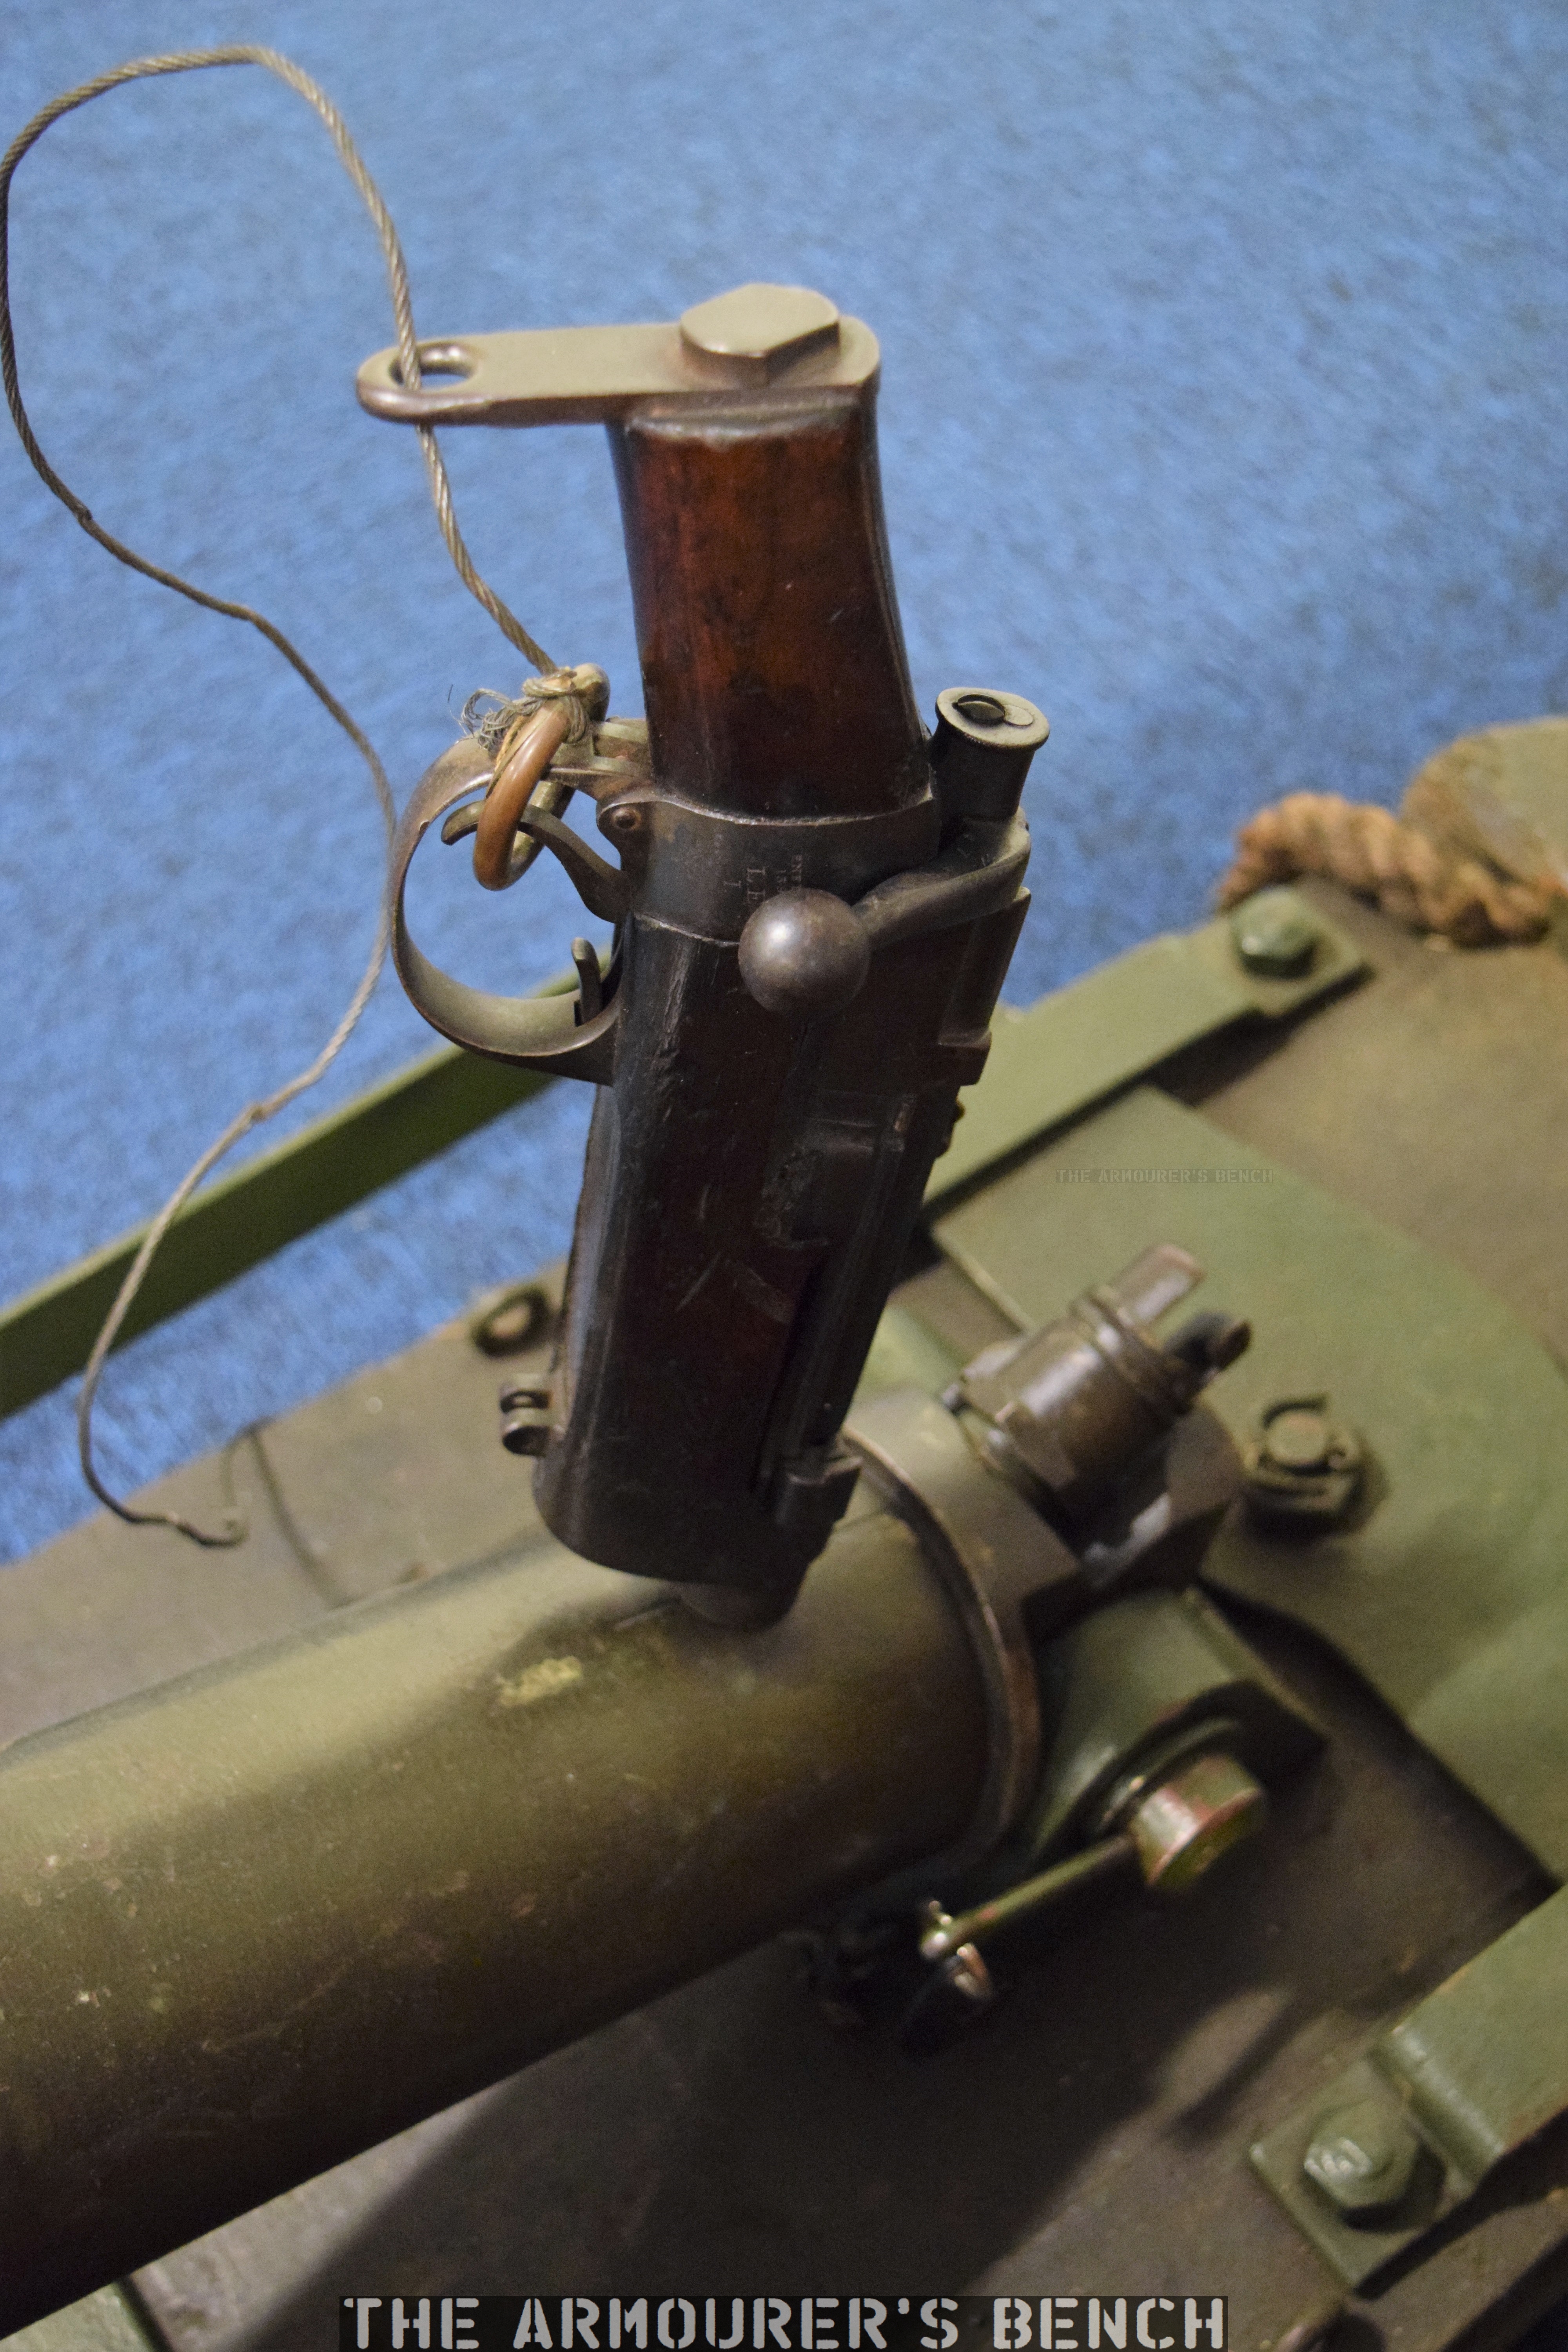
Interestingly, the 2 inch Medium Mortar, like the larger 9.45 inch Heavy Mortar used a cut-down rifle, which screwed into the ‘breech’ end of the mortar tube. This particular mortar has an 1894-dated cut down Lee-Enfield MkI as its ignition system, the cutdown rifle has a wooden insert in its magazine well but it still has its rear volley sight attached. This reusable system replaced the T-tube Friction ignitor, which was in high demand by Britain’s bigger guns. The Lee-Enfield-based system enabled the cordite propellant charges to be ignited by a blank .303 round instead. The rifle’s trigger was pulled with a lanyard from nearby cover. These cutdown ignitor rifle are sometimes confused for Obrez-style Lee-Enfields.
A close up look at the 2in Mortar’s SMLE ignitor (Matthew Moss)
The weight of the cordite charge used dictated the range while a variety of different fuses were used with the projectiles, these screwed into the nose of the bomb. The sphere was about 9.3 inches in diameter with a 2 inch thread for the fuse at its head and a cup for the 22 inch long, 2 inch thick solid cast iron stick or spigot at its base. The sphere was filled with high explosive (Amatol or Ammonal). The high explosive bombs were painted white with a green or pink stripe around their middle.
They were often deployed in batteries of four with three Royal Field Artillery medium mortar batteries attached to each division. The mortars were predominantly tasked with cutting enemy barbed wire and destroying enemy trenches and forward positions, such a machine gun nests.
Men of the Royal Army Ordnance Corps playing cards on a dump of trench mortar ammunition during Battle of the Somme (Imperial War Museum)
Captain Griffith described a battery of 2 inch mortars opening fire on enemy lines:
“A pop, and then a black ball went soaring up, spinning round as it went through the air slowly; more pops and more queer birds against the sky. A stutter of terrific detonations seems to shake the air and the ground, sandbags and bits of timber sailed up slowly and then fell in a calm deliberate way. In the silence that followed the explosions, an angry voice called out in English across No Man’s Land, ‘YOU BLOODY WELSH MURDERERS.’
The 2 inch medium mortar entered service in spring 1915 and remained in use into 1917 with British and Empire troops. It was used on the Western Front and in Mesopotamia. Over 800 were ordered initially with 675,000 bombs, many of the mortars were made in railway and agricultural machinery workshops, allowing larger factories to focus on more complex weapons. The 2 inch mortar was superseded by the larger bore Newton 6 inch mortar later in the war. Some of the remaining 2 inch projectiles were re-purposed as makeshift anti-tank mines, buried in no man’s land in anticipation of possible German tank attacks.
If you enjoyed the video and this article please consider supporting our work here.